CVE-2022-41099 - Analysis of a BitLocker Drive Encryption Bypass
In November 2022, an advisory was published by Microsoft about a BitLocker bypass. This vulnerability caught my attention because the fix required a manual operation by users and system administrators, even after installing all the security updates. Couple this with the fact that the procedure was not well documented initially, and you have the perfect recipe for disaster.
This is typically the kind of vulnerability you do not want to deal with when you are in charge of a large fleet of workstations and laptops. However, on the other side of things, hard to patch vulnerabilities such as this one usually offer the best opportunities for red teamers and the like. This is where my journey investigating this bug and learning more about TPM-based BitLocker Drive Encryption began.
The vulnerability
From the FAQ of the advisory, we learn that:
- An attacker with physical access could “gain access to encrypted data”, nothing surprising here.
- An additional step is required to fix the vulnerability. A security update must be applied to the Windows Recovery Environment (WinRE). This hints at the origin of the vulnerability.
- “The exploit is only possible with the
winre.wimon the recovery partition of the device”, interesting detail. - “To exploit the vulnerability the attacker needs to know the TPM PIN”, if one if configured. So it especially affects systems with a TPM in “transparent mode”, which is the default anyway…
- There is a link to a PowerShell script that automates the update process. This link was added in March 2023 according to the revision history.
Apart from the official advisory, all the public information I could find about this vulnerability at the time came from third-party websites (such as this one) trying their best to provide clear guidance on how to apply the update and Reddit forums (such as here or here) where system administrators were banging their head against the wall. In doubt and disbelief, some of them even suggested to burn the whole thing down by deleting the recovery partition altogether.
Anyways, let us see what Microsoft has in store for us with this patch… As a matter of fact, there are some interesting bits and pieces to get out of the script they released. For example, it uses the built-in reagentc.exe utility, which I did not even know existed, to mount the recovery partition to a local folder.
1
2
3
4
5
6
7
# Create mount directory, eg. C:\Temp\CA551926-299B-27A55276EC22_Mount
LogMessage("Create mount directory " + $mountDir)
New-Item -Path $mountDir -ItemType Directory
# ...
# Mount WinRE image
LogMessage("Mount WinRE:")
reagentc /mountre /path $mountdir
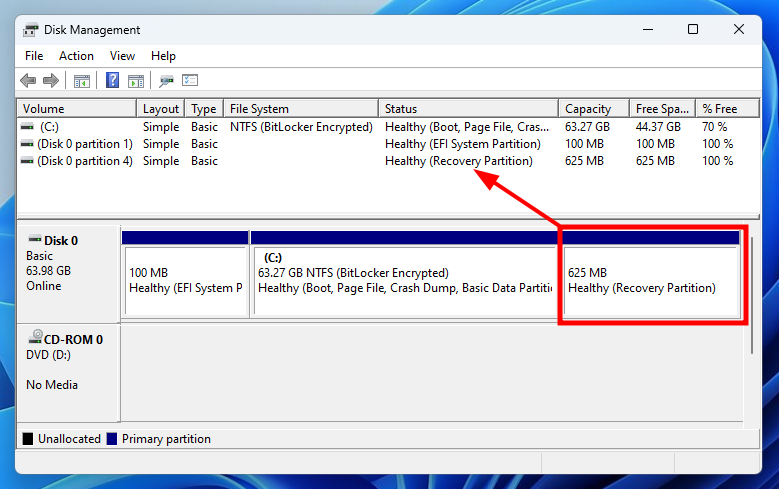 Disk Management - Recovery partition
This command allows easy access to the partition on a live system.
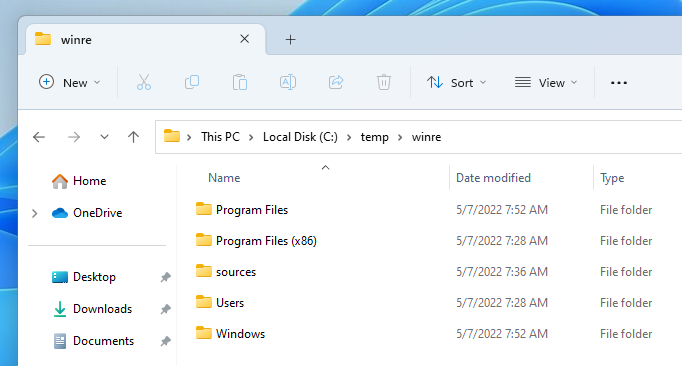 Recovery partition mounted in
 C:\Temp\winre
The script then applies the patch, unmounts the partition, disables WinRE and re-enables it so that the modified version can be trusted by BitLocker.
 https://infosec.exchange/@Rairii@haqueers.com/110312393211399814
If this trust is not established, BitLocker will simply discard the in-memory keys (i.e., relock the volume) before handing over the control to WinRE, and the user will have to enter the recovery password.
1
2
3
4
5
6
7
8
9
10
11
12
13
14
15
16
17
18
19
20
21
22
if (PatchPackage -mountDir $mountDir -packagePath $packagePath) {
    $hasUpdated = TargetfileVersionExam($mountDir)
    # ...
    # Unmount the recovery partition
    LogMessage("Patch succeed, unmount to commit change")
    Dism /unmount-image /mountDir:$mountDir /commit
    # ...
    if ($hasUpdated)
    {
        if (IsTPMBasedProtector)
        {
            # Disable WinRE and re-enable it to let new WinRE be trusted by BitLocker
            LogMessage("Disable WinRE")
            reagentc /disable
            LogMessage("Re-enable WinRE")
            reagentc /enable
            reagentc /info
        }
        # Leave a breadcrumb indicates the script has succeed
        SetRegistrykeyForSuccess
    }
}
From our perspective though, the most interesting part is the TargetfileVersionExam function. This is where the script determines whether the recovery environment needs to be updated. To do so, it simply checks the version of the file bootmenuux.dll.
1
2
3
4
5
6
7
8
9
function TargetfileVersionExam([string]$mountDir) {
    $targetBinary = $mountDir + "\Windows\System32\bootmenuux.dll"
    $realNTVersion = [Diagnostics.FileVersionInfo]::GetVersionInfo($targetBinary).ProductVersion
    $fileRevision = $($realNTVersion.Split('.')[3])

    switch ($fileVersion) {
        # Take a decision based on the file version
    }
}
For instance, on my Windows 11 VM, the file’s version is 22621 and its revision is 317.
1
2
3
4
5
6
7
8
9
10
11
PS C:\Windows\system32> $target = $mountDir + "\Windows\System32\bootmenuux.dll"
PS C:\Windows\system32> $realNTVersion = [Diagnostics.FileVersionInfo]::GetVersionInfo($target).ProductVersion
PS C:\Windows\system32> $realNTVersion
10.0.22621.317
PS C:\Windows\system32> $fileVersion = $($realNTVersion.Split('.')[2])
PS C:\Windows\system32> $fileVersion
22621
PS C:\Windows\system32> $fileRevision = $($realNTVersion.Split('.')[3])
PS C:\Windows\system32> $fileRevision
317
PS C:\Windows\system32> Dism.exe /unmount-image /mountDir:$mountDir /commit
The revision being lower than 815, this means that the patch has not been applied yet, although my system is fully up-to-date.
1
2
3
4
5
6
7
8
"22621" {
    LogMessage("Windows 11, version 22H2")
    if ($fileRevision -ge 815) {
        LogMessage("Windows 11, version 22H2 with revision " + $fileRevision + " >= 815, updates have been applied")
        $hasUpdated = $True
    }
    break
}
Patch diffing
The information provided in the script will facilitate the analysis of the patch a lot. In particular, we know that:
- The main file that needs to be updated is
bootmenuux.dll. - A patched version would be
10.0.22621.815for Windows 11 22H2 for example. - Any previous revision of the file is vulnerable.
Analyzing the patch with Ghidra and BinDiff was straightforward. A function named CommonUtilsRelockVolumes was added and the method CSkipPage::ShouldSkip was modified.
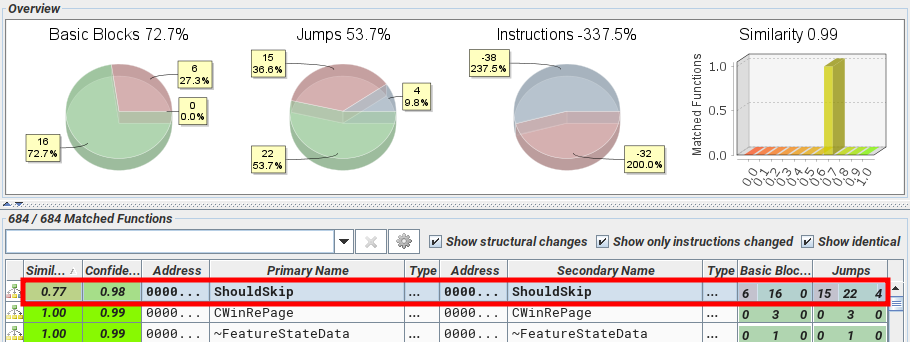 BinDiff - Matched functions
 BinDiff - Unmatched function
The decompiled code below shows the main difference between the vulnerable and patched versions of bootmenuux.dll.
1
2
3
4
5
6
7
8
9
10
11
12
13
14
15
DWORD dwReOp, dwReOpSize;
// ...
UtilWinReGetRecoveryEnvironmentValue(L"SelectedRecoveryOperation",sizeof(dwReOp),&dwReOp,&dwReOpSize);
// ...

// In version 10.0.22621.317
if ((1 < dwReOp + 0xfffffff8) && (1 < dwReOp + 0xffffffef)) {
  // Relock all volumes
}

// In version 10.0.22621.815
if (dwReOp != 9) {
  uVar4 = CommonUtilsRelockVolumes();
  // ...
}
In version 10.0.22621.317, the volumes were not automatically relocked for a certain number of recovery operations. In version 10.0.22621.815 however, the volumes are always relocked, unless the recovery operation is the one with ID 9.
It should be noted that, in the context of BitLocker Drive Encryption (BDE), the terms “lock” and “unlock” designate the fact of preventing and restoring access to encrypted data on a given volume respectively (see Lock-BitLocker and Unlock-BitLocker for reference). They should not be confused with “encrypting” / “decrypting” the data itself.
As for the recovery operation identifiers, a bit more work was necessary. I chose to represent this value as a DWORD in the code above, but thanks to the publicly available symbols, we know that it is an enumeration and that its name is _WINRE_OPERATION_TYPE. After a bit of reverse engineering on the different modules used by WinRE, I could identify the following operations. Typically, it looks like the ID 9 corresponds to a startup repair.
| ID | Operation | Source |
|---|---|---|
1 (0x01) | ? (bmrui.exe) | RecEnv!LaunchRecoveryAction |
2 (0x02) | ? (rstui.exe) | RecEnv!LaunchRecoveryAction |
4 (0x04) | OfflineScanning? | ReAgent!WinReInitiateOfflineScanning |
5 (0x05) | OobeInstall? | ReAgent!WinReOobeInstall |
7 (0x07) | BasicReset | BootMenuUx!UtilWinReGetRecoveryTools |
8 (0x08) | FactoryReset | BootMenuUx!UtilWinReGetRecoveryTools |
9 (0x09) | ? (StartRep.exe) | RecEnv!LaunchRecoveryAction |
10 (0x0a) | ? | RecEnv!LaunchRecoveryAction |
13 (0x0d) | ? (SetupPrep.exe) | RecEnv!LaunchRecoveryAction |
14 (0x0e) | FlightRemoval | BootMenuUx!UtilWinReGetRecoveryTools |
18 (0x12) | BMRReset | BootMenuUx!UtilWinReGetRecoveryTools |
19 (0x13) | UninstallQuality | BootMenuUx!UtilWinReGetRecoveryTools |
20 (0x14) | CloudBMR | RecEnv!Run |
So, the vulnerability has something to do with the system drive not being relocked when entering the recovery mode prior to performing a basic reset or a factory reset for instance. At this point, I tried different manipulations to reproduce the issue, but I was still unsure of what to look for exactly.
Then, a few weeks passed, and a researcher who goes by the pseudonym @Rairii published his findings about this vulnerability on Mastodon.
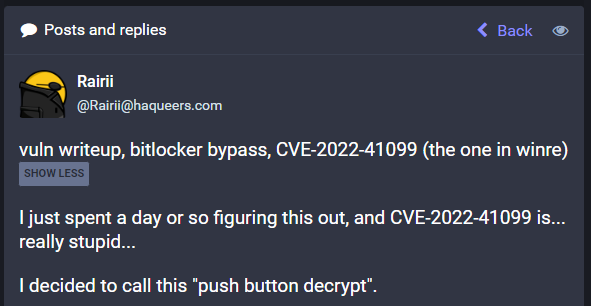 CVE-2022-41099 writeup by @Rairii
According to his writeup, this vulnerability could be exploited as follows.
- Create a raw copy of the BitLocker encrypted drive.
- Boot into recovery mode, for example by holding the Shift key and clicking “Restart” on the login screen.
- Click “Reset this PC”, choose “Remove everything”, “Local reinstall”, “Just remove my files”.
- The machine reboots. We can see the Windows boot logo with the message “Resetting this PC 0%”. Power off the machine when the process reaches ~98%. This is approximately when BitLocker starts decrypting the disk.
- Power on the machine, Windows automatically starts in recovery mode and shows an error.
- After acknowledging the error message, Windows reboots and shows an install progress screen. Press Shift+F10 to open a command prompt.
- The volume is unlocked and the decryption is resumed, you can issue the command
manage-bde -pause C:to stop it. The machine might reboot automatically before you have time to do anything else, this is not a problem - Windows starts the install process. On the first page, you can press Shift+F10 again to open a new command prompt and get the recovery password, or even extract the keys from memory.
- Decrypt the initial copy of the disk using the recovery password or the master key.
The screenshot below corresponds to the step 7. The result of the command manage-bde -status shows that the decryption is in progress. Although it cannot be seen here, the command manage-bde -pause C: is issued right after.
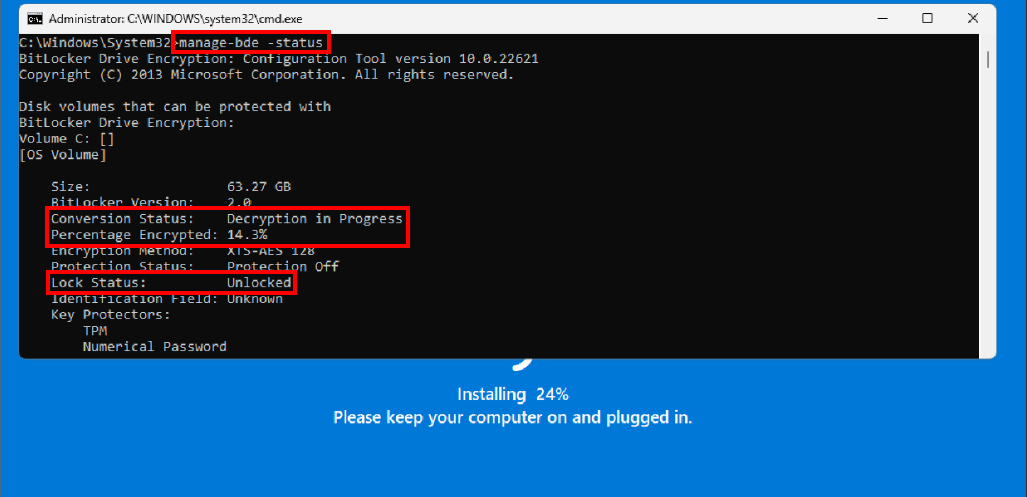 Windows decrypting the disk and installing
In a normal recovery process, the system drive would have been completely decrypted, and all the protectors would have been removed from BitLocker’s metadata. Powering off the machine during this step allowed us to interrupt this process. After powering on the machine again, the install process is resumed, giving us the opportunity to open a command prompt and pause the decryption.
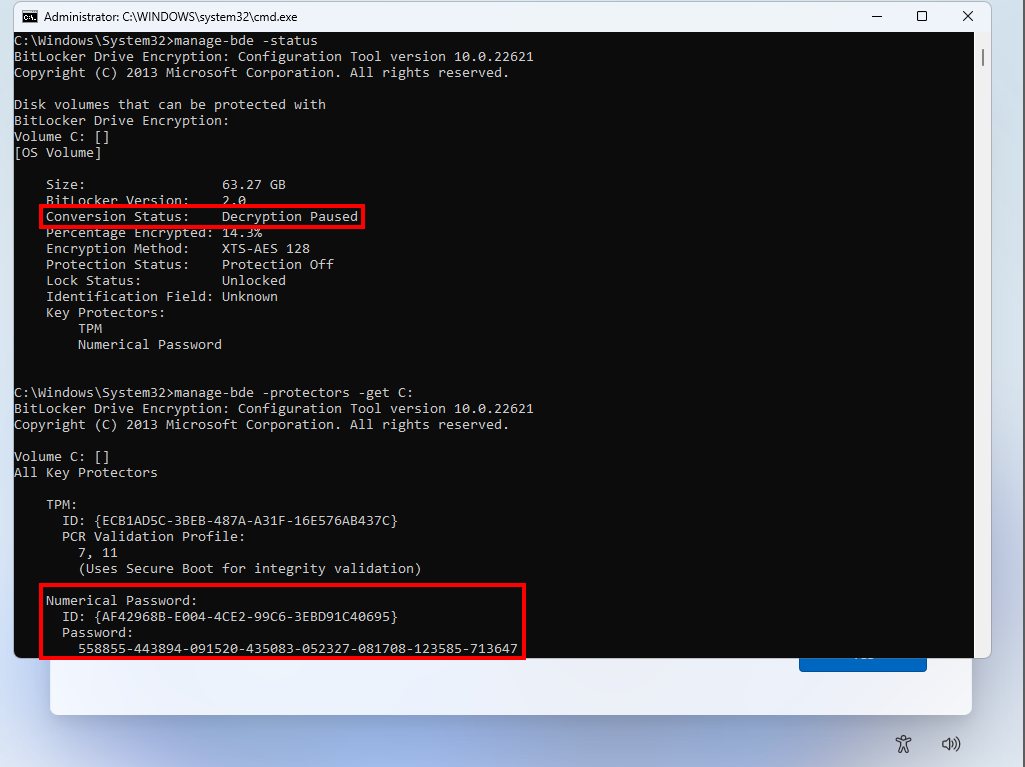 BitLocker decryption paused and extraction of the recovery key
With the system drive unlocked and the decryption paused, we have plenty of time to do whatever we want. Here, I chose to simply list the protectors and thus obtain the recovery password. But, we could also have dumped the kernel memory and extracted the Volume Master Key (VMK) or Full Volume Encryption Key (FVEK).
Applying the patch
Now, it would be interesting to see what difference the patch makes on an updated WinRE. So, let us apply it thanks to the script provided by Microsoft. Before we can do that, though, we need to take note of the Windows version. In my case, it is Windows 11 version 22H2.
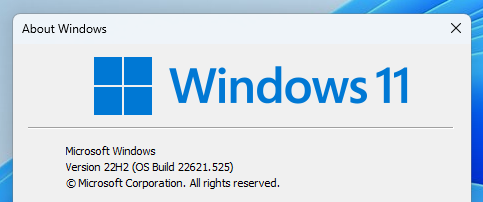 Windows version
Then, we have to download the latest Safe OS Dynamic Update from the Microsoft Update Catalog. The search can be narrowed down using the following keywords: “Safe OS Dynamic Update 11 22H2 x64”.
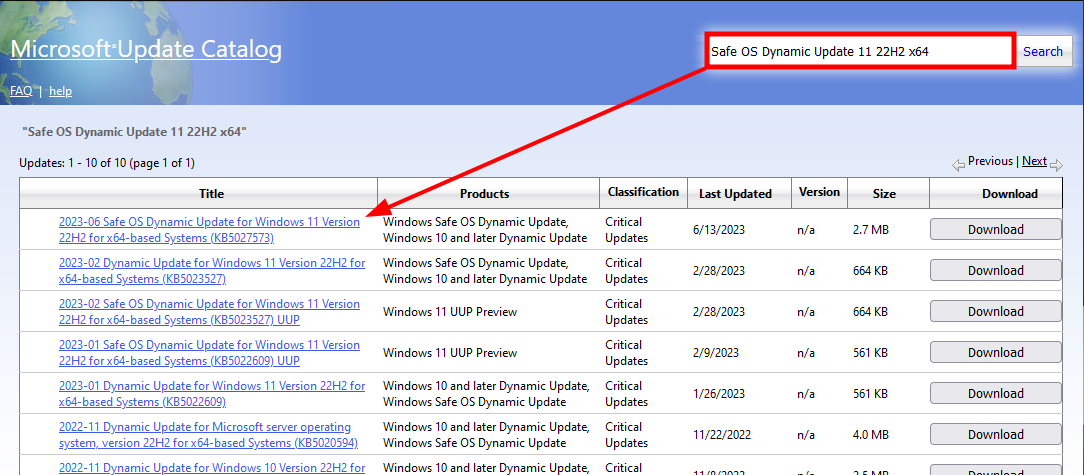 Microsoft Update Catalog
After downloading the appropriate .cab file, we may run the script using the following command line.
1
2
3
4
5
6
7
8
9
10
11
12
13
14
15
16
17
18
19
c:\Users\Admin\Downloads>powershell -ep bypass -file PatchWinREScript_2004plus.ps1 -packagePath windows11.0-kb5027573-x64_5501f9473cdf67bd6c63858c986a2636d2d3d4a9.cab
...
07/13/2023 13:18:24 - Mount WinRE:
REAGENTC.EXE: Operation Successful.

07/13/2023 13:18:43 - TargetFile: C:\Users\Admin\AppData\Local\Temp\CA551926-299B-27A55276EC22_Mount\Windows\System32\bootmenuux.dll
07/13/2023 13:18:43 - Target file version: 10.0.22621.317
07/13/2023 13:18:43 - Windows 11, version 22H2
07/13/2023 13:18:43 - Apply package:windows11.0-kb5027573-x64_5501f9473cdf67bd6c63858c986a2636d2d3d4a9.cab
07/13/2023 13:18:56 - Successfully applied the package
07/13/2023 13:18:56 - Cleanup image
07/13/2023 13:19:00 - Cleanup image succeed
07/13/2023 13:19:00 - TargetFile: C:\Users\Admin\AppData\Local\Temp\CA551926-299B-27A55276EC22_Mount\Windows\System32\bootmenuux.dll
07/13/2023 13:19:00 - Target file version: 10.0.22621.815
07/13/2023 13:19:00 - Windows 11, version 22H2
07/13/2023 13:19:00 - Windows 11, version 22H2 with revision 815 >= 815, updates have been applied
07/13/2023 13:19:00 - After patch, find expected version for target file
07/13/2023 13:19:00 - Patch succeed, unmount to commit change
...
At first sight, all is looking good. The patch was successfully applied. However, I noticed something weird…
1
2
3
4
5
6
7
8
9
10
11
12
13
14
15
16
17
18
19
20
21
22
23
24
25
26
...
07/13/2023 13:19:51 - Checking BitLocker status
07/13/2023 13:19:52 - Protected
07/13/2023 13:19:52 - Trusted Platform Module (TPM)
07/13/2023 13:19:52 - Has TPM-based protector
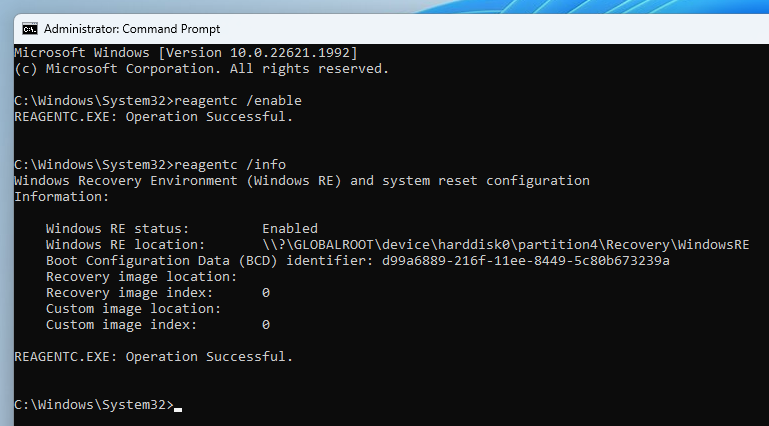
07/13/2023 13:19:52 - Disable WinRE
REAGENTC.EXE: Operation Successful.
07/13/2023 13:19:54 - Re-enable WinRE
REAGENTC.EXE: Windows RE cannot be enabled on a volume with BitLocker Drive Encryption enabled.
Windows Recovery Environment (Windows RE) and system reset configuration
Information:
Windows RE status: Disabled
Windows RE location:
Boot Configuration Data (BCD) identifier: 00000000-0000-0000-0000-000000000000
Recovery image location:
Recovery image index: 0
Custom image location:
Custom image index: 0
REAGENTC.EXE: Operation Successful.
The operation completed successfully.
07/13/2023 13:19:55 - Delete mount direcotry
After committing the changes to WinRE, the script must restore the trust with BitLocker, by disabling and re-enabling it, as explained earlier. The problem is that the second step fails, and trying to run the command manually in a separate prompt yields the same result.
 REAGENTC.EXE error message
What the heck?! WinRE cannot be enabled because the main volume is protected by BitLocker?! This message does not make any sense to me. It turns out this error is due to the recovery partition not being large enough as I found out on this forum. Decrypting the disk, shrinking the main volume, and re-creating the recovery partition with more space solved the problem.
 Manually re-enabling WinRE
Note: this is not necessarily an issue you will encounter when applying the patch, but I thought it was interesting to mention it as part of this post, rather than sweeping it under the carpet, since it may happen.
WinRE should now be completely operational. It is time to try and reproduce the exploit. After entering the Recovery Environment, we choose the option “Reset this PC” and click “Remove everything” and, this time, we are greeted with the following prompt.
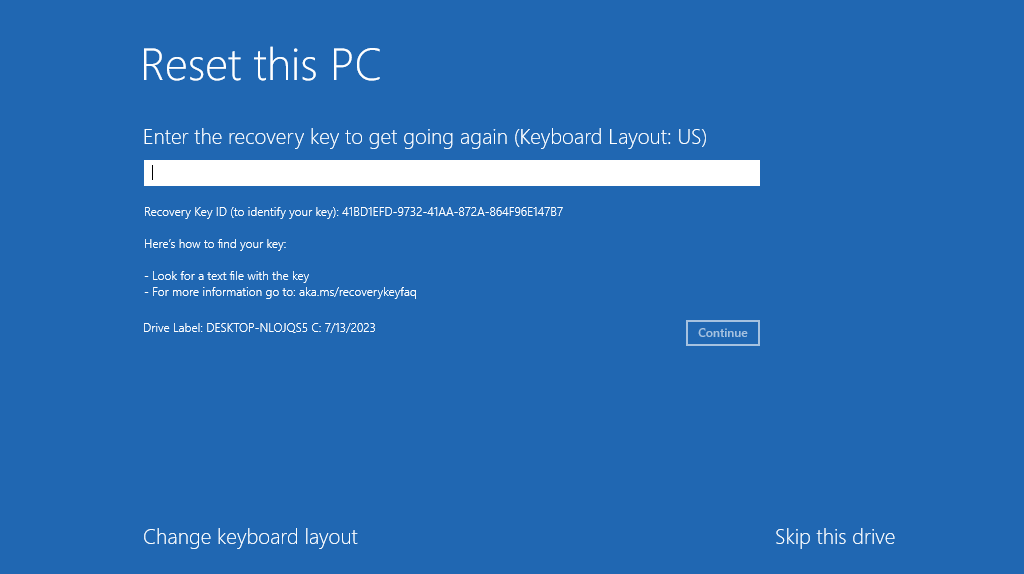 WinRE prompting the user to enter the recovery key
The recovery key must be entered to proceed with the operation.
Recommendations for pentesters and sysadmins
First of all, it has been long known that TPM-based BitLocker on its own is not sufficient to effectively protect against an attacker with physical access to the device. Most notably, a couple years ago, two of my teammates were able to reproduce the famous “TPM sniffing” attack, initially demonstrated by Denis Andzakovic in the article Extracting BitLocker keys from a TPM, using cheap equipment. As a reminder, this attack consists in analyzing the electric signal on a chip connected to the same bus as the TPM to extract the master key when it is unsealed by the TPM at boot time. Since then, my colleague @julien has even largely perfected the technique, but this will certainly be the subject for another upcoming post…
That being said, companies are usually quite reluctant to enforce a second factor of authentication such as a startup key, or even a simple 6-digit PIN, because of the overhead it might cause for IT staff. In this regard, transparent TPM-based BitLocker encryption offers an appealing security / usability trade-off.
The downside is that a vulnerability such as this one will cripple the security posture of a company regarding their portable devices. So, if you are a security consultant tasked with the assessment of a Windows workstation or a system administrator in charge of a fleet of Windows laptops, here are a few tips to help you identify vulnerable machines.
First, open the BitLocker control panel, and check whether it is enabled in “transparent mode”. If so, you should see something similar to the screenshot below. Otherwise, there would be other actions available such as “Change the PIN”. Of course, this step is mostly relevant for consultants. I would imagine that administrators know how their systems are configured.
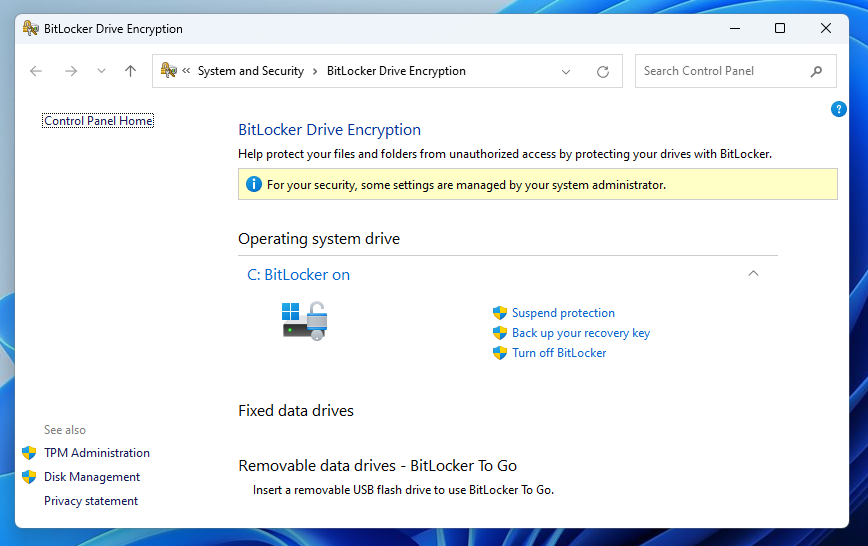 Control panel - BitLocker status
Note that if a second or third factor of authentication is required, this does not mean that WinRE is not vulnerable. It just means that it cannot be exploited without knowing the PIN and / or possessing the startup key.
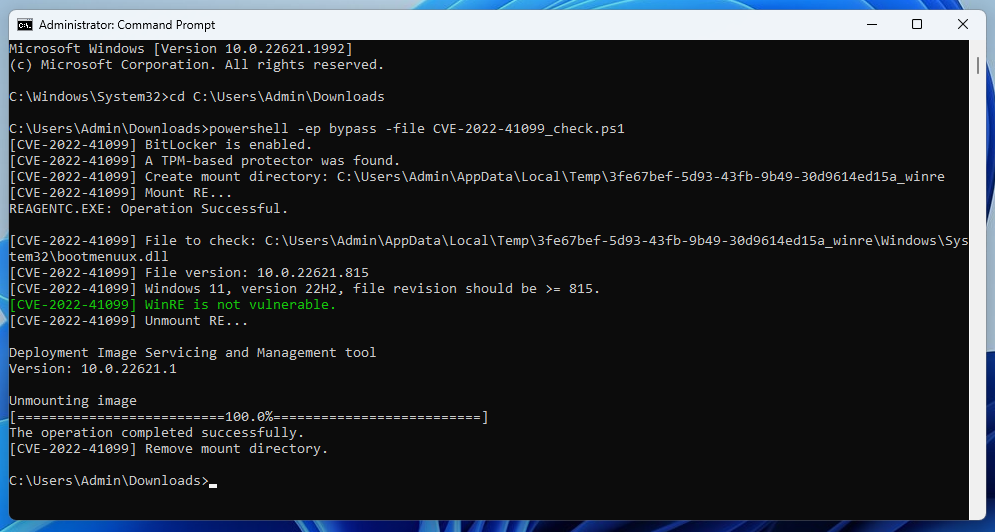
Then, open a command prompt as an administrator, and execute the following PowerShell script. This is a simplified version of the one published by Microsoft that only checks whether WinRE is vulnerable.
1
2
3
4
5
6
7
8
9
10
11
12
13
14
15
16
17
18
19
20
21
22
23
24
25
26
27
28
29
30
31
32
33
34
35
36
37
38
39
40
41
42
43
44
45
46
47
48
49
50
51
$BitLocker = Get-WmiObject -Namespace "Root\cimv2\Security\MicrosoftVolumeEncryption" -Class "Win32_EncryptableVolume" -Filter "DriveLetter = '$($env:SystemDrive)'"
if ($BitLocker) {
    if ($BitLocker.GetProtectionStatus().protectionStatus -eq 1) {
        Write-Host "[CVE-2022-41099] BitLocker is enabled."
        $TpmProtectors = $BitLocker.GetKeyProtectors("0").volumekeyprotectorID | Where-Object {
            $KeyProtectorType = $BitLocker.GetKeyProtectorType($_).KeyProtectorType
            ($KeyProtectorType -eq 1) -or ($KeyProtectorType -ge 4 -and $KeyProtectorType -le 6)
        }
        if ($TpmProtectors) {
            Write-Host "[CVE-2022-41099] A TPM-based protector was found."
            $MountDir = Join-Path -Path ([System.IO.Path]::GetTempPath()) -ChildPath "$([Guid]::NewGuid().Guid)_winre"
            Write-Host "[CVE-2022-41099] Create mount directory: $MountDir"
            $null = New-Item -Path $MountDir -ItemType Directory
            Write-Host "[CVE-2022-41099] Mount RE..."
            reagentc.exe /mountre /path $MountDir
            if ($LASTEXITCODE -eq 0) {
                $TargetFile = Join-Path -Path $MountDir -ChildPath "\Windows\System32\bootmenuux.dll"
                Write-Host "[CVE-2022-41099] File to check: $TargetFile"
                $RealNtVersion = [Diagnostics.FileVersionInfo]::GetVersionInfo($TargetFile).ProductVersion
                Write-Host "[CVE-2022-41099] File version: $RealNtVersion"
                $VersionString = "$($RealNtVersion.Split('.')[0]).$($RealNtVersion.Split('.')[1])"
                $FileVersion = $($RealNtVersion.Split('.')[2])
                $FileRevision = $($RealNtVersion.Split('.')[3])
                if ($VersionString -eq "10.0") {
                    $ExpectedRevision = 0
                    switch ($FileVersion) {
                        "10240" { Write-Host "[CVE-2022-41099] Windows 10, version 1507, file revision should be >= 19567."; $ExpectedRevision = 19567 }
                        "14393" { Write-Host "[CVE-2022-41099] Windows 10, version 1607, file revision should be >= 5499."; $ExpectedRevision = 5499 }
                        "17763" { Write-Host "[CVE-2022-41099] Windows 10, version 1809, file revision should be >= 3646."; $ExpectedRevision = 3646 }
                        "19041" { Write-Host "[CVE-2022-41099] Windows 10, version 2004, file revision should be >= 2247."; $ExpectedRevision = 2247 }
                        "22000" { Write-Host "[CVE-2022-41099] Windows 11, version 21H2, file revision should be >= 1215."; $ExpectedRevision = 1215 }
                        "22621" { Write-Host "[CVE-2022-41099] Windows 11, version 22H2, file revision should be >= 815."; $ExpectedRevision = 815 }
                        default { Write-Host "[CVE-2022-41099] Unsupported OS."}
                    }
                    if ($ExpectedRevision -ne 0) {
                        if ($FileRevision -lt $ExpectedRevision) { Write-Host "[CVE-2022-41099] WinRE is vulnerable." -ForegroundColor Red }
                        else { Write-Host "[CVE-2022-41099] WinRE is not vulnerable." -ForegroundColor Green }
                    }
                }
                else { Write-Host "[CVE-2022-41099] Unsupported version: $VersionString" }
                Write-Host "[CVE-2022-41099] Unmount RE..."
                dism.exe /unmount-image /mountDir:$MountDir /discard
            }
            else { Write-Host "[CVE-2022-41099] Failed to mount WinRE." }
            Write-Host "[CVE-2022-41099] Remove mount directory."
            Remove-Item -Path $MountDir
        }
        else { Write-Host "[CVE-2022-41099] No TPM-based protector was found." }
    }
    else { Write-Host "[CVE-2022-41099] BitLocker is not enabled." }
}
Note: unlike the original script, this one uses the option /discard when unmounting the recovery partition with dism.exe. This way, nothing is written to the partition and there is no need to disable / re-enable WinRE to restore the trust with BitLocker.
The screenshot below shows the result of the script on a vulnerable system.
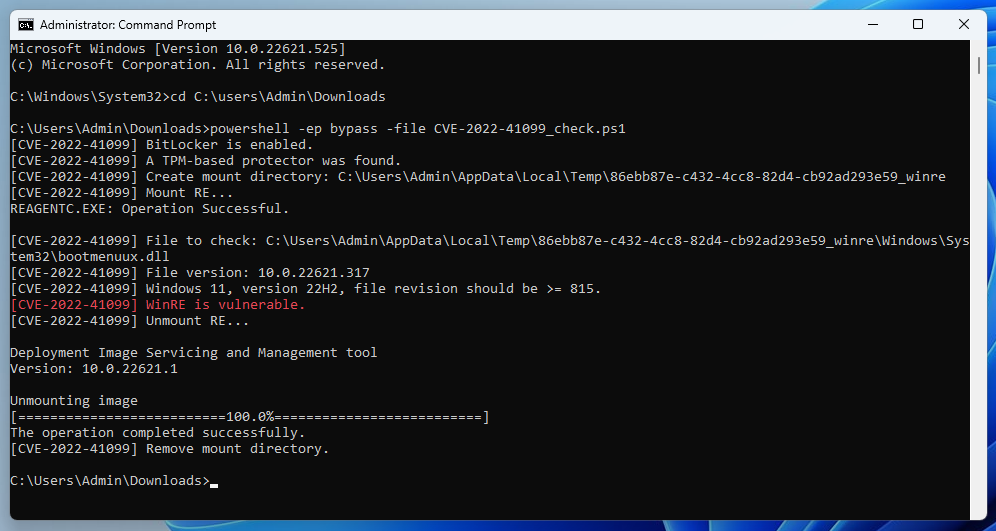 CVE-2022-41099 check on a vulnerable system
After applying the patch, the script should yield something like this.
 CVE-2022-41099 check on a patched system
Unfortunately, at least from a security consultant’s perspective, mounting WinRE, or even querying the status of BitLocker through WMI, requires local administrative privileges. There might be cases where such privileges might not be provided to you, for whatever reason. In this case, you can still check whether the system is vulnerable simply by attempting to reproduce the first steps of the exploit.
To do so, you would first have to boot the machine into recovery mode. The easiest way to do that is to hold the Shift key and click Restart from the login screen (or an active Windows session). The machine will reboot and you should see the message “Please wait” under the Windows logo.
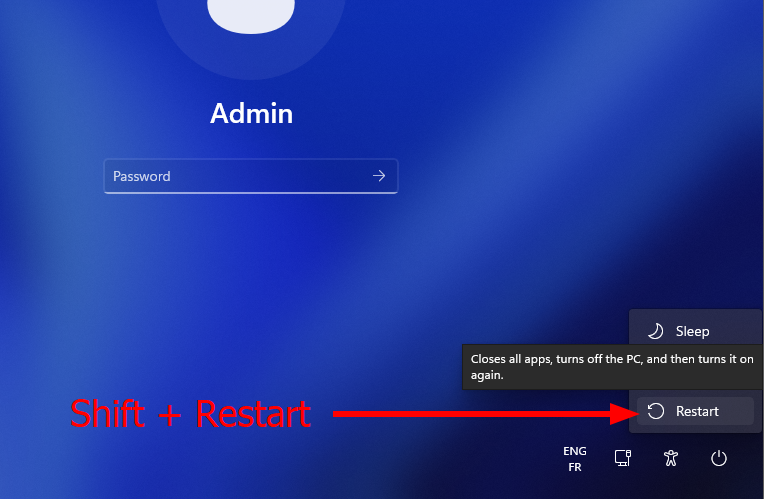 Reboot into Recovery Mode from the login screen
Once in the Recovery Environment, click “Troubleshoot”, “Reset this PC”, and “Remove everything”. If the next screen you see is the one below, then the machine is vulnerable. Otherwise, you should see a prompt asking you to enter the recovery password, as we saw in the previous part.
Note: no worries here, selecting the option “Remove everything” will not immediately reset the machine. There are several confirmation prompts after that before actually reaching this point.
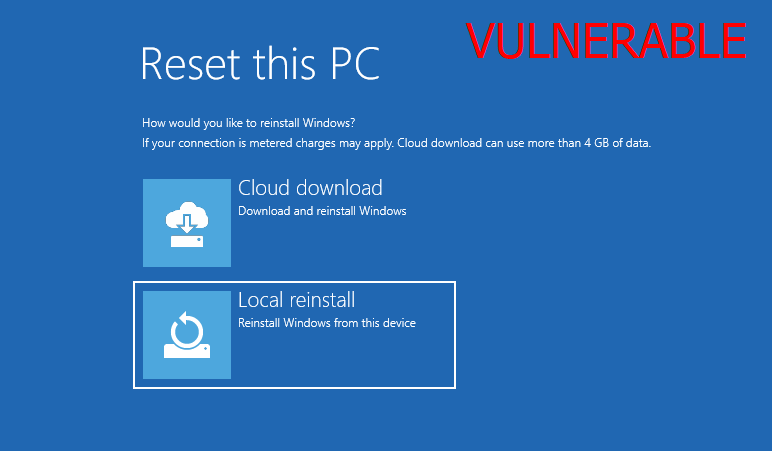 Vulnerable WinRE
Conclusion
Analyzing this vulnerability was an excellent opportunity for me to tackle another area of Windows security. This also motivated me to further explore and understand how BitLocker works hand in hand with the TPM to (theoretically) guarantee the integrity and confidentiality of the data. As a result, I made some interesting findings and observations that I will share in a future article.
This article was originally posted on SCRT’s blog here.