Fuzzing Windows RPC with RpcView
The recent release of PetitPotam by @topotam77 motivated me to get back to Windows RPC fuzzing. On this occasion, I thought it would be cool to write a blog post explaining how one can get into this security research area.
RPC as a Fuzzing Target?
As you know, RPC stands for “Remote Procedure Call”, and it isn’t a Windows specific concept. The first implementations of RPC were made on UNIX systems in the eighties. This allowed machines to communicate with each other on a network, and it was even “used as the basis for Network File System (NFS)” (source: Wikipedia).
The RPC implementation developed by Microsoft and used on Windows is DCE/RPC, which is short for “Distributed Computing Environment / Remote Procedure Calls” (source: Wikipedia). DCE/RPC is only one of the many IPC (Interprocess Communications) mechanisms used in Windows. For example, it’s used to allow a local process or even a remote client on the network to interact with another process or a service on a local or remote machine.
As you will have understood, the security implications of such a protocol are particularly interesting. Vulnerabilities in a an RPC server may have various consequences, ranging from Denial of Service (DoS) to Remote Code Execution (RCE) and including Local Privilege Escalation (LPE). Coupled with the fact that the code of the legacy RPC servers on Windows is often quite old (if we exclude the more recent (D)COM model), this makes it a very interesting target for fuzzing.
How to Fuzz Windows RPC?
To be clear, this post is not about advanced and automated fuzzing. Others, far more talented than me, already discussed this topic. Rather, I want to show how a beginner can get into this kind of research without any knowledge in this field.
Pentesters use Windows RPC every time they work in Windows / Active Directory environments with impacket-based tools, perhaps without always being fully aware of it. The use of Windows RPC was probably made a bit more obvious with tools such as SpoolSample (a.k.a the “Printer Bug”) by @tifkin_ or, more recently, PetitPotam by @topotam77.
If you want to know how these tools work, or if you want to find bugs in Windows RPC by yourself, I think there are two main approaches. The first approach consists in looking for interesting keywords in the documentation and then experimenting by modyfing the impacket library or by writing an RPC client in C. As explained by @topotam77 in the episode 0x09 of the French Hack’n Speak podcast, this approach was particularly efficient in the conception of PetitPotam. However, it has some limitations. The main one is that not all RPC interfaces are documented, and even the existing documentation isn’t always complete. Therefore, the second approach consists in enumerating the RPC servers directly on a Windows machine, with a tool such as RpcView.
RpcView
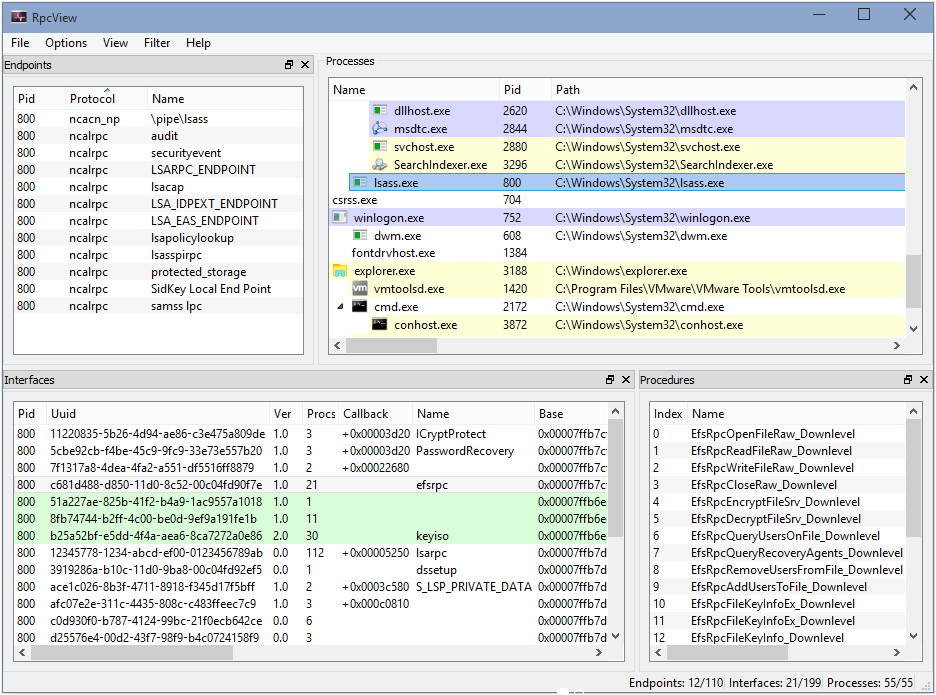
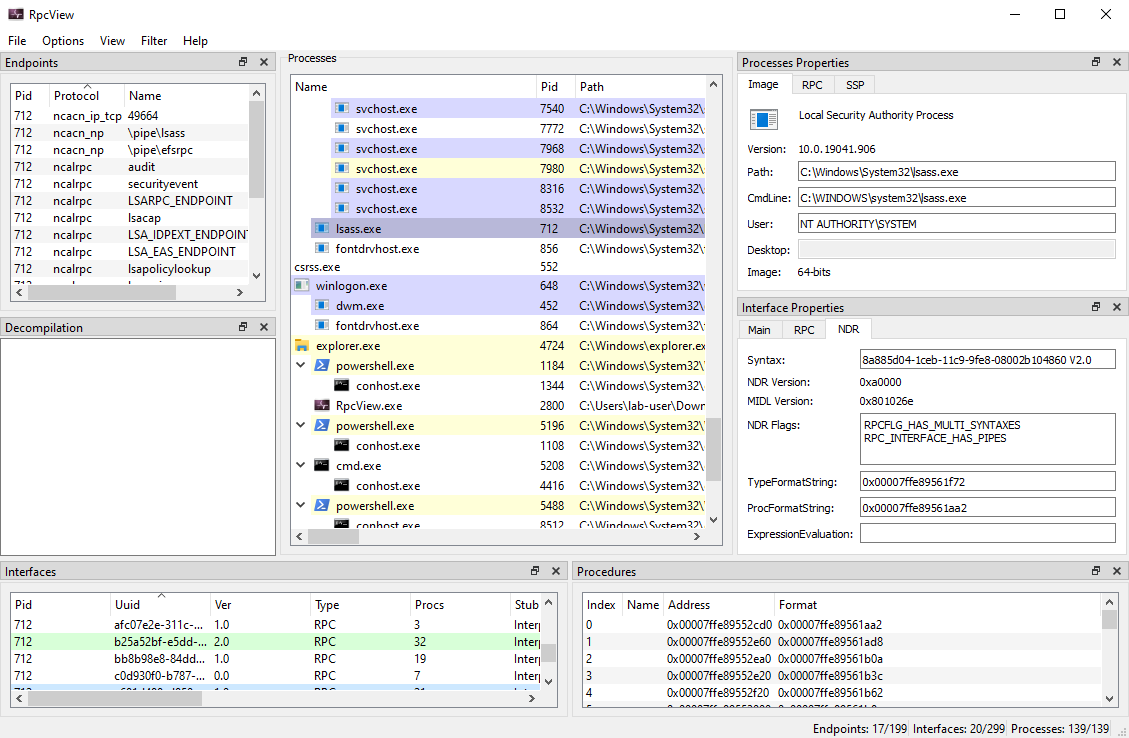
If you are new to Windows RPC analysis, RpcView is probably the best tool to get started. It is able to enumerate all the RPC servers that are running on a machine and it provides all the collected information in a very neat GUI (Graphical User Interface). When you are not yet familiar with a technical and/or abstract concept, being able to visualize things this way is an undeniable benefit.
Note: this screenshot was taken from https://rpcview.org/.
This tool was originally developed by 4 French researchers - Jean-Marie Borello, Julien Boutet, Jeremy Bouetard and Yoanne Girardin (see authors) - in 2017 and is still actively maintained. Its use was highlighted at PacSec 2017 in the presentation A view into ALPC-RPC by Clément Rouault and Thomas Imbert. This presentation also came along with the tool RPCForge.
Downloading and Running RpcView for the First Time
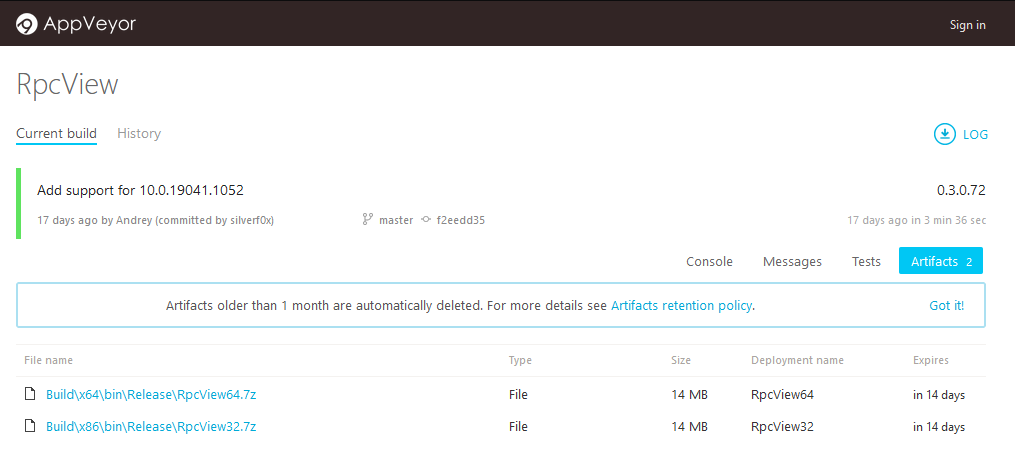
RpcView’s official repository is located here: https://github.com/silverf0x/RpcView. For each commit, a new release is automatically built through AppVeyor. So, you can always download the latest version of RpcView here.
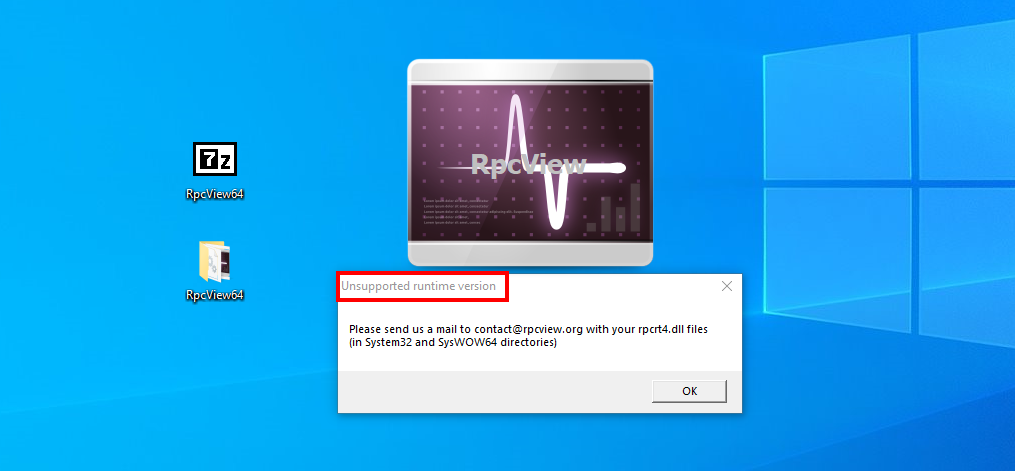
After extracting the 7z archive, you just have to execute RpcView.exe (ideally as an administrator), and you should be ready to go. However, if the version of Windows you are using is too recent, you will probably get an error similar to the one below.
According to the error message, our “runtime version” is not supported, and we are supposed to send our rpcrt4.dll file to the dev team. This message may sound a bit cryptic for a neophyte but there is nothing to worry about, that’s completely fine.
The library rpcrt4.dll, as its name suggests, literally contains the “RPC runtime”. In other words, it contains all the necessary base code that allows an RPC client and an RPC server to communicate with each other.
Now, if we take a look at the README on GitHub, we can see that there is a section entitled How to add a new RPC runtime. It tells us that there are two ways to solve this problem. The first way is to just edit the file RpcInternals.h and add our runtime version. The second way is to reverse rpcrt4.dll in order to define the required structures such as RPC_SERVER. Honestly, the implementation of the RPC runtime doesn’t change that often, so the first option is perfectly fine in our case.
Compiling RpcView
We saw that our RPC runtime is not currently supported, so we will have to update RpcInternals.h with our runtime version and build RpcView from the source. To do so, we will need the following:
- Visual Studio 2019 (Community)
- CMake >= 3.13.2
- Qt5 == 5.15.2
Note: I strongly recommend using a Virtual Machine for this kind of setup. For your information, I also use Chocolatey - the package manager for Windows - to automate the installation of some of the tools (e.g.: Visual Studio, GIT tools).
Installing Visual Studio 2019
You can download Visual Studio 2019 here or install it with Chocolatey.
1

choco install visualstudio2019community
While you’re at it, you should also install the Windows SDK as you will need it later on. I use the following code in PowerShell to find the latest available version of the SDK.
1
2

[string[]]$sdks = (choco search windbg | findstr "windows-sdk")
$sdk_latest = ($sdks | Sort-Object -Descending | Select -First 1).split(" ")[0]
And I install it with Chocolatey. If you want to install it manually, you can also download the web installer here.
1

choco install $sdk_latest
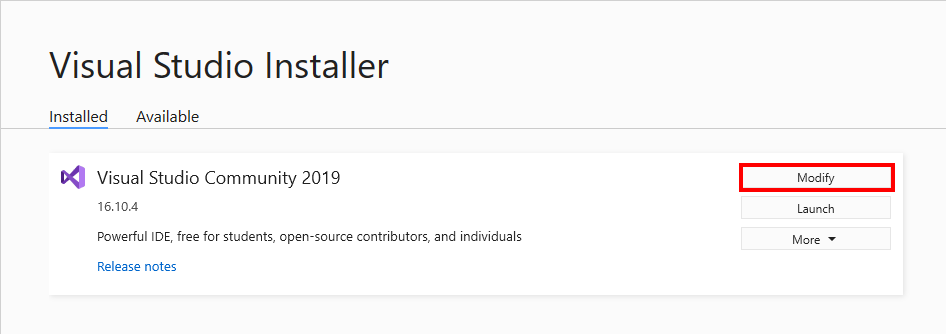
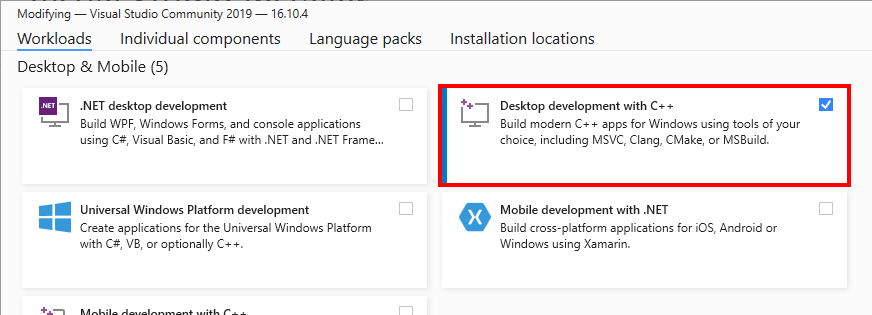
Once, Visual Studio is installed. You have to open the “Visual Studio Installer”.
And install the “Desktop development with C++” toolkit. I hope you have a solid Internet connection and enough disk space… ![]()
Installing CMake
Installing CMake is as simple as running the following command with Chocolatey. But, again, you can also download it from the official website and install it manually.
1

choco install cmake
Note: CMake is also part of Visual Studio “Desktop development with C++”, but I never tried to compile RpcView with this version.
Installing Qt
At the time of writing, the README specifies that the version of Qt used by the project is 5.15.2. I highly recommend using the exact same version, otherwise you will likely get into trouble during the compilation phase.
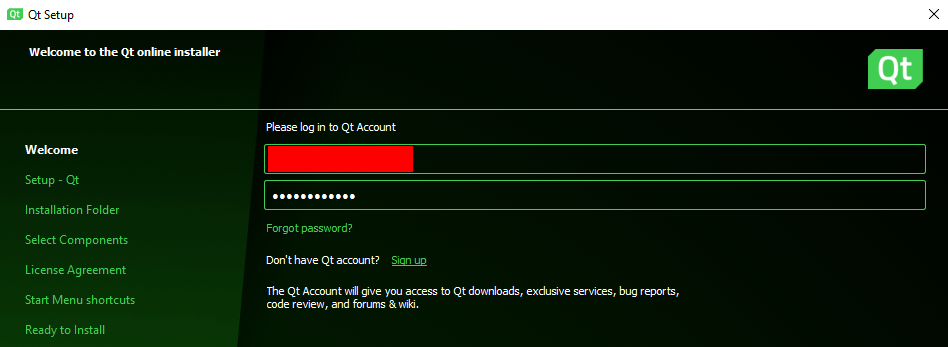
The question is how do you find and download Qt5 5.15.2? That’s were things get a bit tricky because the process is a bit convoluted. First, you need to register an account here. This will allow you to use their custom web installer. Then, you need to download the installer here.
Once you have started the installer, it will prompt you to log in with your Qt account.
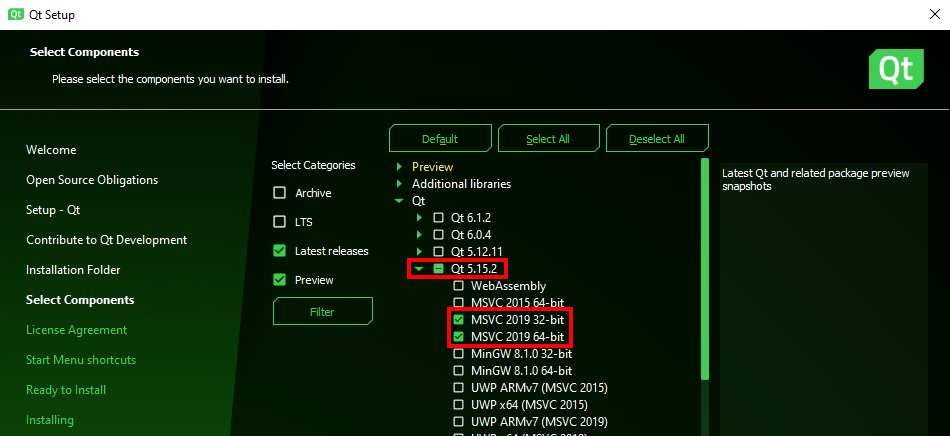
After that, you can leave everything as default. However, at the “Select Components” step, make sure to select Qt 5.15.2 for MSVC 2019 32 & 64 bits only. That’s already 2.37 GB of data to download, but if you select everything, that represents around 60 GB. ![]()
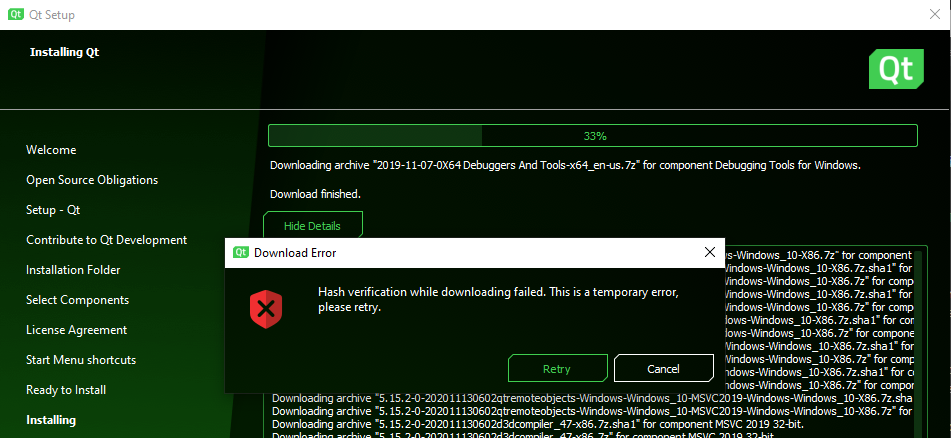
If you are lucky enough, the installer should run flawlessly, but if you are not, you will probably encounter an error similar to the one below. At the time of writing, an issue is currently open on their bug tracker here, but they don’t seem to be in a hurry to fix it.
To solve this problem, I wrote a quick and dirty PowerShell script that downloads all the required files directly from the closest Qt mirror. That’s probably against the terms of use, but hey, what can you do?! I just wanted to get the job done.
If you let all the values as default, the script will download and extract all the required files for Visual Studio 2019 (32 & 64 bits) in C:\Qt\5.15.2\.
Note: make sure 7-Zip is installed before running this script!
1
2
3
4
5
6
7
8
9
10
11
12
13
14
15
16
17
18
19
20
21
22
23
24
25
26
27
28
29
30
31
32
33
34
35
36
37
38
39
40

# Update these settings according to your needs but the default values should be just fine.
$DestinationFolder = "C:\Qt"
$QtVersion = "qt5_5152"
$Target = "msvc2019"
$BaseUrl = "https://download.qt.io/online/qtsdkrepository/windows_x86/desktop"
$7zipPath = "C:\Program Files\7-Zip\7z.exe"

# Store all the 7z archives in a Temp folder.
$TempFolder = Join-Path -Path $DestinationFolder -ChildPath "Temp"
$null = [System.IO.Directory]::CreateDirectory($TempFolder)

# Build the URLs for all the required components.
$AllUrls = @("$($BaseUrl)/tools_qtcreator", "$($BaseUrl)/$($QtVersion)_src_doc_examples", "$($BaseUrl)/$($QtVersion)")

# For each URL, retrieve and parse the "Updates.xml" file. This file contains all the information
# we need to dowload all the required files.
foreach ($Url in $AllUrls) {
    $UpdateXmlUrl = "$($Url)/Updates.xml"
    $UpdateXml = [xml](New-Object Net.WebClient).DownloadString($UpdateXmlUrl)
    foreach ($PackageUpdate in $UpdateXml.GetElementsByTagName("PackageUpdate")) {
        $DownloadableArchives = @()
        if ($PackageUpdate.Name -like "*$($Target)*") {
            $DownloadableArchives += $PackageUpdate.DownloadableArchives.Split(",") | ForEach-Object { $_.Trim() } | Where-Object { -not [string]::IsNullOrEmpty($_) }
        }
        $DownloadableArchives | Sort-Object -Unique | ForEach-Object {
            $Filename = "$($PackageUpdate.Version)$($_)"
            $TempFile = Join-Path -Path $TempFolder -ChildPath $Filename
            $DownloadUrl = "$($Url)/$($PackageUpdate.Name)/$($Filename)"
            if (Test-Path -Path $TempFile) {
                Write-Host "File $($Filename) found in Temp folder!"
            }
            else {
                Write-Host "Downloading $($Filename) ..."
                (New-Object Net.WebClient).DownloadFile($DownloadUrl, $TempFile)
            }
            Write-Host "Extracting file $($Filename) ..."
            &"$($7zipPath)" x -o"$($DestinationFolder)" $TempFile | Out-Null
        }
    }
}
Building RpcView
We should be ready to go. One last piece is missing though: the RPC runtime version. When I first tried to build RpcView from the source files, I was a bit confused and I didn’t really know which version number was expected, but it’s actually very simple (once you know what to look for…).
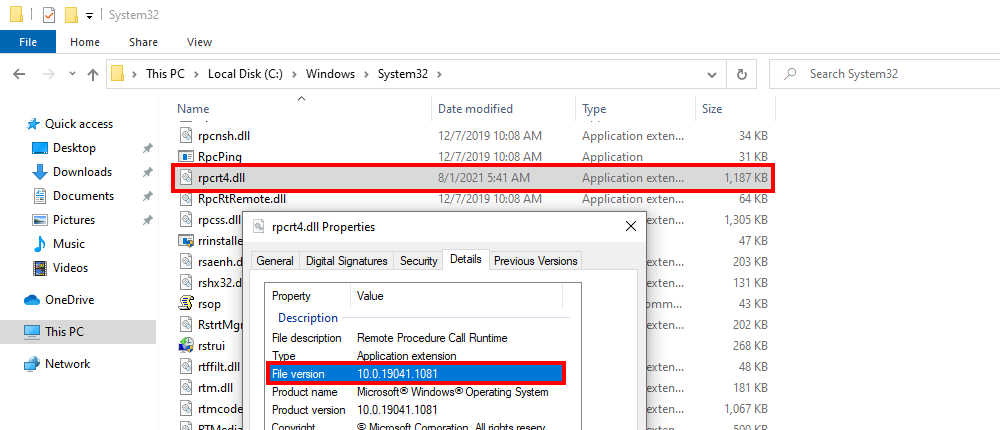
You just have to open the properties of the file C:\Windows\System32\rpcrt4.dll and get the File Version. In my case, it’s 10.0.19041.1081.
Then, you can download the source code.
1

git clone https://github.com/silverf0x/RpcView
After that, we have to edit both .\RpcView\RpcCore\RpcCore4_64bits\RpcInternals.h and .\RpcView\RpcCore\RpcCore4_32bits\RpcInternals.h. At the beginning of this file, there is a static array that contains all the supported runtime versions.
1
2
3
4
5
6
7

static UINT64 RPC_CORE_RUNTIME_VERSION[] = {
    0x6000324D70000LL,  //6.3.9431.0000
    0x6000325804000LL,  //6.3.9600.16384
    ...
    0xA00004A6102EALL,  //10.0.19041.746
    0xA00004A61041CLL,  //10.0.19041.1052
}
We can see that each version number is represented as a longlong value. For example, the version 10.0.19041.1052 translates to:
0xA00004A61041 = 0x000A (10) || 0x0000 (0) || 0x4A61 (19041) || 0x041C (1052)
If we apply the same conversion to the version number 10.0.19041.1081, we get the following result.
1
2
3
4
5
6
7
8

static UINT64 RPC_CORE_RUNTIME_VERSION[] = {
    0x6000324D70000LL,  //6.3.9431.0000
    0x6000325804000LL,  //6.3.9600.16384
    ...
    0xA00004A6102EALL,  //10.0.19041.746
    0xA00004A61041CLL,  //10.0.19041.1052
    0xA00004A610439LL,  //10.0.19041.1081
}
Finally, we can generate the Visual Studio solution and build it. I will show only the 64-bits compilation process, but if you want to compile the 32-bits version, you can refer to the documentation. The process is very similar anyway.
For the next commands, I assume the following:
- Qt is installed in
C:\Qt\5.15.2\. - CMake is installed in
C:\Program Files\CMake\. - The current working directory is RpcView’s source folder (e.g.:
C:\Users\lab-user\Downloads\RpcView\).
1
2
3
4
5

mkdir Build\x64
cd Build\x64
set CMAKE_PREFIX_PATH=C:\Qt\5.15.2\msvc2019_64\
"C:\Program Files\CMake\bin\cmake.exe" ../../ -A x64
"C:\Program Files\CMake\bin\cmake.exe" --build . --config Release
Finally, you can download the latest release from AppVeyor here, extract the files, and replace RpcCore4_64bits.dll and RpcCore4_32bits.dll with the versions that were compiled and copied to .\RpcView\Build\x64\bin\Release\.
If all went well, RpcView should finally be up and running! ![]()
Patching RpcView
If you followed along, you probably noticed that, in the end, we did all that just to add a numeric value to two DLLs. Of course, there is a more straightforward way to get the same result. We can just patch the existing DLLs and replace one of the existing values with our own runtime version.
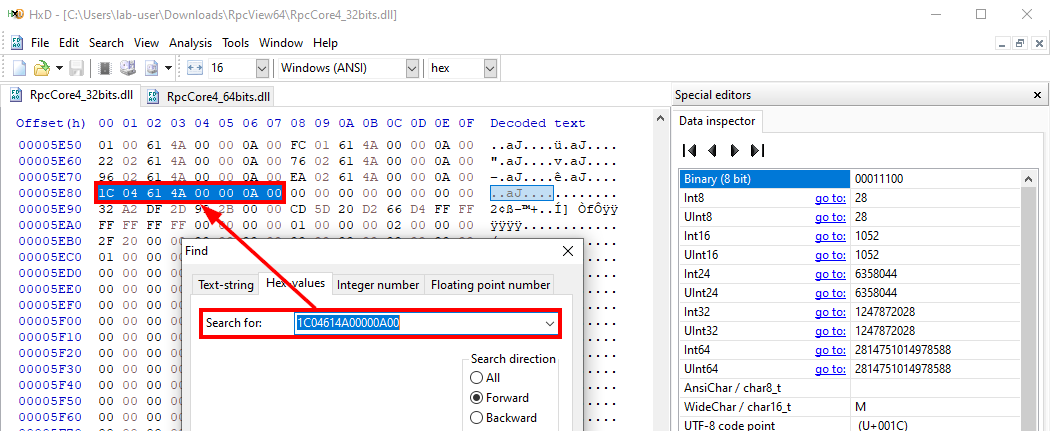
To do so, I will open the two DLLs with HxD. We know that the value 0xA00004A61041C is present in both files, so we can try to locate it within the binary data. Values are stored using the little-endian byte ordering though, so we actually have to search for the hexadecimal pattern 1C04614A00000A00.
Here, we just have to replace the value 1C04 (0x041C = 1052) with 3904 (0x0439 = 1081) because the rest of the version number is the same (10.0.19041).
After saving the two files, RpcView should be up and running. That’s a dirty hack, but it works and it’s way more effective than building the project from the source! ![]()
Update: Using the “Force” Flag
As it turns out, you don’t even need to go through all this trouble. RpcView has an undocumented /force command line flag that you can use to override the RPC runtime version check.
1

.\RpcView64\RpcView.exe /force
Honestly, I did not look at the code at all. Otherwise I would have probably seen this. Lesson learned. Thanks @Cr0Eax for bringing this to my attention (source: Twitter). Anyway, building it and patching it was a nice challenge I guess. ![]()
Initial Configuration
Now that RpcView is up and running, we need to tweak it a little bit in order to make it really usable.
The Refresh Rate
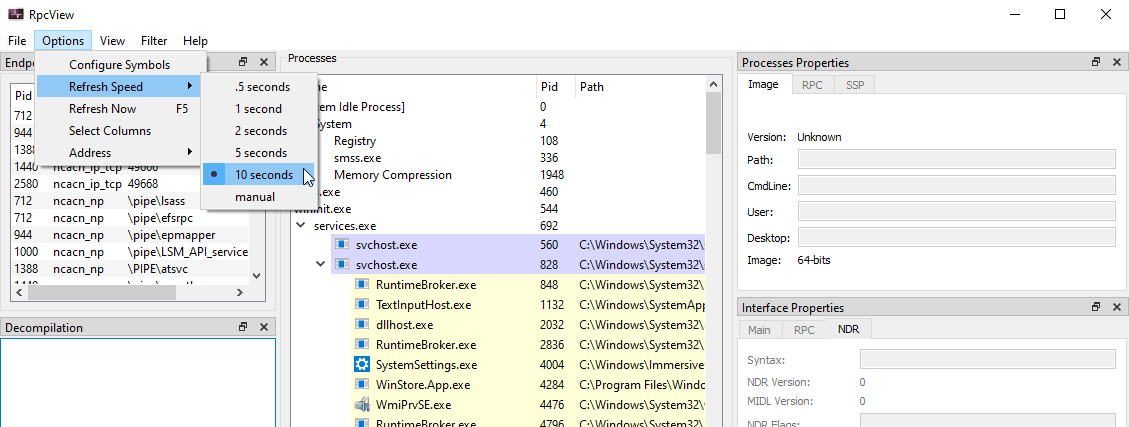
The first thing you want to do is lower the refresh rate, especially if you are running it inside a Virtual Machine. Setting it to 10 seconds is perfectly fine. You could even set this parameter to “manual”.
Symbols
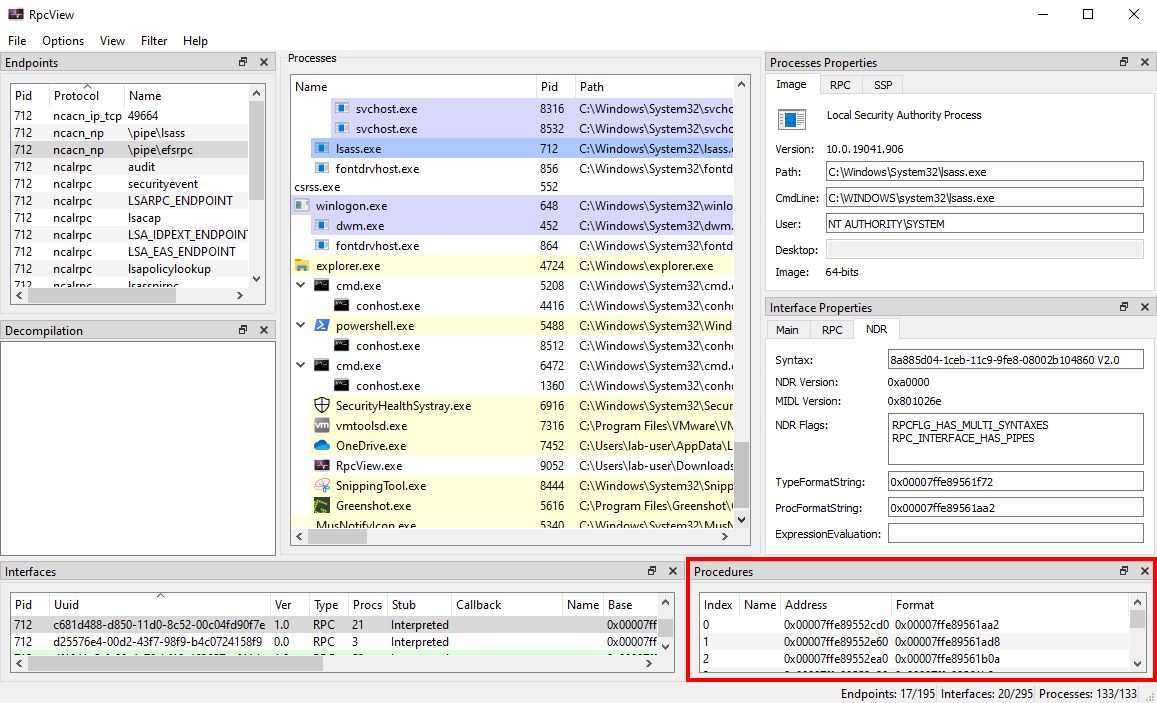
On the screenshot below, we can see that there is section which is supposed to list all the procedures or functions that are exposed through an RPC server, but it actually only contains addresses.
This isn’t very convenient, but there is a cool thing about most Windows binaries. Microsoft publishes their associated PDB (Program DataBase) file.
PDB is a proprietary file format (developed by Microsoft) for storing debugging information about a program (or, commonly, program modules such as a DLL or EXE) - source: Wikipedia
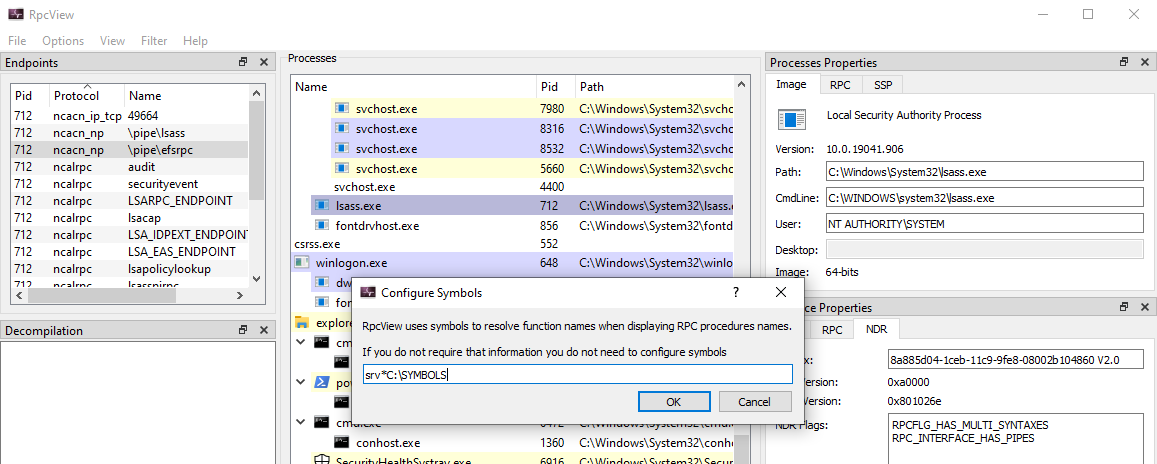
These symbols can be configured through the Options > Configure Symbols menu item. Here, I set it to srv*C:\SYMBOLS.
The only caveat is that RpcView is not able, unlike other tools, to download the PDB files automatically. So, we need to download them beforehand.
If you have downloaded the Windows 10 SDK, this step should be quite easy though. The SDK includes a tool called symchk.exe which allows you to fetch the PDB files for almost any EXE or DLL, directly from Microsoft’s servers. For example, the following command allows you to download the symbols for all the DLLs in C:\Windows\System32\.
1
2

cd "C:\Program Files (x86)\Windows Kits\10\Debuggers\x64\"
symchk /s srv*c:\SYMBOLS*https://msdl.microsoft.com/download/symbols C:\Windows\System32\*.dll
Once the symbols have been downloaded, RpcView must be restarted. After that, you should see that the name of each function is resolved in the “Procedures” section. ![]()
Conclusion
This post is already longer than I initially anticipated, so I will end it there. If you are new to this, I think you already have all the basics to get started. The main benefit of a GUI-based tool such as RpcView is that you can very easily explore and visualize some internals and concepts that might be difficult to grasp otherwise.
If you liked this post, don’t hesitate to let me know on Twitter. I only scratched the surface here, but this could be the beginning of a series in which I explore Windows RPC. In the next part, I could explain how to interact with an RPC server. In particular, I think it would be a good idea to use PetitPotam as an example, and show how you can reproduce it, based on the information you can get from RpcView.
Links & Resources
- RpcView
https://rpcview.org/ - GitHub - PetitPotam by @topotam77
https://github.com/topotam/PetitPotam - PacSec 2017 - A view into ALPC-RPC
https://hakril.net/slides/A_view_into_ALPC_RPC_pacsec_2017.pdf
