Chimichurri Reloaded - Giving a Second Life to a 10-year old Windows Vulnerability
This is a kind of follow-up to my last post, in which I discussed a technique that can be used for elevating privileges to SYSTEM when you have impersonation capabilities. In the last part, I explained how this type of vulnerability could be fixed and I even illustrated it with a concrete example of a workaround that was implemented by Microsoft 10 years ago in the context of the Service Tracing feature. Though, I also insinuated that this security measure could be bypassed. So, let’s see how we can make a 10-year old vulnerability great again…
What Are We Talking About?
I won’t assume that you’ve read all of my previous blog posts, so I’ll start things off with a brief recap.
Around 10 years ago, Cesar Cerrudo (@cesarcer) found that it was possible to use the Service Tracing feature of Windows as a way of capturing a SYSTEM token using a named pipe. As long as you had the SeImpersonatePrivilege privilege, you could then execute arbitrary code in the security context of this user. Back then, this was acknowledged by Microsoft as a vulnerability and it got the CVE ID CVE-2010-2554.
Let’s take the Service Tracing key corresponding to the RASMAN service as an example. The idea is simple, you first have to start a local named pipe server. Then, instead of setting a simple directory path as the target log file’s folder in the registry, you can specify the path of this named pipe.
In this example, \\localhost\pipe\tracing is set as the target directory. Then, as soon as EnableFileTracing is set to 1, the service will try to open its log file using the path \\localhost\pipe\tracing\RASMAN.LOG. So, if we create a named pipe with the name \\.\pipe\tracing\RASMAN.LOG, we will receive a connection and we can impersonate the service account by calling the ImpersonateNamedPipeClient function. Since RASMAN is running as NT AUTHORITY\SYSTEM, we eventually get a SYSTEM impersonation token.
Note: depending on the version of Windows, the log file open event sometimes doesn’t occur immediately when EnableFileTracing is set to 1. One way to trigger it reliably is to start the service. Note that the RASMAN service can be started by low-privileged users via the Service Control Manager (SCM).
Of course, if you try to do this on a version of Windows that is less than 10 years old, you’ll run into the same problem that is shown on the above screenshot. If you try to execute arbitrary code in the security context of the impersonated user, you’ll get the error code 1346, i.e. Either a required impersonation level was not provided, or the provided impersonation level is invalid.. You could also get the error code 5, i.e. Access denied. It’s the result of a counter-measure that was enforced by Microsoft in this particular Windows feature.
I detailed this security update in my previous post. To put it simple, the flags SECURITY_SQOS_PRESENT | SECURITY_IDENTIFICATION are now specified in the CreateFile function call, which is responsible for getting the initial handle on the target log file. Because of these flags, the resulting impersonation level of the token we get is now SecurityIdentification (level 2/4). Though, SecurityImpersonation (level 3/4) or SecurityDelegation (level 4/4) is required in order to fully impersonate the user.
Note: as a side note, you probably noticed that the message Unknown error 0x80070542 is printed on the command prompt instead of the actual Win32 error message. The reason for this is that I try to get the error message correspondnig to the error code while impersonating the user. Because of the limited impersonation level, this code/message lookup fails.
Does it mean we are screwed? Short answer, yes, we are because the token we get is kinda useless. Long answer, well, you’ll have to read the next parts… ![]()
A UNC Path?
In the previous part, we saw that if we specify the name of a pipe as the log file directory, we do get an impersonation token but we cannot use it to create a new process. OK but did you notice how I glossed over an important detail here? How did I specify the name of a pipe in the first place?
First you need to know how the final log file path is calculated. That’s trivial, it’s a simple string concatenation: <DIRECTORY>\<SERVICE_NAME>.LOG, where <DIRECTORY> is read from the registry (FileDirectory value). So, if you specify C:\Temp as the output directory for a service called Bar, the service will use C:\Temp\BAR.LOG as the path of its log file.
In this exploit though, we specified the name of a pipe rather than a regular directory, by using a UNC path. On Windows, there are many ways to specify a path and this is only one of them but this post isn’t about that. Actually, UNC (Universal Naming Convention) is exactly what we need, but we need to use it a slightly differently.
UNC paths are commonly used for accessing remote shares on a local network. For example, if you want to access the folder BAR on the volume FOO of the machine DUMMY, you’ll use the UNC path \\DUMMY\FOO\BAR. In this case, the client machine connects to the TCP port 445 of the target server and uses the SMB protocol to exchange data.
There is a slight variant of this example that you probably already know of. You can use a path such as \\DUMMY@4444\FOO\BAR in order to access a remote share on an arbitrary port (4444 in this example) rather than the default TCP port 445. Although the difference in the path is small, the implications are huge. The most obvious one is that the SMB protocol is no longer used. Instead, the client uses an extended version of the HTTP protocol, which is called WebDAV (Web Distributed Authoring and Versioning).
On Windows, WebDAV is handled by the WebClient service. If you check the description of this service, you can read the following:
Enables Windows-based programs to create, access, and modify Internet-based files. If this service is stopped, these functions will not be available. If this service is disabled, any services that explicitly depend on it will fail to start.
Although, WebDAV uses a completely different protocol, one thing remains: authentication. So, what if we create a local WebDAV server and use such a path as the output directory?
Hello, I’m Officer Dave. May I See Your ID, Please?
First things first, we need to edit the regsitry and change the value of FileDirectory. We will set \\127.0.0.1@4444\tracing instead of a named pipe path.

Thanks to netcat, we can easily open a socket and listen on the local TCP port 4444. After enabling the service tracing, here is what we get:
Interesting! We get an HTTP OPTIONS request. The User-Agent header also shows us that this is a WebDAV request but, apart from that, there’s not much to learn. Though, now that we know that the service is willing to communicate using WebDAV, we should reply and send an authentication request. ![]()
To do so, I created a simple PowerShell script that uses a System.Net.Sockets.TcpListener object to listen on an arbitrary port and send a hardcoded HTTP response to the first client that connects to the socket. Here is the content of the HTTP response we will send to the client:
1
2
3

HTTP/1.1 401 Unauthorized
WWW-Authenticate: NTLM
If you are familiar with web application pentesting, there is a high chance you’ve encountered the WWW-Authenticate header with the value Basic quite a lot (e.g.: Apache htpasswd), but not necessarily NTLM. This value allows us to indicate that the client must authenticate using the 3-way NTLM authentication scheme. By the way, if you feel like you need to fill some gaps about NTLM, I highly recommend you to read this excellent post about NTLM relaying by @HackAndDo. These blog posts are always very well written. ![]()
With the script running in the background, we get the following result:
At first glance, it looks like the service accepted to initiate the NTLM authentication and sent us its NTLM NEGOTIATE request. This is confirmed by the output of Wireshark.
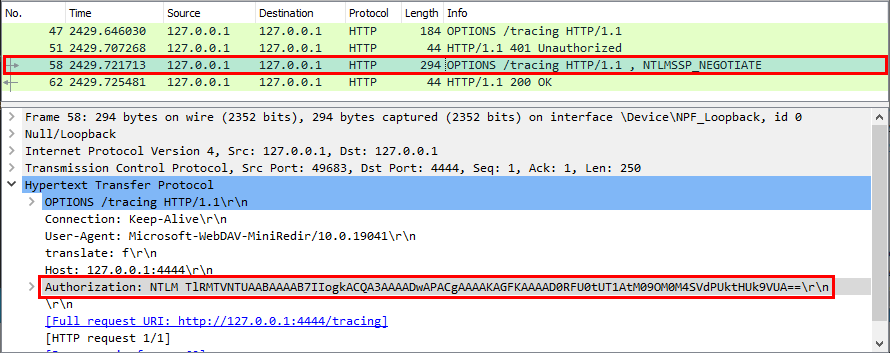
This is a good start, we are definitely on the right track but there is one last thing to verify. This one last thing will decide whether all of this was for nothing or not: the Negotiate Identify flag.
The NTLM authentication protocol documentation is quite exhaustive. You can see the detailed structure of each message that is used in the protocol. In particular, this section explains how the NegotiateFlags value is calculated in the NEGOTIATE message. About the Identify flag, you can read:

So, if this bit is set, the client tells the server that it can request a token with an impersonation level of SecurityIdentification only. In other words, if this flag is set, we are back to square one. We won’t be able to get a proper impersonation token.
Thanks to the amazing Wireshark dissectors, we can easily check the value of this flag.
The Identify flag is not set!!! ![]()
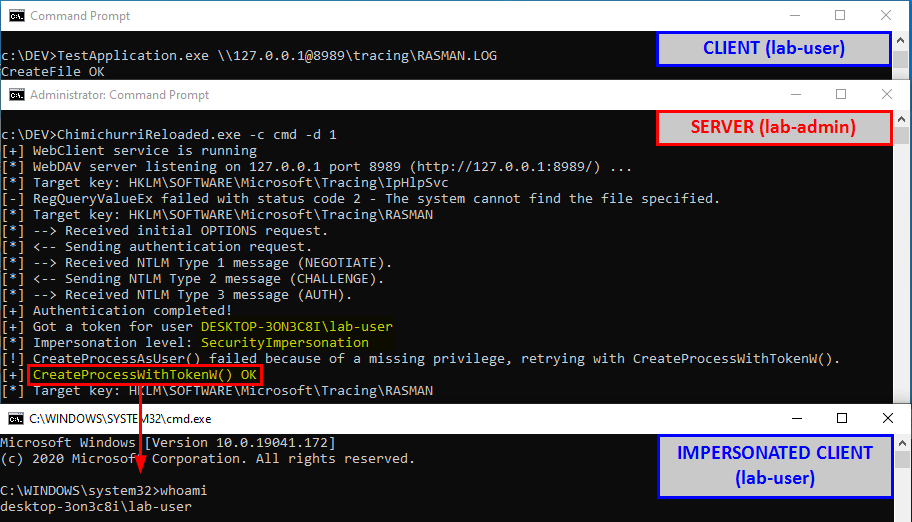
This means that we can bypass the patch and get an impersonation token that we can use to execute arbitrary code in the context of NT AUTHORITY\SYSTEM. What we need to do next is simply complete the NTLM authentication thanks to an NTLM negotiator. This will allow us to transform this raw NTLM exchange into a token that we can then use if we have impersonation privileges. Though, I won’t talk about this here because this subject is already covered by the *Potato exploits.
The below screenshot shows the result of the PoC I implemented.
A Quick Bug Analysis
There is still some work to do in order to fully understand why this trick works. I won’t write a detailed analysis here but I’ll share some insight.
First, there is one detail that you may have noticed while reading the previous part. The service is requesting the resource /tracing rather than /tracing/RASMAN.LOG. Weird, isn’t it? ![]()
Since we specified \\127.0.0.1@4444\tracing as the directory path, you’d expect that the service uses the path \\127.0.0.1@4444\tracing\RASMAN.LOG and therefore requests /tracing/RASMAN.LOG. Of course, there is an explanation. If you take a quick look at the code of the TraceCreateClientFile function in rtutils.dll, you’ll see that, before trying to open the log file, it begins by checking whether the directory specified in the FileDirectory value exists.
On the below screenshot, you can see that if CreateDirectory succeeds, i.e. if the target directory didn’t exist and was successfully created, then the function immediately returns. In this case, the log file is never opened and you’d have to disable the tracing and re-enable it. In other words, for the TraceCreateClientFile function to complete, this CreateDirectory call must fail.
The first HTTP request we receive on our WebDAV server is actually the result of this initial check. Moreover, CreateDirectory is nothing more than a user-friendly wrapper for the NtCreateFile function. Yes, everything is a file, even on Windows! ![]()
This CreateDirectory function is very convenient but there is a problem: it doesn’t allow you to specify custom flags, such as the ones used to restrict the impersonation level of the token. This explains why I was able to get a proper impersonation token using this trick.
1
2
3
4

BOOL CreateDirectoryW(
  LPCWSTR               lpPathName,
  LPSECURITY_ATTRIBUTES lpSecurityAttributes
);
Does it mean that I was lucky? What would happen if the server actually requested /tracing/RASMAN.LOG via the hardened CreateFile function call? To answer this question, I compiled the following code:
1
2
3
4
5
6
7
8
9
10
11
12
13
14
15
16
17

HANDLE hFile = CreateFile(
    argv[1],
    GENERIC_READ | GENERIC_WRITE,
    0,
    NULL,
    OPEN_EXISTING,
    SECURITY_SQOS_PRESENT | SECURITY_IDENTIFICATION, // <- Limited token
    NULL);
if (hFile)
{
    wprintf(L"CreateFile OK\n");
    CloseHandle(hFile);
}
else
{
    PrintLastErrorAsText(L"CreateFile");
}
Then, instead of waiting for the RASMAN service to connect, I manually triggered the WebDAV access using this dummy application as a low-privileged user. And… here is the result:
Although the flags SECURITY_SQOS_PRESENT | SECURITY_IDENTIFICATION are specified in the CreateFile function call, we still get a token with the impersonation level SecurityImpersonation! As a conclusion, yes, I was a bit lucky but it’s not that simple as it turns out the WebClient service is also flawed.
Conclusion
In this post, I explained how it is possible to easily bypass a security patch that was originally implemented to prevent a malicious server application from getting a usable impersonation token by leveraging the Service Tracing feature. Though I have to give part of the credit to this MS16-075 exploit that was written by a colleague of mine a couple of years ago. It served as a great inspiration.
I don’t know yet if I’ll publish this as a tool or not. There is still some work to do in order to make it a usable tool because of the many Service Tracing keys that can be triggered. Moreover, there is still a major prerequisite for this trick to work: the WebClient service must be installed and enabled. Although this is the default on Workstations, it’s not the case for Servers. On a server, you would need to install/enable the WebDAV component as an additional feature.
Lastly, I didn’t take the time to push further the investigation. There is a lot more work to do in order to understand why the request that is coming from the WebClient service doesn’t take the SECURITY_IDENTIFICATION flag of the CreateFile call into consideration. In my opinion, this is a vulnerability but, who cares? ![]()
Links & Resources
CVE-2010-2554
https://www.cvedetails.com/cve/CVE-2010-2554/MS10-059 - Vulnerabilities in the Tracing Feature for Services Could Allow Elevation of Privilege
https://docs.microsoft.com/en-us/security-updates/securitybulletins/2010/ms10-059GitHub - Chimichurri exploit
https://github.com/Re4son/Chimichurri/Hackndo - NTLM Relay
https://en.hackndo.com/ntlm-relay/MS16-075 exploit leveraging the WebClient service
https://github.com/NotGlop/SysExec