Weaponizing Privileged File Writes with the USO Service - Part 2/2
In the previous post, I showed how the USO client could be used to interact with the USO service and thus have it load the windowscoredeviceinfo.dll DLL on demand with the StartScan option. I wasn’t totally satisfied with this though. So, I reverse engineered a part of the client and the server in order to replicate its behavior as a standalone project that could be reused in future exploits. This is what I’ll try to show and explain in this second part.
USO client - Static analysis
Although I also used Ghidra during my research process, I’ll stick to IDA in this demonstration for consistency and because of its debugging capabilities.
Before opening usoclient.exe in IDA, I downloaded the corresponding PDB file with the following command. Theoritically, IDA will do this automatically but I found that it doesn’t always work. The PDB file can then be loaded with File > Load File > PDB File....
symchk comes with Windows SDK and is generally located in C:\Program Files (x86)\Windows Kits\10\Debuggers\x64\.
1

symchk /s "srv*c:\symbols*https://msdl.microsoft.com/download/symbols" "c:\windows\system32\usoclient.exe"
Note: PDB stands for “Program Database”. Program database (PDB) is a proprietary file format (developed by Microsoft) for storing debugging information about a program (or, commonly, program modules such as a DLL or EXE). Source: Wikipedia
usoclient.exe is now opened in IDA and the symbols are loaded, where do we go from here? Well, here the starting point is quite obvious. We know that the StartScan option is a valid “trigger” so, we will naturally look for occurrences of this string in the binary and enumerate all the Xrefs to find out where it’s used.
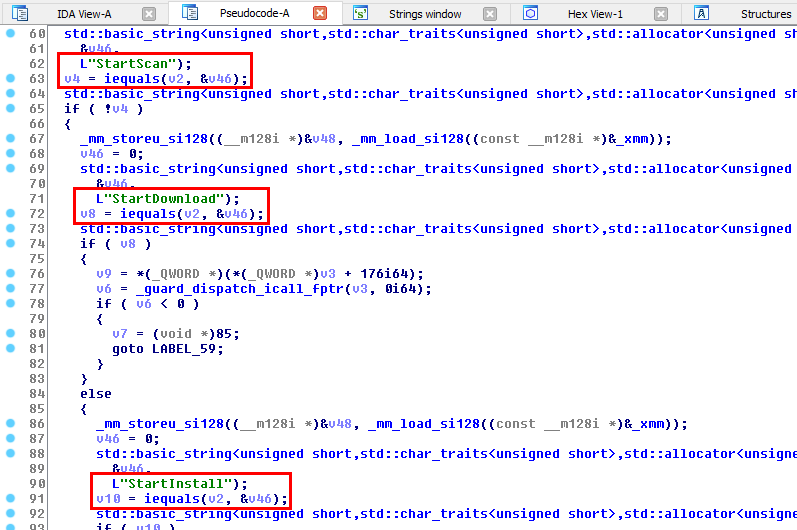
The StartScan string is used inside two functions: PerformOperationOnSession() and PerformOperationOnManager(). Let’s check the first one and generate the corresponding pseudocode.
This seems to be a “Switch Case Statement”. The input is compared against a list of hardcoded commands: StartScan, StartDownload, StartInstall, etc. If there is a match, an action is taken.
For example, when the StartScan option is used, the following code is run.
1
2
3
4

v5 = *(_QWORD *)(*(_QWORD *)v3 + 168i64);
v6 = _guard_dispatch_icall_fptr(v3, 0i64);
if ( v6 >= 0 )
  return 0i64;
This code doesn’t make much sense. ![]() So, I considered it as a dead end for the moment and decided to go up instead by looking for
So, I considered it as a dead end for the moment and decided to go up instead by looking for Xrefs to this function.
This function is called only once so it’s pretty straightforward.
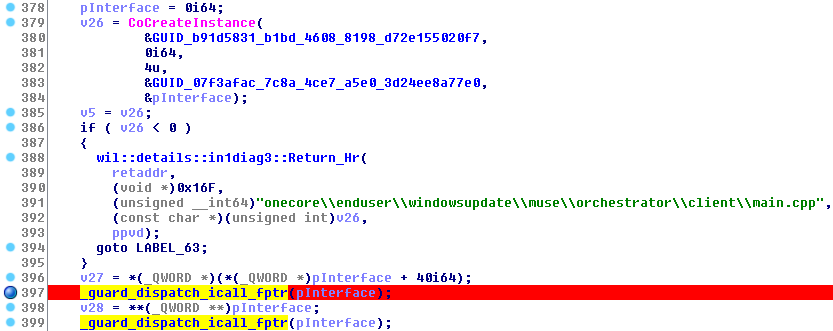
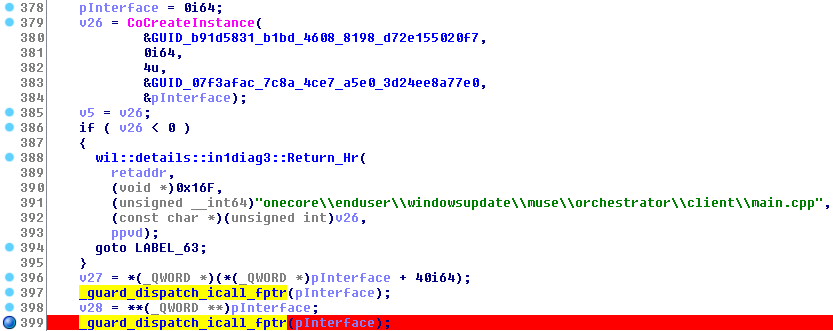
I then had a quick look at the pseudocode and I immediately spotted the following calls: CoInitializeEx(), CoCreateInstance(), CoSetProxyBlanket(), etc. Because I already played around with COM (Component Object Model) before, I recognized the sequence of API calls.
Let’s take a closer look at the following call.
According to Microsoft documentation, you can call CoCreateInstance() to create a single uninitialized object of the class associated with a specified CLSID (Source: CoCreateInstance function)
Here is the prototype of the function:
1
2
3
4
5
6
7

HRESULT CoCreateInstance(
  REFCLSID  rclsid,
  LPUNKNOWN pUnkOuter,
  DWORD     dwClsContext,
  REFIID    riid,
  LPVOID    *ppv
);
-
rclsidis the CLSID associated with the data and code that will be used to create the object. -
riidis a reference to the identifier of the interface to be used to communicate with the object.
If we apply this to the call in the USO client, it means that the object with the CLSID b91d5831-b1bd-4608-8198-d72e155020f7 will be created and the interface with the IID 07f3afac-7c8a-4ce7-a5e0-3d24ee8a77e0 will be used to communicate with it.
Having read the article Exploiting Arbitrary File Writes for Local Elevation of Privilege by James Forshaw several times, I knew what I had to do next. Thanks to his tool called OleViewDotNet, it should be quite easy to reverse engineer the DCOM object.
If you’re already familiar with this concept, you can skip the next part. For more information: https://docs.microsoft.com/en-us/windows/win32/com/inter-object-communication.
A quick word about (D)COM
As I said earlier, COM stands for Component Object Model. It’s a standard defined by Microsoft for inter process communications. Since I don’t know much about this technology myself, I won’t go into the details.
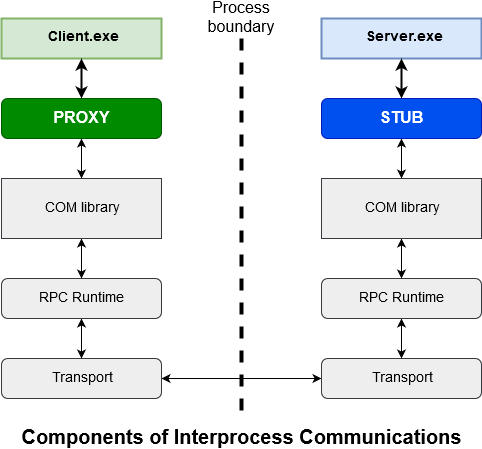
The key point to keep in mind though is how the communication between a client and a server is done. It is described on the following diagram. The client’s call goes through a Proxy and then through a Channel which is part of the COM library. The marshaled call is transmitted to the server’s process thanks to the RPC runtime and finally, the parameters are unmarshaled by the Stub before being forwarded to the server.
The obvious consequence is that we will find only the proxy definition on client side and, we might miss some key information from the server’s side.
Reverse engineering a COM communication (almost) by hand
Let’s start the reverse engineering of the COM object. We already know its CLSID so, using OleViewDotNet, this step should be straigthforward, right?
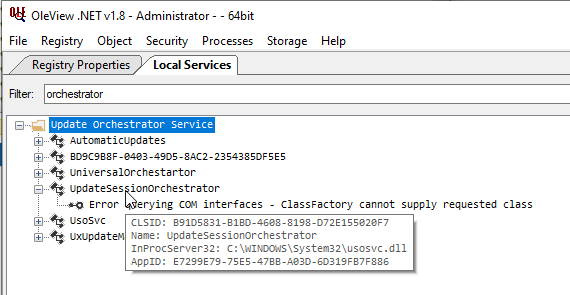
First we can enumerate all the objects exposed by the services running on the host by going to Registry > Local Services. Since we also know the name of the service, we can narrow down the list with the keywork orchestrator. This yields a few objects that we can inspect manually to find the one we are looking for: UpdateSessionOrchestrator. The CLSID matches the one we saw earlier while reverse engineering the USO client: b91d5831-b1bd-4608-8198-d72e155020f7.
The next step would be to expand the corresponding node in order to enumerate all the interfaces of the object. However, in this case it failed with the following error: Error querying COM interface - ClassFactory cannot supply requested class.
OK, never mind, we will have to do it manually. From this point on, I went for a dynamic analysis of the client in order to see how the RPC calls worked.
To do so, I used those three tools:
- IDA (with debug symbols configured)
-
IDA’s x86_64 Windows debug server -
C:\Program Files (x86)\IDA 6.8\dbgsrv\win64_remotex64.exe - WinDbg (with debug symbols configured)
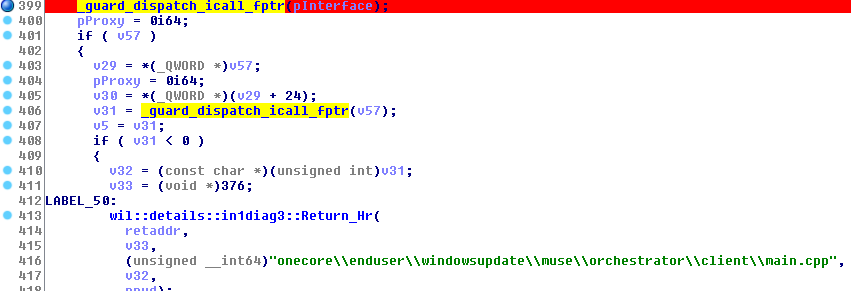
We already know that the CoCreateInstance() call is used to instantiate the remote COM object. As a result the variable pInterface, as its name implies, holds a pointer to the interface with the IID 07f3afac-7c8a-4ce7-a5e0-3d24ee8a77e0, which will be used to communicate with the object. My goal now is to understand what happens next. Therefore, I put a breakpoint on the first _guard_dispatch_icall_fptr call that comes right after.
Here is what happens right before the call:
- The
RCXregister holds the location of the interface’s pointer (i.e.pInterface). - The value pointed to by
RCXis loaded intoRAX- i.e.RAX=pInterface. - The value that was stored in
RSIis copied toRDX- We don’t know what it is yet. - The value pointed to by
RAX+0x28is loaded intoRAX- i.e.ProxyVTable[5]as we will see.
The value of RCX is 0x000002344FA53D68. Let’s see what we can find at this address with WinDbg.
1
2

0:000> dqs 0x00002344FA53D68 L1
00000234`4fa53d68  00007ff8`e48fd560 usoapi!IUpdateSessionOrchestratorProxyVtbl+0x10
We find the start address of the Proxy VTable of the UpdateSessionOrchestrator’s interface. We can then enumerate all the pointers listed in the VTable.
1
2
3
4
5
6
7
8
9
10
11
12

0:000> dqs 0x00007ff8e48fd560 LB
00007ff8`e48fd560  00007ff8`e48f8040 usoapi!IUnknown_QueryInterface_Proxy
00007ff8`e48fd568  00007ff8`e48f7d90 usoapi!IUnknown_AddRef_Proxy
00007ff8`e48fd570  00007ff8`e48f7ed0 usoapi!IUnknown_Release_Proxy
00007ff8`e48fd578  00007ff8`e48f7dc0 usoapi!ObjectStublessClient3
00007ff8`e48fd580  00007ff8`e48f8090 usoapi!ObjectStublessClient4
00007ff8`e48fd588  00007ff8`e48f7e80 usoapi!ObjectStublessClient5
00007ff8`e48fd590  00007ff8`e48f7ef0 usoapi!ObjectStublessClient6
00007ff8`e48fd598  00007ff8`e48f7e60 usoapi!ObjectStublessClient7
00007ff8`e48fd5a0  00007ff8`e49068b0 usoapi!IID_IMoUsoUpdate
00007ff8`e48fd5a8  00007ff8`e48fefb0 usoapi!CAutomaticUpdates::`vftable'+0x3b0
00007ff8`e48fd5b0  00000000`00000019
The first three functions are QueryInterface, AddRef and Release. These are the functions that a COM interface inherits from IUnknown. Then, there are 5 other functions but we don’t know their names.
In order to find more information about the VTable, we have to inspect the server. We know the name of the COM object - UpdateSessionOrchestrator - and we know the name of the service - USOsvc. So, theoritically, we should find all the information we need in usosvc.dll.
1
2
3
4
5
6
7
8

.rdata:00000001800582F8 dq offset UpdateSessionOrchestrator::QueryInterface(void)
.rdata:0000000180058300 dq offset UpdateSessionOrchestrator::AddRef(void)
.rdata:0000000180058308 dq offset UpdateSessionOrchestrator::Release(void)
.rdata:0000000180058310 dq offset UpdateSessionOrchestrator::CreateUpdateSession(tagUpdateSessionType,_GUID const &,void * *)
.rdata:0000000180058318 dq offset UpdateSessionOrchestrator::GetCurrentActiveUpdateSessions(IUsoSessionCollection * *)
.rdata:0000000180058320 dq offset UpdateSessionOrchestrator::LogTaskRunning(ushort const *)
.rdata:0000000180058328 dq offset UpdateSessionOrchestrator::CreateUxUpdateManager(IUxUpdateManager * *)
.rdata:0000000180058330 dq offset UpdateSessionOrchestrator::CreateUniversalOrchestrator(IUniversalOrchestrator * *)
Nice! ![]() Here is the complete VTable. We can see that the function at offset 5 is
Here is the complete VTable. We can see that the function at offset 5 is UpdateSessionOrchestrator::LogTaskRunning(ushort const *).
Finally, the value of RDX is 0x000002344FA39450. Let’s check what we can find at this address as well, with IDA this time:
It’s just a pointer to the null terminated unicode string L"StartScan".
All this information can be summarized as follows.
1
2
3

RAX = VTable[5] = `UpdateSessionOrchestrator::LogTaskRunning(ushort const *)`
RCX = argv[0]   = `UpdateSessionOrchestrator pInterface`
RDX = argv[1]   = L"StartScan"
If we consider the x86_64 calling convention of Windows, this can be represented by the following pseudocode.
1

pInterface->LogTaskRunning(L"StartScan");
The same process can be applied to the next call.
This would yield the following:
1
2
3
4

RAX = VTable[0] = `UpdateSessionOrchestrator::QueryInterface()`
RCX = argv[0]   = `UpdateSessionOrchestrator pInterface`
RDX = argv[1]   = `*GUID(c57692f8-8f5f-47cb-9381-34329b40285a)`
R8  = argv[2]   = Output pointer location
Here, the returned value is NULL so, all the code after the if statement would be ignored.
Therefore, we can skip it and jump right here:
Nice! ![]() Were are getting closer to the target
Were are getting closer to the target PerformOperationOnSession() call.
With the same reverse engineering process, we find the following.
1
2
3
4
5

RAX = VTable[3] = `UpdateSessionOrchestrator::CreateUpdateSession(tagUpdateSessionType,_GUID const &,void * *)`
RCX = argv[0]   = `UpdateSessionOrchestrator pInterface`
RDX = argv[1]   = 1
R8  = argv[2]   = `*GUID(fccc288d-b47e-41fa-970c-935ec952f4a4)`
R9  = argv[3]   = `void **param_3 (usoapi!IUsoSessionCommonProxyVtbl+0x10)` --> IUsoSessionCommon pProxy
Here, we can see that another interface is involded: IUsoSessionCommon. It’s identified by the IID fccc288d-b47e-41fa-970c-935ec952f4a4 and its VTable has 68 entries so I won’t list all the functions here.
Next there is a CoSetProxyBlanket() call. This is a standard WinApi function that is used to set the authentication information that will be used to make calls on the specified proxy (Source: CoSetProxyBlanket function).
If we translate all the hexadecimal values back to Win32 constants, this yields the following API call.
1
2

IUsoSessionCommonPtr usoSessionCommon;
CoSetProxyBlanket(usoSessionCommon, RPC_C_AUTHN_DEFAULT, RPC_C_AUTHZ_DEFAULT, COLE_DEFAULT_PRINCIPAL, RPC_C_AUTHN_LEVEL_DEFAULT, RPC_C_IMP_LEVEL_IMPERSONATE, nullptr, NULL);
Now, we can enter the PerformOperationOnSession() function and, we are back to the piece of code that didn’t make sense before. However, thanks to the reverse engineering process we just went through, this is now getting clearer. This is a simple call on the IUsoSessionCommon proxy. We just need to determine which function is called and with which parameters.
With this final breakpoint, the function’s offset and the parameters can be easily determined.
1
2
3
4
5

RAX = VTable[21] = combase_NdrProxyForwardingFunction21
RCX = argv[0]    = IUsoSessionCommon pProxy
RDX = argv[1]    = 0
R8  = argv[2]    = 0
R9  = argv[3]    = L"ScanTriggerUsoClient"
This would be equivalent to the following pseudocode.
1

pProxy->Proc21(0, 0, L"ScanTriggerUsoClient");
If all the pieces are put together, the “StartScan” action in the USO client can be summarized with the following simplified code.
1
2
3
4
5
6
7
8
9
10
11
12
13
14
15
16
17
18
19

HRESULT hResult;
// Initialize the COM library
hResult = CoInitializeEx(0, COINIT_MULTITHREADED);
// Create the remote UpdateSessionOrchestrator object
GUID CLSID_UpdateSessionOrchestrator = { 0xb91d5831, 0xb1bd, 0x4608, { 0x81, 0x98, 0xd7, 0x2e, 0x15, 0x50, 0x20, 0xf7 } };
IUpdateSessionOrchestratorPtr updateSessionOrchestrator;
hResult = CoCreateInstance(CLSID_UpdateSessionOrchestrator, nullptr, CLSCTX_LOCAL_SERVER, IID_PPV_ARGS(&updateSessionOrchestrator));
// Invoke LogTaskRunning()
updateSessionOrchestrator->LogTaskRunning(L"StartScan");
// Create an update session
IUsoSessionCommonPtr usoSessionCommon;
GUID IID_IUsoSessionCommon = { 0xfccc288d, 0xb47e, 0x41fa, { 0x97, 0x0c, 0x93, 0x5e, 0xc9, 0x52, 0xf4, 0xa4 } };
updateSessionOrchestrator->CreateUpdateSession(1, &IID_IUsoSessionCommon, &usoSessionCommon);
// Set the authentication information
CoSetProxyBlanket(usoSessionCommon, RPC_C_AUTHN_DEFAULT, RPC_C_AUTHZ_DEFAULT, COLE_DEFAULT_PRINCIPAL, RPC_C_AUTHN_LEVEL_DEFAULT, RPC_C_IMP_LEVEL_IMPERSONATE, nullptr, NULL);
// Trigger the "StartScan" action
usoSessionCommon->Proc21(0, 0, L"ScanTriggerUsoClient")
// Close the COM library
CoUninitialize();
Conclusion
Knowing how the USO client works and how it can trigger privileged actions, it is now possible to replicate this behavior as a standalone application: UsoDllLoader. Of course, the transition from this reverse engineering process to the actual C++ code requires a bit more work but it’s not the most interesting part so I skipped it. The only thing that I should mention though is that the DiagHub PoC did help a lot.
Regarding the reverse engineering part, I have to say that it wasn’t too difficult because the COM client already exists and is provided with Windows by default. OleViewDotNet did help a lot in the end as well. It was able to generate the code for the second interface (UsoSessionCommon) - you know, the one with 68 functions! ![]()
Well, that wraps it up for this post. I hope you enjoyed it. ![]()
Links & Resources
- Microsoft Documentation - CoCreateInstance
https://docs.microsoft.com/en-us/windows/win32/api/combaseapi/nf-combaseapi-cocreateinstance - Microsoft Documentation - Inter-Object Communications
https://docs.microsoft.com/en-us/windows/win32/com/inter-object-communication - Microosft Documentation - x64 calling convention
https://docs.microsoft.com/en-us/cpp/build/x64-calling-convention?view=vs-2019 - Windows Exploitation Tricks: Exploiting Arbitrary File Writes for Local Elevation of Privilege
https://googleprojectzero.blogspot.com/2018/04/windows-exploitation-tricks-exploiting.html

